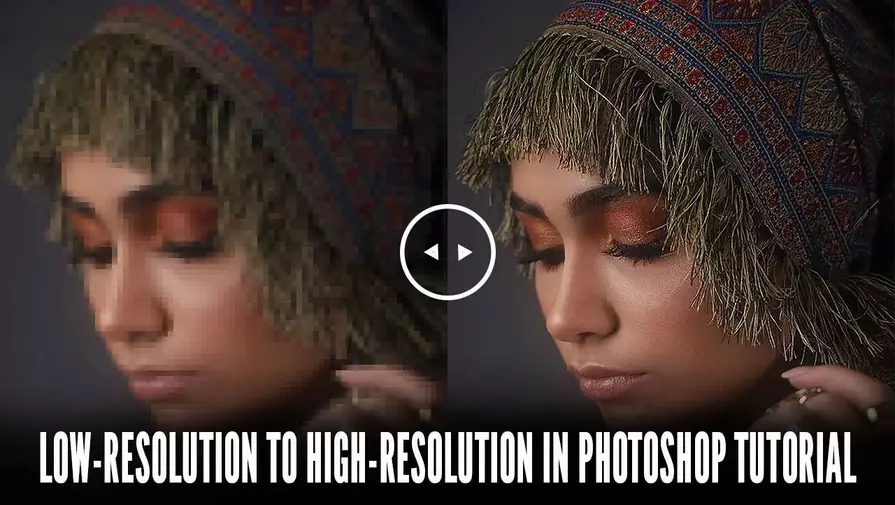
Have you ever had a low-resolution photo that you wanted to use, but the quality just wasn’t good enough? Don’t worry! While you can’t magically turn a low-res image into a perfect high-res photo, Photoshop can help you improve it significantly. With just a few simple steps, your images can look much clearer and more professional.
What is Resolution?
Resolution refers to the amount of detail an image contains. Images are made up of tiny colored dots called pixels. More pixels mean a clearer, smoother image, while fewer pixels make it look blurry or pixelated.
Although you cannot truly add new details to a low-res image, Photoshop allows you to enlarge and enhance the existing pixels using smart tools. The results won’t be perfect, but they will be much better than the original.
Methods to Convert Low- to High-Resolution Images
Method 1: Using Photoshop’s AI (Preserve Details 2.0)
Photoshop CC2018 and later versions include an AI-powered feature called Preserve Details 2.0. It intelligently enlarges images while maintaining details.
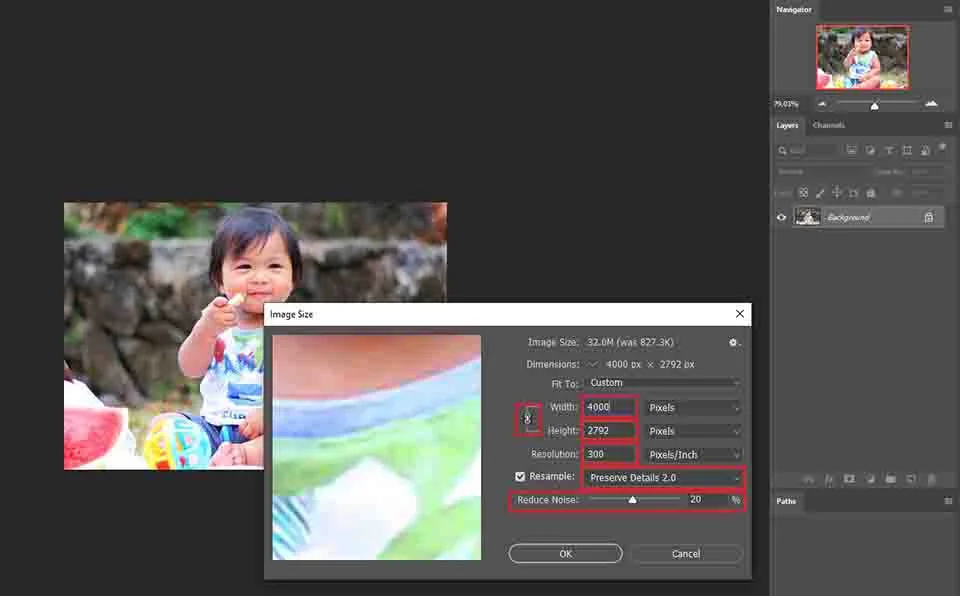
For this method, we are using an image of a baby that I have downloaded from Pixabay.com. The size of the image is only 300 x 209 pixels. We will try to improve the resolution to make a better view. However, if your image has better pixels, you will have a better result, of course.
Step 1: Enable Preserve Details 2.0
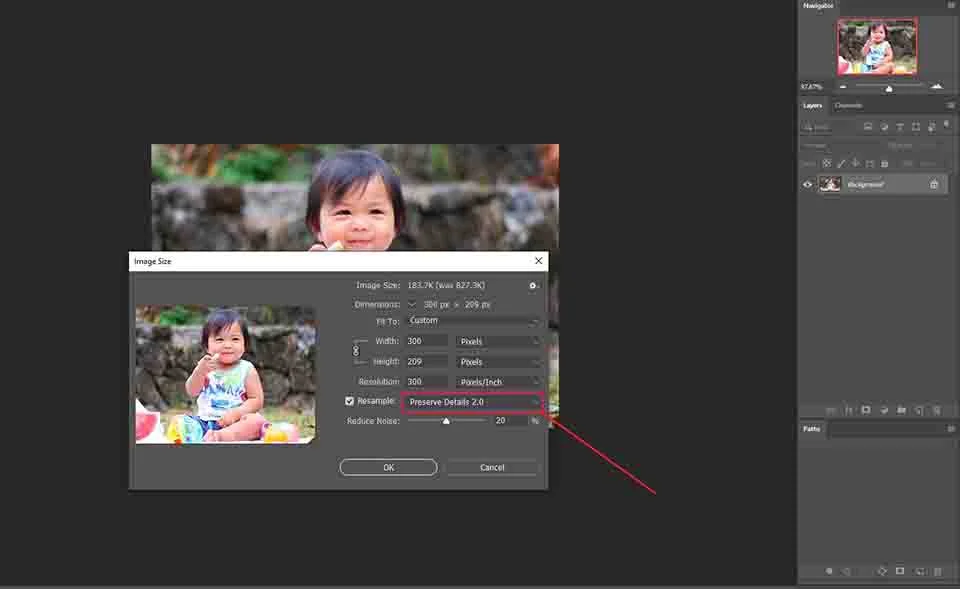
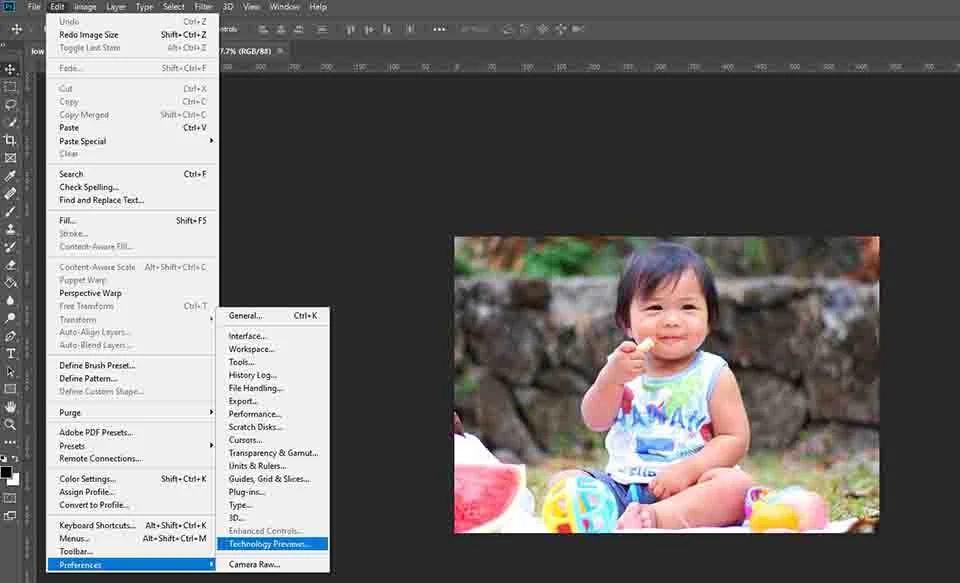
To see ‘Preserve Details 2.0’, first go to Image>Image size. See the above image. You will find several settings options to modify. If you do not have the option here by default, you need to go to another location. So, go to Edit>Preferences>Technology Previews.
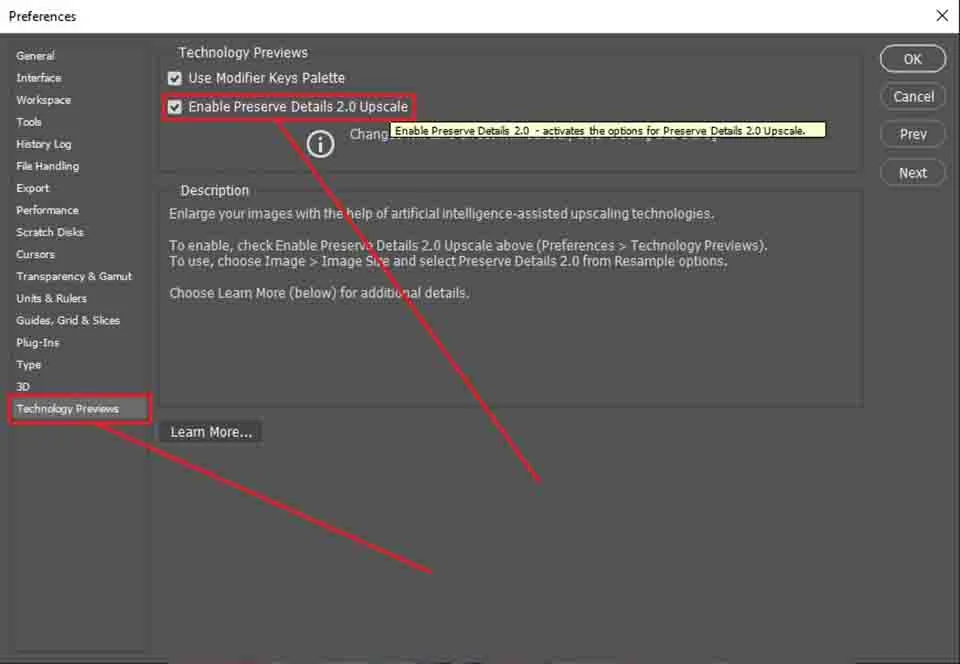
In the window, select ‘Technology Previews’ from the tree. Then, check the box beside the ‘Enable Preserve Details 2.0 Upscale’. Press OK to continue. Now, if you go to Edit>Image size, you will find the option as previewed on the image before.
Step 2: Resize the Image
In the Image Size window, set the width to your desired size (e.g., 4000 pixels). The height will adjust automatically. Check the Resample box and select Preserve Details 2.0 from the dropdown. Adjust the Reduce Noise slider (try 20% as a starting point).
Step 3: Save Your Image
To save the file as a JPG, go to File>Save As and select the file extension JPEG. You can also use the keyboard shortcut Ctrl/Command+Shift+S for Windows/MAC to reach ‘Save As’. You can also keep a copy in PSD format if you have a plan to edit it further.
Method 2: Improving Black & White Images
This method works best if your image only has two colors (e.g., black on white). It’s perfect for simple designs but won’t work well with colorful or gradient images.
Step 1: Make a Copy
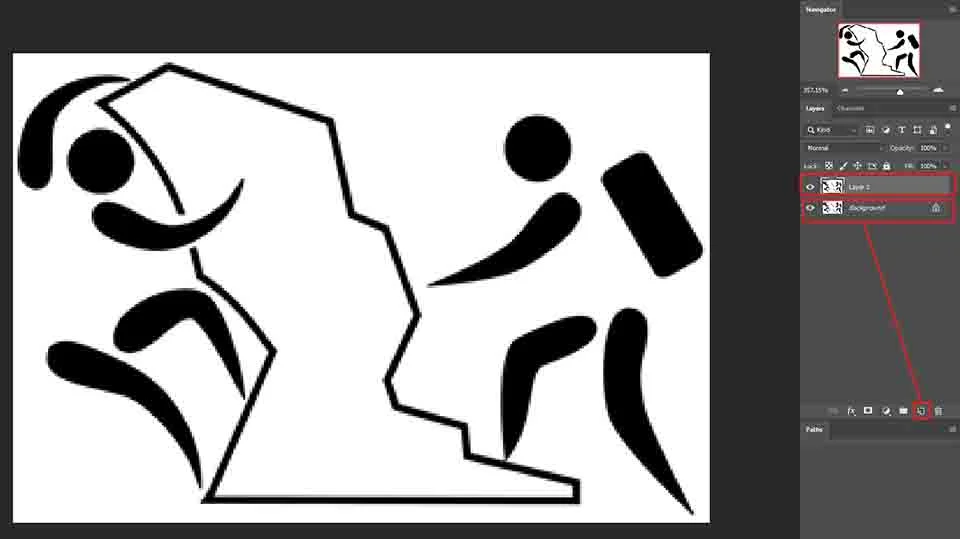
We are using a black-and-white image on a white background with dimensions of 300 x 202 pixels. To compare the before-and-after results more easily, first make a copy of the original image. Press Ctrl + J (Windows) or Command + J (Mac) to duplicate the layer.
Step 2: Prepare the Background
If your image is black and white, it’s best to use a white background while editing. You can choose a different color if you like, but black on white usually provides the clearest contrast. To do this, create a solid white adjustment layer and place it beneath the original image layer.
Step 3: Increasing Image Size
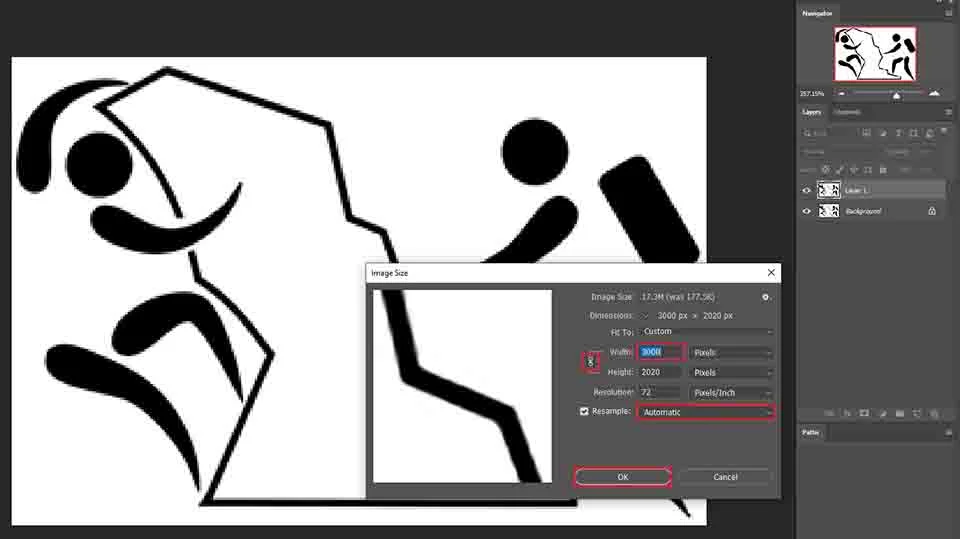
Increasing the image size is an essential step in this process. Go to Image > Image Size and enter a larger width or height. This time, set Resample to Automatic and click OK to apply the changes.
Step 4: Apply Gaussian Blur
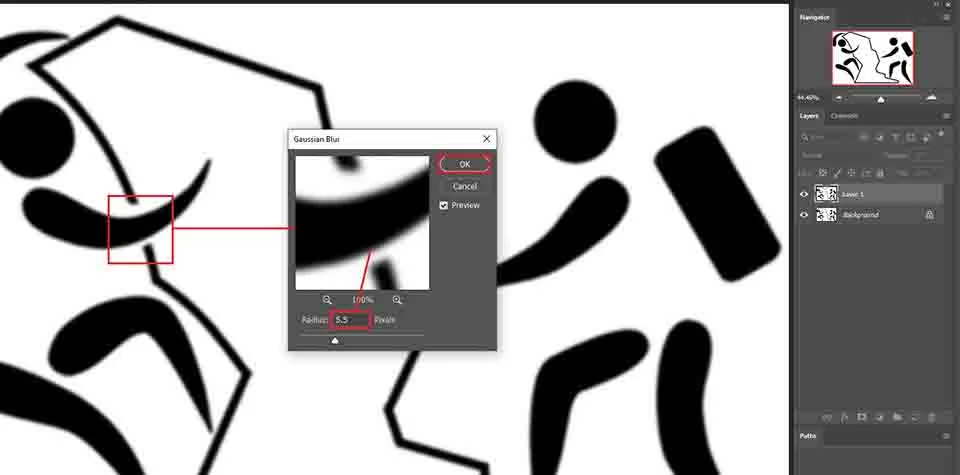
Go to Filter>Blur>Gaussian Blur. Click on the image to choose a more uneven area. Take the slider to the left and gradually move to the right. When most of the edges become smooth, stop. For this example, a value of 5.5 pixels works well. Click OK to apply the blur.
Step 5: Correct the Edges and Save Your Image
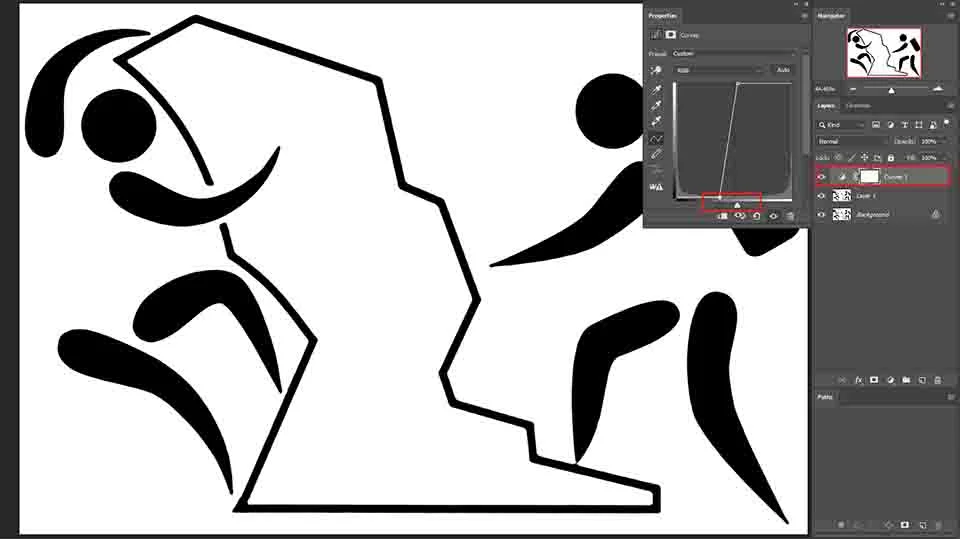
After applying the blur, the image edges may need refinement. Add a Curves Adjustment Layer and carefully adjust the sliders to sharpen the edges. Avoid over-adjusting, as this can cause cracks or unnatural results. Stop once the edges look sharp but smooth. Finally, save your image using File > Save As, choosing either JPEG or PSD if you plan to edit it further.
Conclusion
Improving the resolution of a low-res image might not make it perfect, but it can make it usable. With Photoshop CC’s AI-powered features, you can get impressive results in just a few clicks. Stay tuned for more tips, including how to enhance low-resolution videos, soon!
While Photoshop makes it easy to improve image resolution, for flawless results, you can rely on our Photo Retouching Services to make every photo crisp and high-quality.
Frequently Asked Questions
Upscaling can cause some blur because Photoshop is essentially adding pixels based on existing ones. Using Preserve Details 2.0 and noise reduction helps minimize blur, but extremely low-res images may never be perfectly sharp.
Yes, but results depend on the original quality. Photoshop can improve resolution for print, but if the source image is very small, details may still look soft. Always check the print preview and consider limiting the enlargement to maintain clarity.
Absolutely. Black-and-white images can benefit from adjusting contrast and using a solid white background before upscaling. This reduces pixelation and helps edges appear sharper. For color images, additional noise reduction and color correction may be needed.