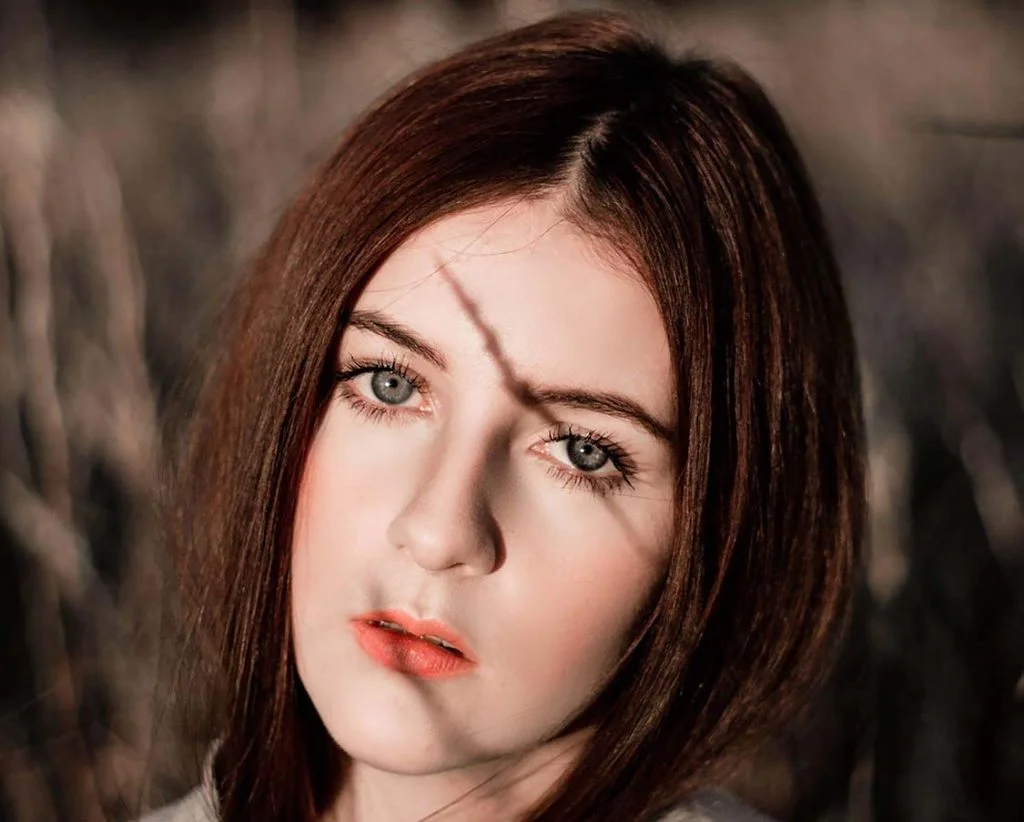
Removing shadows from faces, objects, or backgrounds improves photos. Photoshop has easy tools that can help you get rid of shadows and improve your pictures.
These steps will help make your images clean & professional. We will show you how to remove shadows in Photoshop step by step. It’s simple to follow & learn.
Photoshop Tools for Removing a Shadow in Photoshop
You need to know a few Photoshop tools to remove the shadow from a photo surface. We will use the brush tool for this. Here we will discuss three procedures.
Method 1: Using the Brush Tool
The brush tool is one of the most used tools in Photoshop. The action of the tool is remarkable for adornment. Sometimes, you just need to remove shadows.
However, there are various situations when you may get bored using the tool for a long time. Use this tool only for simple image subjects.
Step 1: Open the Photoshop Program
Open the Photoshop program on your computer and load the image. Use ‘Open’ in the ‘File’ menu or drag and drop the image into Photoshop.
Make a copy of the image by using Ctrl+J for Win or Command+J for Mac. Or you can click and drag the background layer onto to ‘Create a new layer’ button.
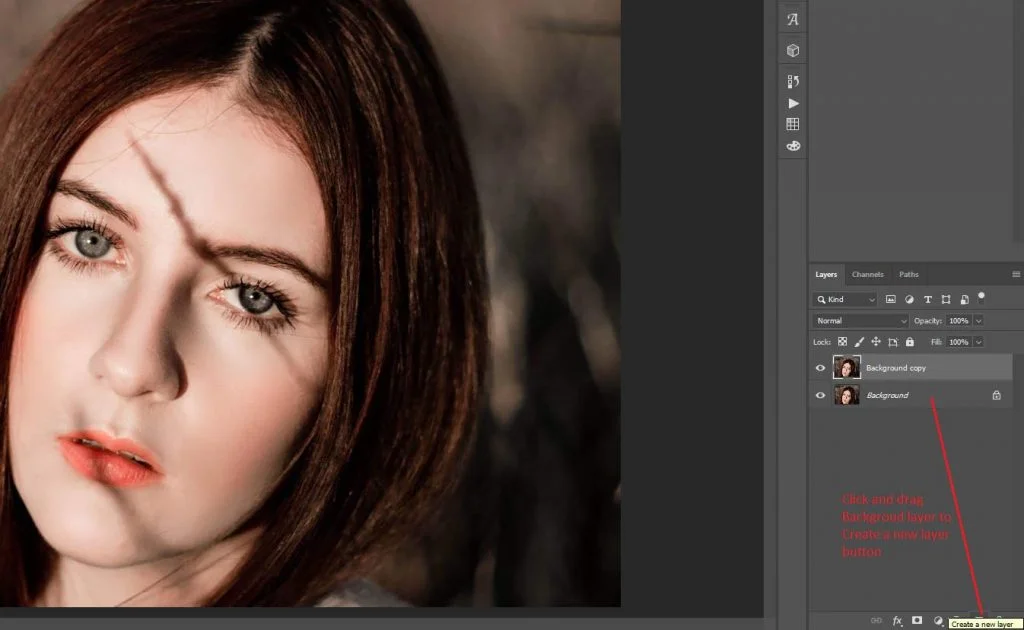
Step 2: Create A New Layer Over The Background
Create a new layer over the Background copy and hide the original Background layer.
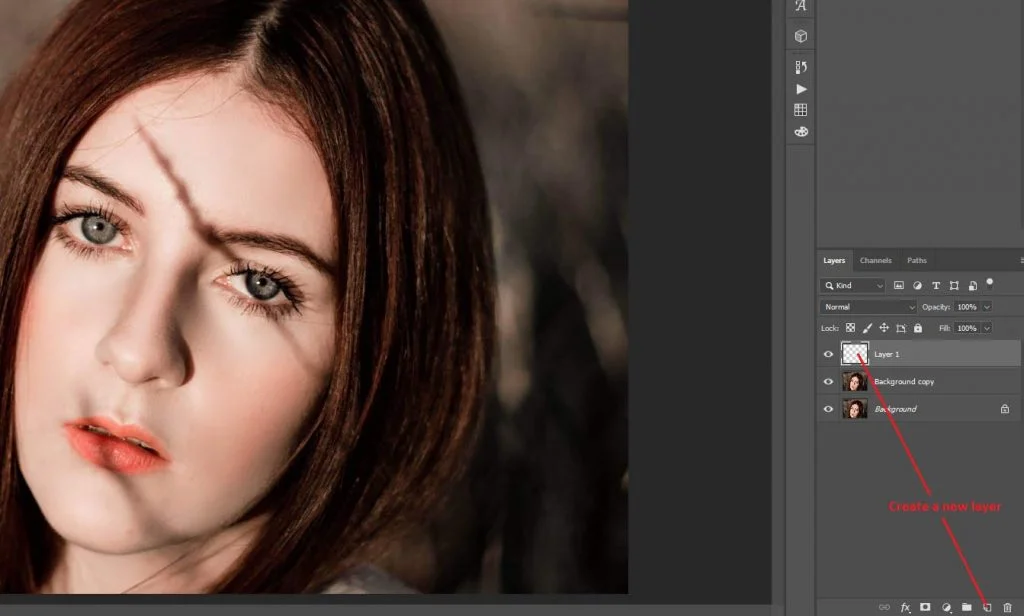
Step 3: Tools Column
Now we will use the brush tool from the Tools Column. Select the new layer and zoom in on the image so that you can get a better look. Make sure the opacity is at 100% and the Flow is at 15% or less.
Brush over the shadow until the darkness gets removed. Do the same for all the shadows on the face. By the way, you can sample from other areas with a matching tone.
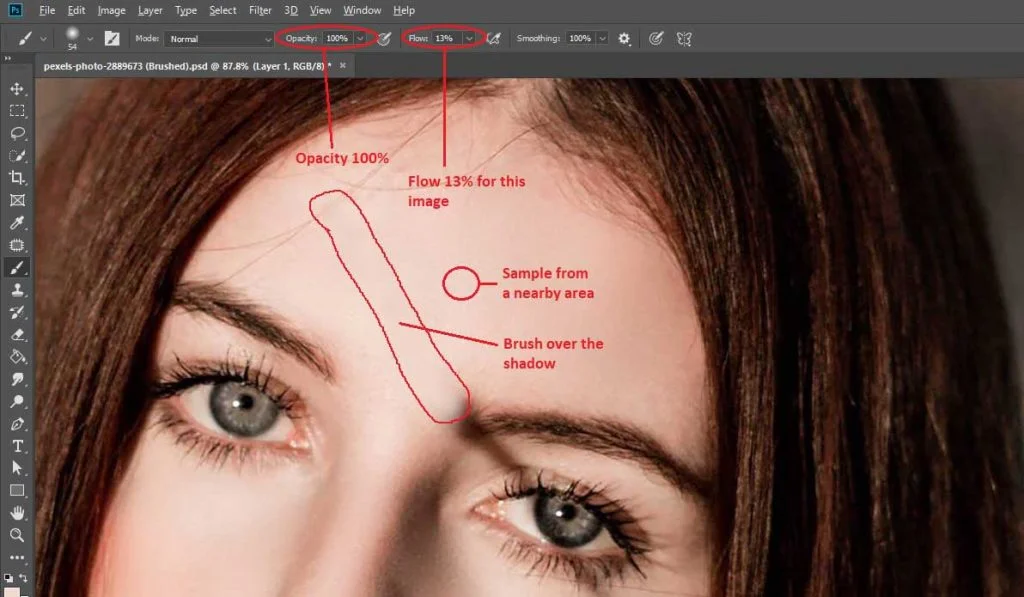
Step 4: Use Of the Brush Tool
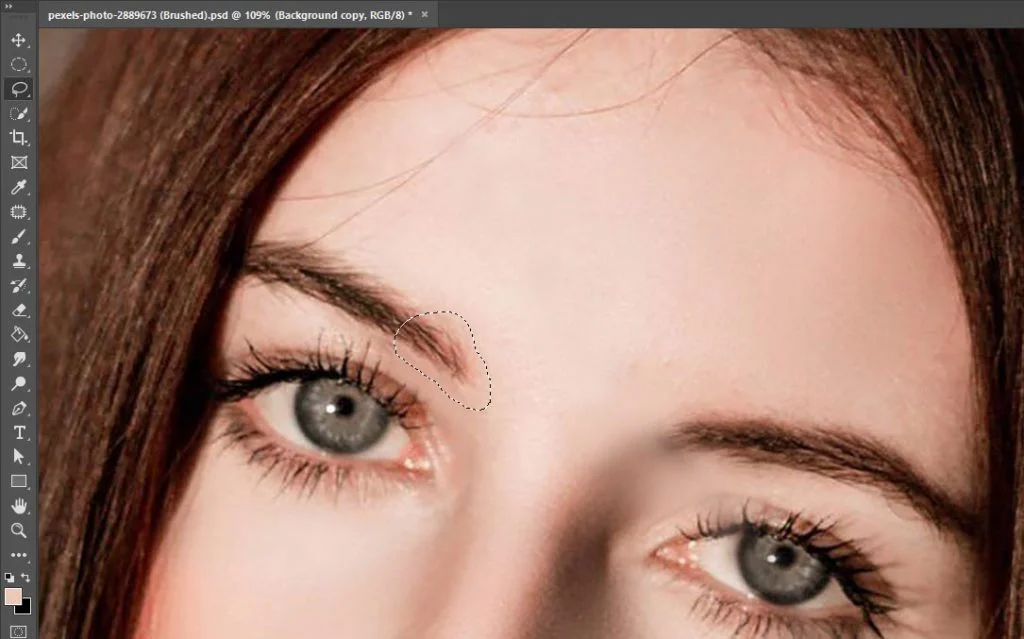
You can see a harsh shadow over the right eyebrow, and you cannot use the brush tool there. What would you do then? Very simple. Make a copy of the eyebrow that has no shadow.
Just a small area that can cover the other one. Select the Background copy layer and take the lasso tool. Mark an area with the lasso.
Step 5: Flip Horizontal
Copy the area to a new layer by pressing Ctrl+J for Win or Command+J for Mac. Put the layer on top and use Ctrl+T for Windows or Command+T for Mac to get the transformation tool.
Right-click on the copy and select ‘Flip Horizontal’. Place the copy over the shadowed eyebrow.
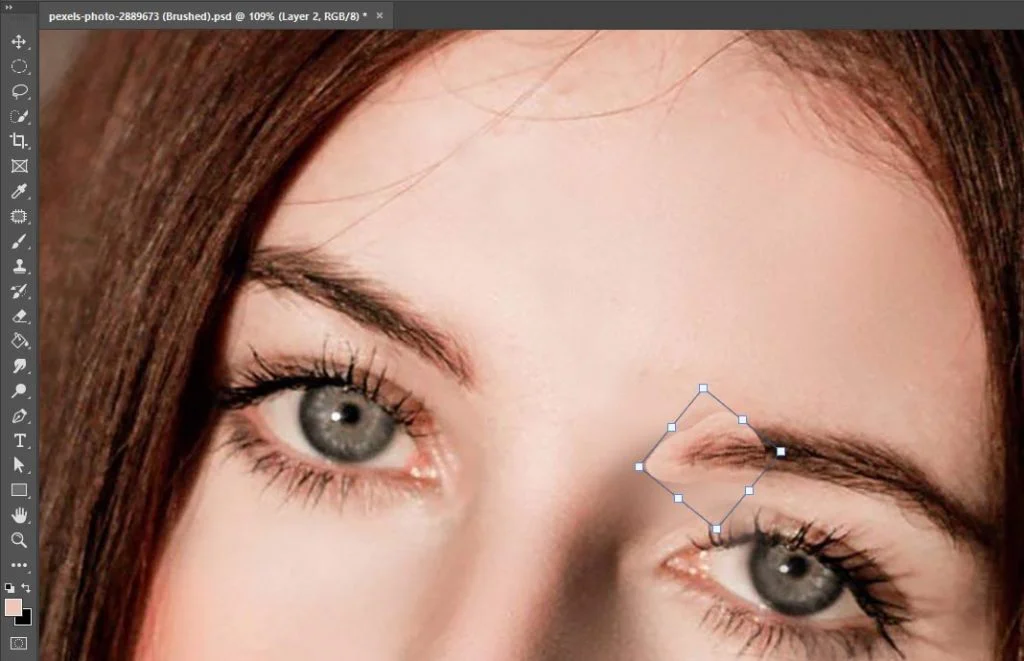
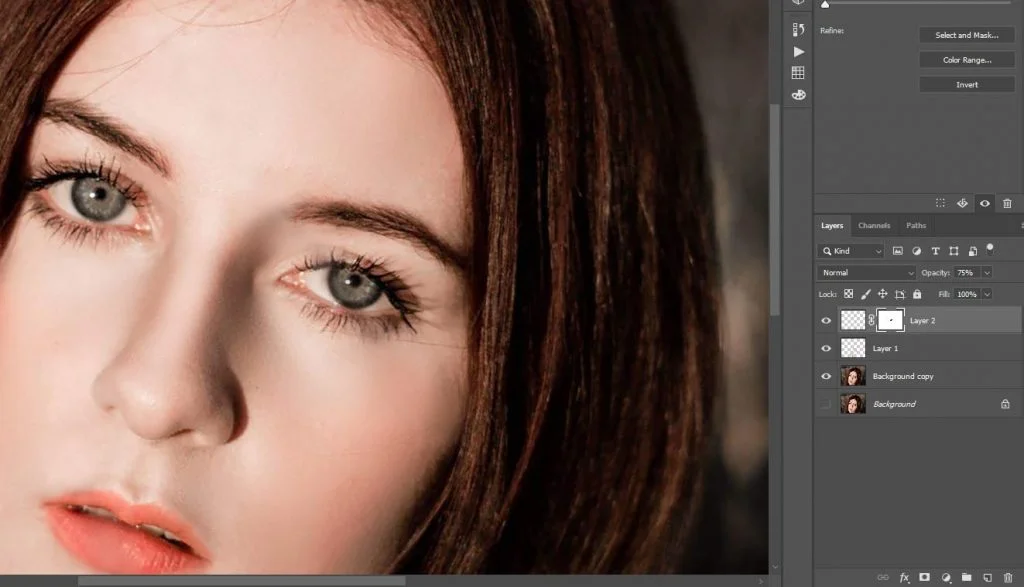
Reduce the opacity to 75% and mask the layer. Use the brush tool on the mask. With the foreground color black, brush over the edge of the layer to match. Set the Flow at 100% before brushing.
Step 6: Finishing Touch
We are almost done. Now, select ‘layer 1’ once again and add some noise. Go to Filter>Noise>Add noise. I am using 1.4% for this image. It may vary depending on the image quality. The final output is as below.

Method 2: By Frequency Separation
You can work separately with color and texture by the Frequency Separation method. The process has two different layers. Together, they act like one.
We are using the same image as before. The frequency Separation process is a little more complicated than the last one. But the result is more satisfactory.
Step 1: Two Copies of the Background Layer
You need to make two copies of the background layer and name them ‘Color’ and ‘Texture’. Naming is not mandatory, but good for understanding. 1st, we will work with the color.
Select the color level and add ‘Gaussian Blur’ from Filter>Blur>Gaussian Blur. Use the Radius 4 pixels for the image and click ok.
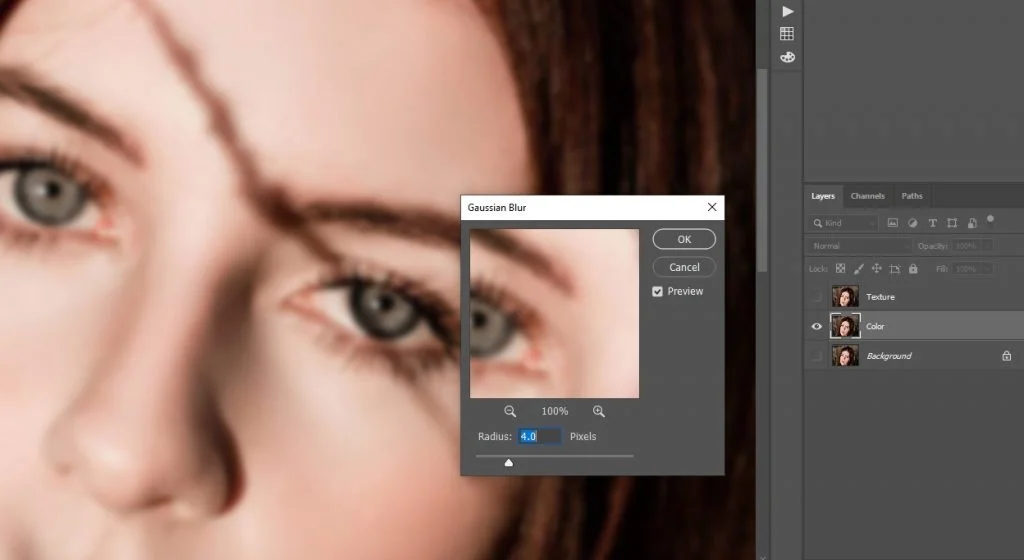
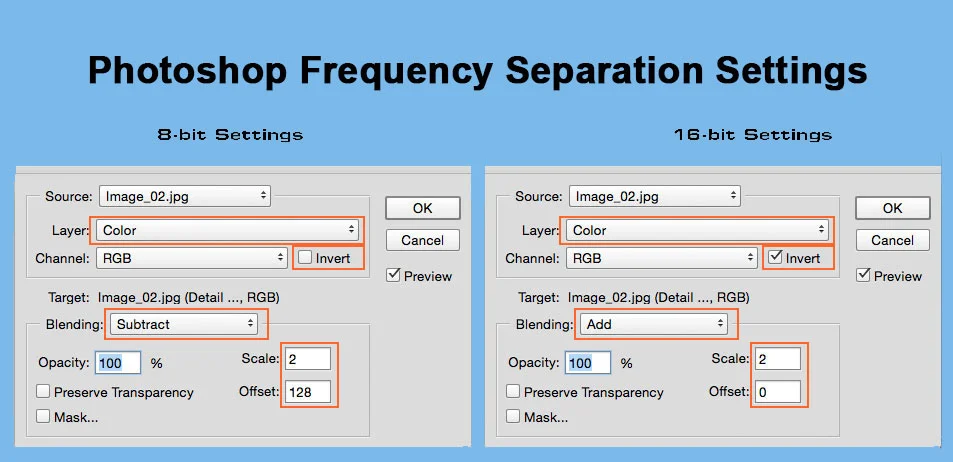
Now, select the texture layer and go to Image>Apply Image. Choose as mentioned below for the image resolution: 8-bit or 16-bit. If your image is 8-bit, go with 8-bit settings, and if 16-bit, go with 16-bit settings.
Then change the ‘Blend Mode’ from ‘Normal’ to ‘Linear Light’.
Step 2: Select Both Layers
Select both layers (Color & Texture) and press Ctrl+G for Win or Command+G for Mac to make a group. If you hide or show the group and compare it with the background layer, you will see no difference.
The reason is that the image got separated by the two layers that we made changes to just now. If you work on one layer, the other will not be affected.
Add a new layer just above the color layer (Layer 1). Select the brush tool, take a sample from a clean area, and paint over the shadow. Make sure the Opacity is at 100% and the Flow is around 15%.
Select the ‘soft round brush’ and use it over the shadow until it matches the tone beside it. It will take time, but repeat the process for all the areas with the shadow.
You can increase or decrease the size of the brush by using the ‘[ & ]’ from the keyboard. The activity will be easier with the proper brush size.
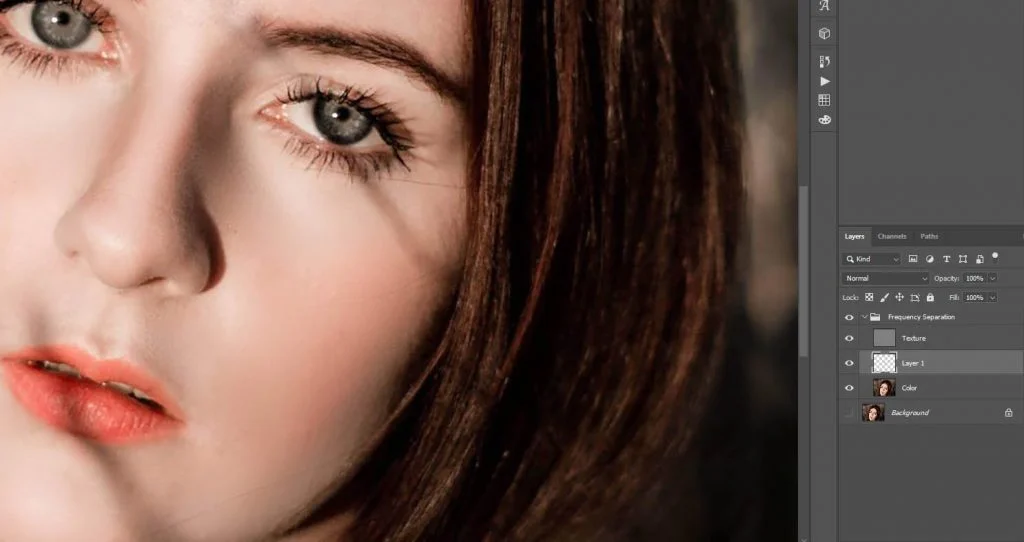
You will see some uneven textures where the shadows were. We need to take care of those. Our next step will be to take care of the texture.
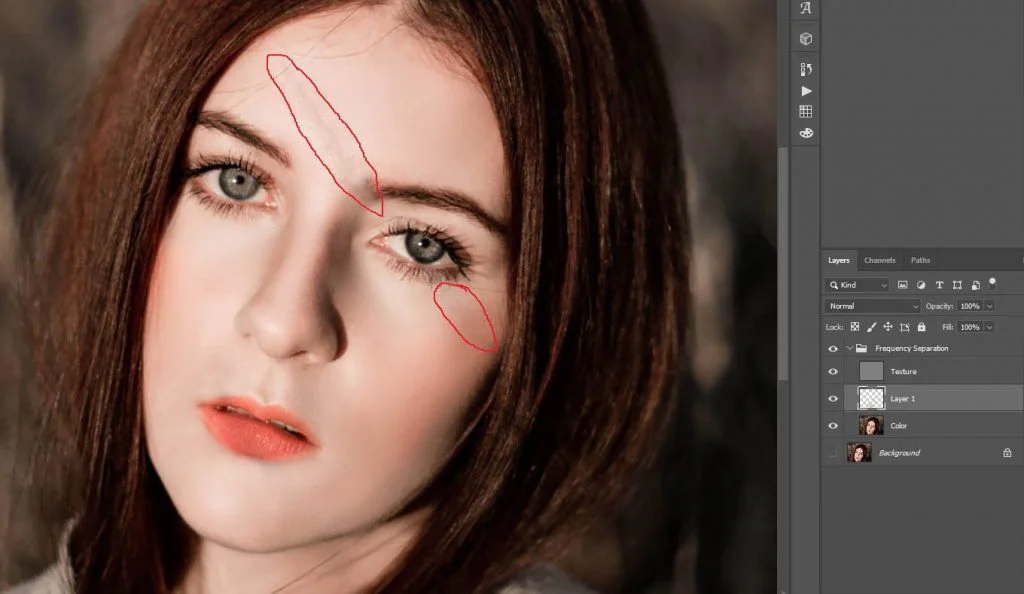
Select the ‘Texture’ layer and take the ‘Patch Tool’ for this operation.
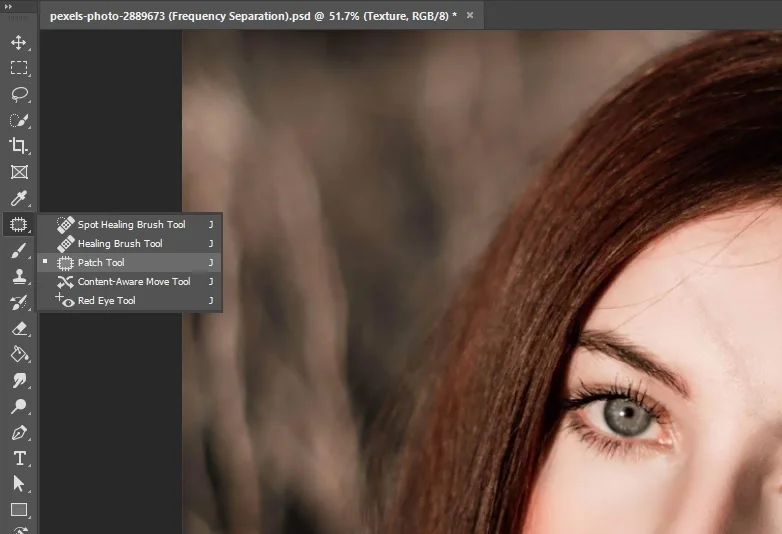
With the Patch tool, select an area that has a harsh texture. Now, click and drag the selected area to a clean textured surface. Continue doing the same for all the areas with impure textures.
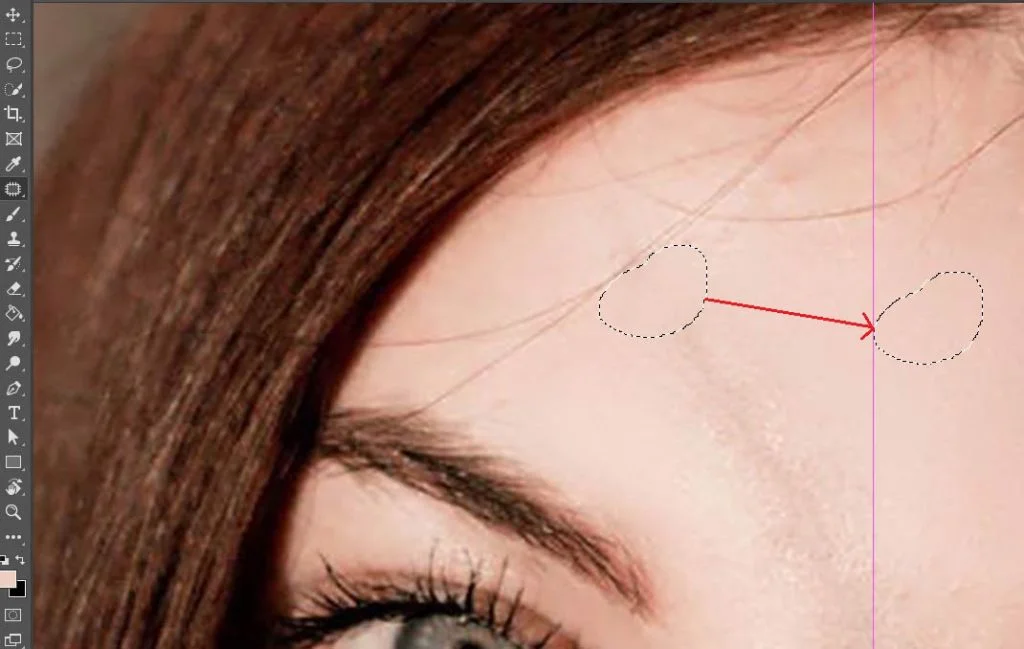
The result is as follows after the above process. But we are not done yet. The finishing touch is still pending.
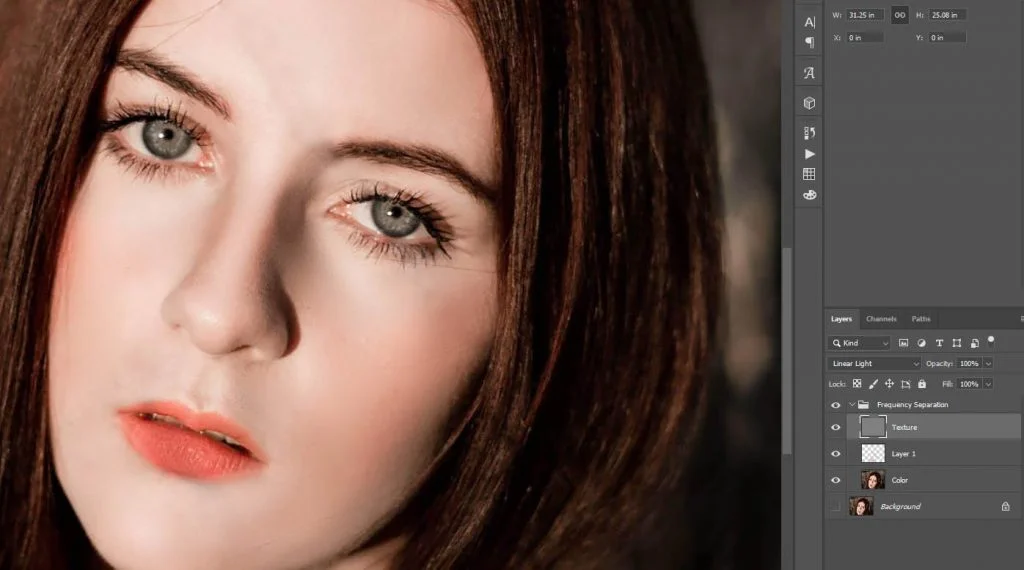
Step 3: Finishing Touch
Select ‘Layer 1’ again and select the ‘Brush’ tool. Brush over the uneven tones following the same brushing as before. Take a sample from a nearby clean area and brush over the impurities. The final output will be as below.

Method 3: With Curves and Masks
We will use the same image for this procedure as well. Though there is a harsh shadow on the image, we will go with it. You may need to give more time for this one than the above procedures.
Curves and Masks process is a little more time-saving and effective for images with soft shadows. For the harsh shadows, the process is a little lengthy. However, let’s use the process to remove the harsh shadow.
Step 1: Open The Image in Adobe Photoshop
First, open the image in Adobe Photoshop. As we already know, the activities of Photoshop, I will not waste time with details. Create a ‘Curves adjustment layer’ and brighten the image below the curve settings.
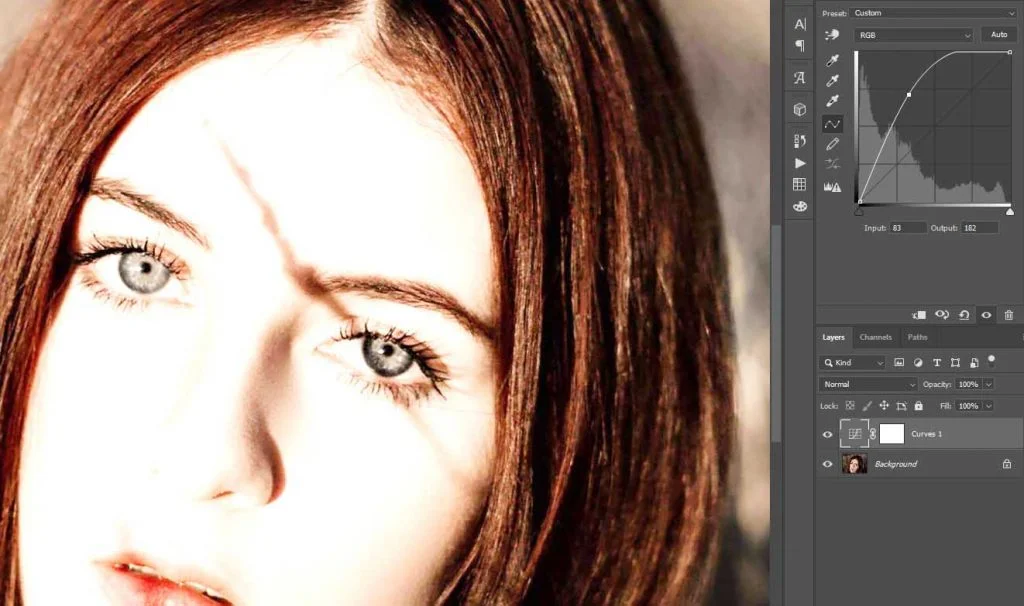
Select the Mask and press Ctrl+I for Win or Command+I for MAC to invert.
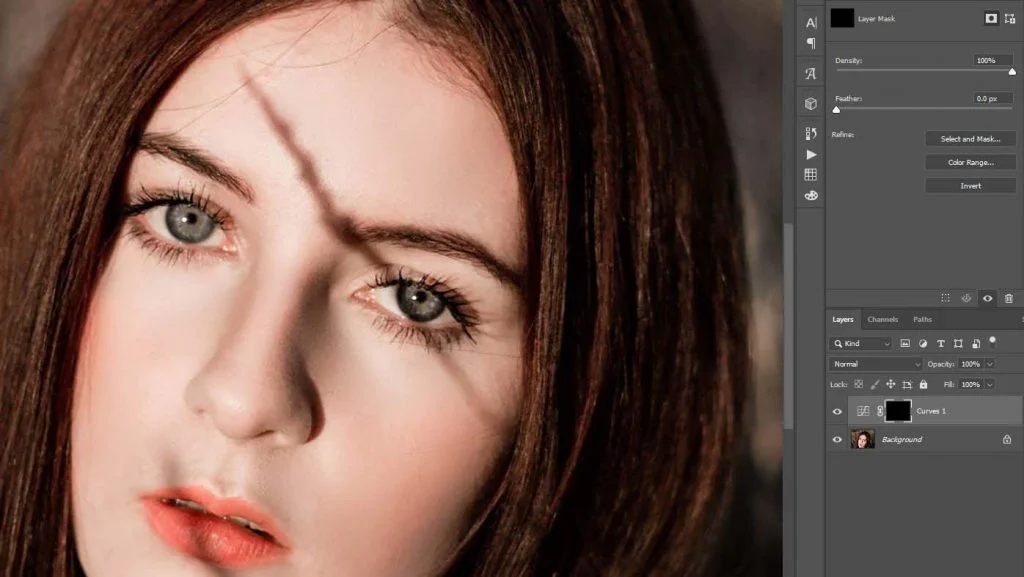
Step 2: Soft Round Brush
Take the soft, round brush. Set the Opacity to 100%, Flow around 7%, and Smooth to 100%. Brush over the shadow a couple of times until it reduces to a minimum. As already said, the shadow is too harsh. So, you cannot make it perfect at once.
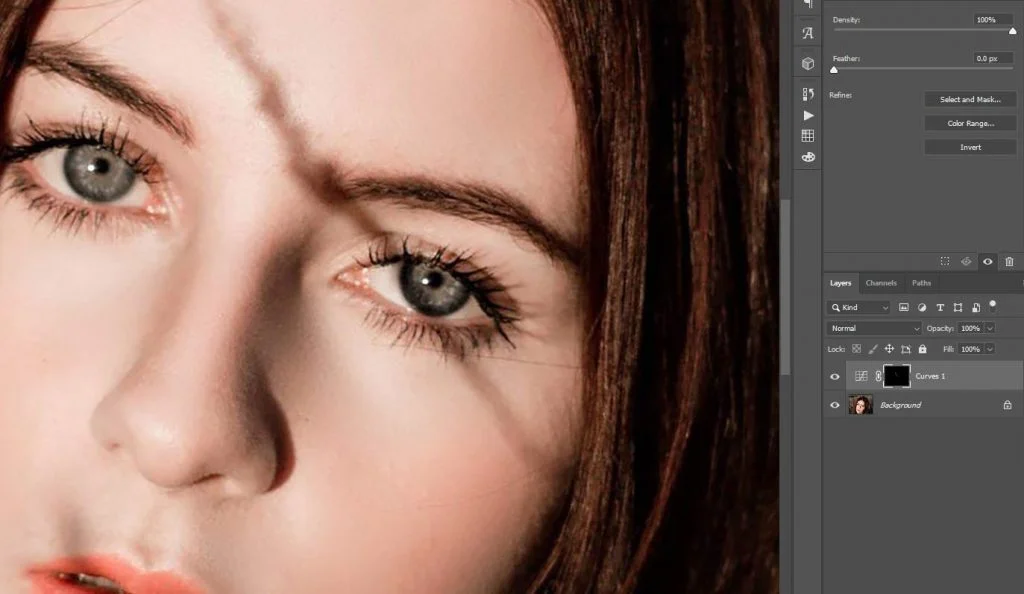
The curves and Masks layer activity ends here. But, still, there are some harsh textures left on the face. We will take care of them in a moment.
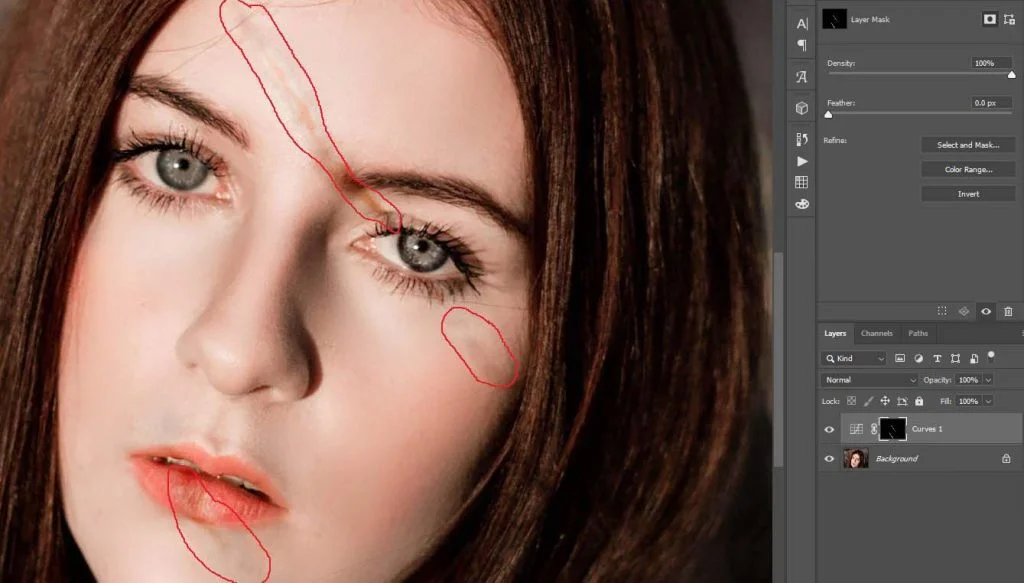
Step 3: Lasso Tool
Before that, we need to copy the corner of the eyebrow that has no shadow over it. You see, shadow went over the other eyebrow, and you cannot do any good without a clean one. So, we will copy the good one and put it over the shadowed one, same as the first procedure.
Make sure you select the background layer, then make the copy. Take the layer to the top so that no layer can affect this one. You can use the ‘Lasso Tool’ because it is convenient.
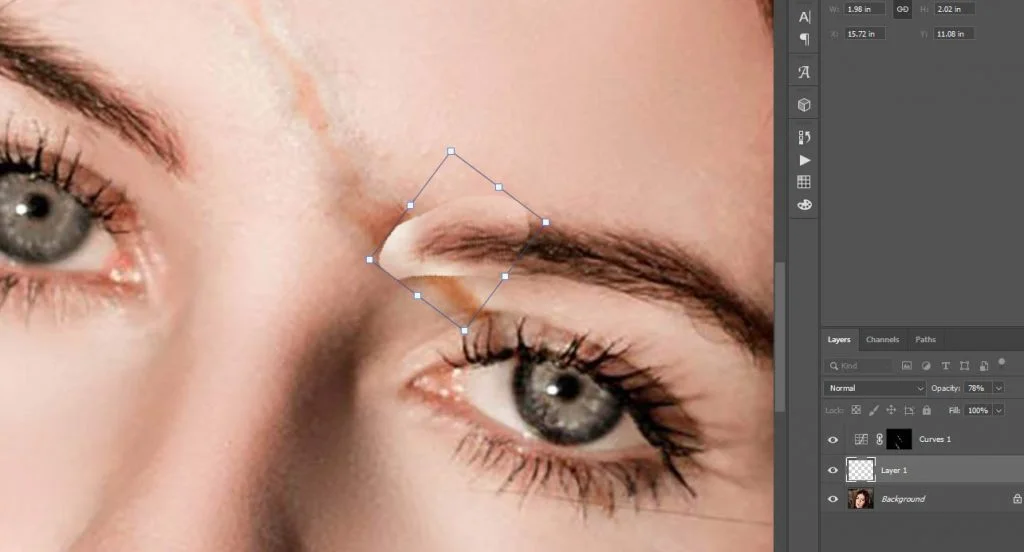
Place the copy in the exact position and mask it. Get the soft round brush, choose the foreground color black, and brush over the edge of the copy to match the shade below.
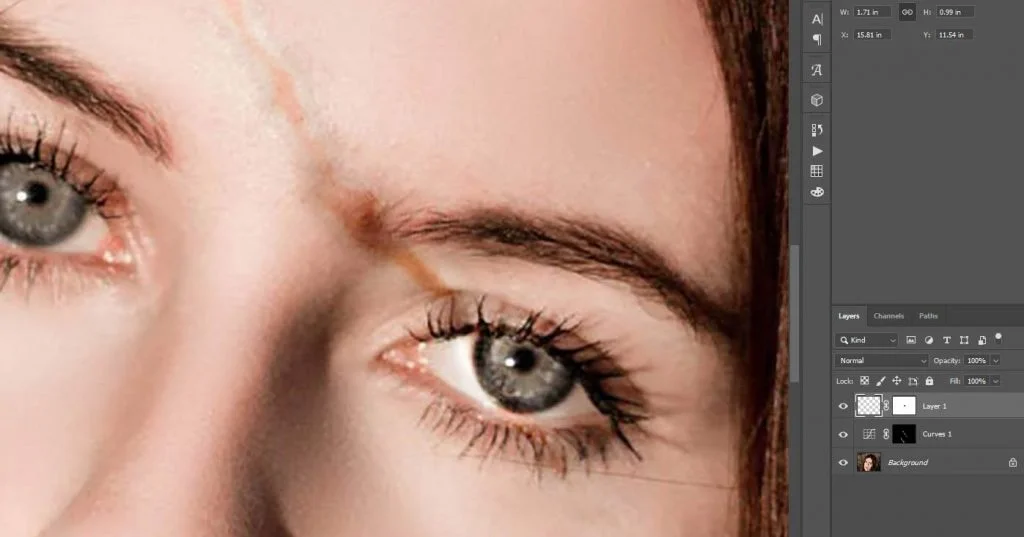
Step 4: Take A New Layer
Take a new layer right over the Curves adjustment layer. Select the soft, round brush and take a sample from the nearby area with a smooth tone.
You can also select the Color Picker tool first to select a sample size of 5×5. It will take an average sample of 5 by 5 pixels. Also, select the sample ‘Current and Below’.
Now, take the brush, press and hold Alt for Windows or Option for MAC, and click on a clean area. Brush over the shadowed area until you remove all the impurities caused by the shadow.
Take care of the lips, eyes, and throat as well. Keep the opacity 100% and set it to flow to 15% or less, depending on the image category.
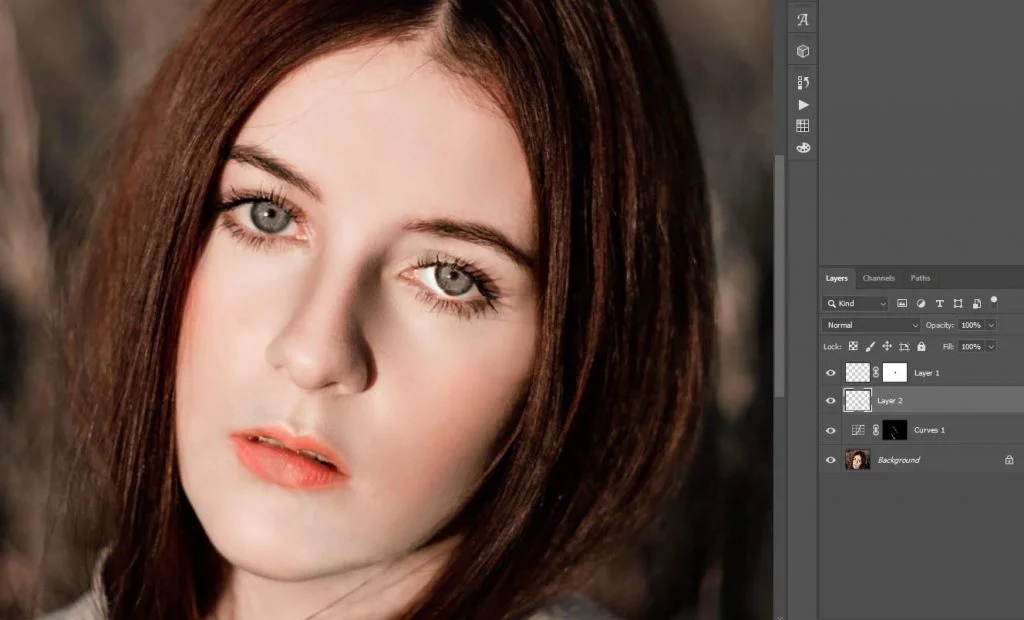
Step 5: Finishing Touch
We are almost done with the procedure. If you are already satisfied with the current result, no need to go further. However, we will add a finishing touch to the image. It is not mandatory, but you can apply it for better finishing.
Take a new layer on top of all layers, select the soft brush again, and paint over the skin areas. The process will smooth the skin tone without any harm to the texture.
Make sure to keep the opacity 100% and flow not more than 5%. Brush gently, and if you are using a Wacom Tablet device, brush with less pressure. The output is as below.
Very minor differences, but it looks more furnished. Well, as already said, the procedure is optional, and you may skip this step.
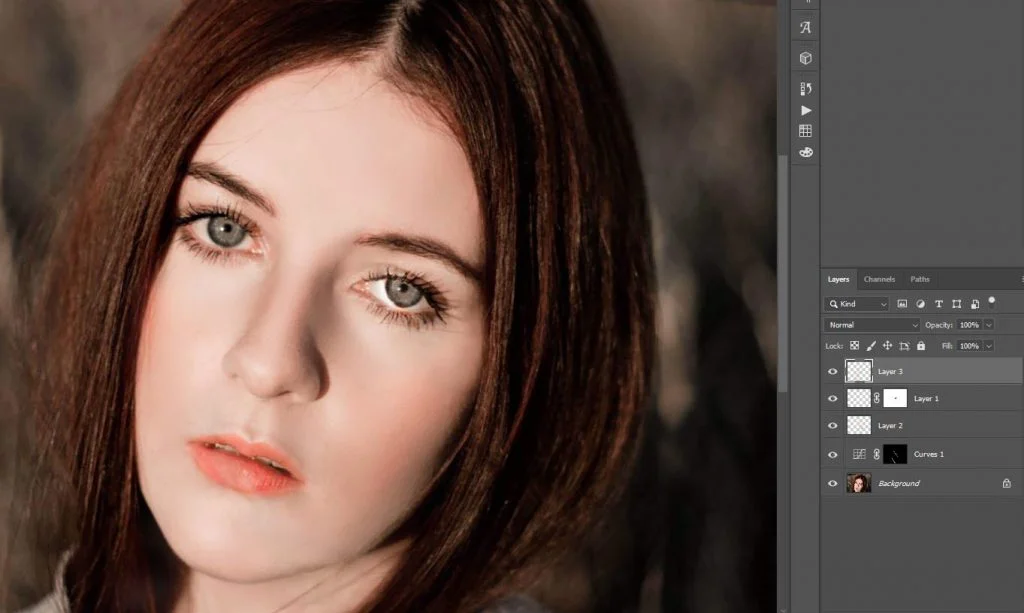
The final output is as below.

Final Thought
We have discussed three major and effective procedures for you. The brush tool is common for all procedures. You cannot ignore the necessity of the procedure at all. However, there are other ways you can implement to remove a shadow from the image.
Removing shadows from the face app is sometimes good to save time. They might be a little more complicated than these, but you can do it. By the way, you can remove a shadow from a photo using online services, but that is not good enough.
We are just giving you a touch of the working procedure. The real performance for the best result lies in your efficiency and creativity. Good luck.
FAQs | How to Remove A Shadow in Photoshop
Shadow is the dark part over an image subject, not relevant to the original image. The shadow often creates a disturbance to the image that needs to be removed for a good look.
The most common property of a shadow is darkness. For a Raster image, it damages the beauty or makes the image imperfect. Well, sometimes shadows create a different impression that gives the whole image a great look.
Unwanted shadow removal restores the image impression to the fullest. With the shadow removal procedure, you can make the image fresh without any distractions.

