Image masking in Photoshop is a non-destructive editing technique that isolates a subject by hiding or revealing parts of an image using a layer mask instead of deleting pixels. It is commonly used for complex edges like hair, fur, smoke, and transparency.
Image masking becomes essential when standard background removal methods cannot accurately handle elements such as hair, fur, smoke, shadows, or transparency. In these situations, masking provides greater control, smoother edge refinement, and higher precision.
As one of the most advanced background removal methods in Photoshop, image masking is widely used in ecommerce product photography, advertising visuals, and professional compositing workflows where edge realism and editing flexibility are critical.
What is Image Masking in Photoshop?
Image masking in Photoshop is a non-destructive editing technique used to isolate a subject from its background by hiding or revealing areas instead of deleting pixels. It uses grayscale masks where white reveals, black conceals, and gray partially shows image areas.
Image masking is one of the most advanced background removal methods in Photoshop, particularly when automated tools cannot preserve soft or complex edges such as hair, fur, smoke, or transparency.
Unlike destructive editing techniques, masking keeps the original image data intact. Editors can refine or reverse changes at any stage, making it a preferred method in commercial and professional workflows.
Why Do You Need Image Masking in Photoshop?
Image masking is essential because it allows precise background removal without altering the original pixels. This non-destructive approach provides full control over complex edges and enables refinements at any time.
It becomes particularly important when working with:
- Hair and fur
- Transparent or semi-transparent objects
- Fabric textures
- Smoke, glass, and reflections
- Soft shadows
In ecommerce and advertising workflows, masking quality directly affects realism, product presentation, and brand perception. In high-resolution commercial and advertising photography, even minor edge imperfections become visible in print or large digital displays. Proper masking ensures realism, edge precision, and professional-quality output.
Key Reasons to Use Image Masking
Image masking offers several practical advantages in professional editing workflows, especially when precision and flexibility are required.
- Remove or replace backgrounds non-destructively
- Maintain full editing control
- Refine difficult edges with precision
- Show or hide specific areas easily
- Create advanced compositing effects
- Preserve flexibility for future edits
Because masking does not permanently delete pixels, it provides long-term editing flexibility and ensures that complex subjects can be refined without compromising image quality.
Types of Image Masking in Photoshop
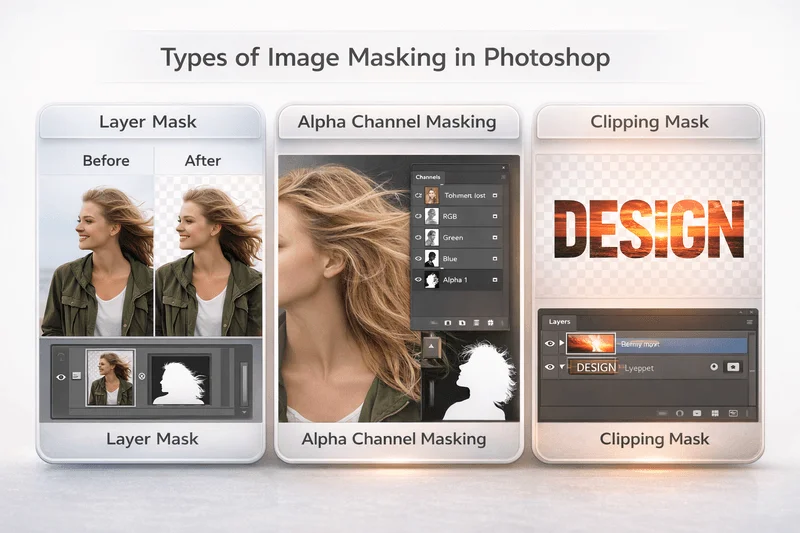
Image masking in Photoshop can be applied in different ways depending on the image complexity and editing goals.
1. Layer Mask
Layer masks are the most common masking method. They allow editors to hide or reveal parts of an image using black and white brush strokes without deleting pixels.
Best for:
- Non-destructive background removal
- Edge refinement
- Reversible editing
2. Alpha Channel Masking
Alpha channel masking is used for extremely complex edges such as hair, fur, smoke, or transparent materials. This technique stores selection information in a separate channel, allowing for highly precise masking.
Best for:
- Portrait photography
- Complex product images
- Advanced photo compositing
3. Clipping Mask
Clipping masks control the visibility of one layer based on the shape of another. Unlike layer masks, clipping masks are primarily used for creative design rather than background removal.
Best for:
- Text effects
- Graphic design layouts
- Creative compositions
How Image Masking Works in Photoshop
Image masking in Photoshop follows a structured, non-destructive workflow that allows editors to isolate subjects accurately while maintaining full control over edge refinement and transparency.
Step 1: Create an Accurate Selection
The first step in image masking is creating a precise selection of the subject. Photoshop provides several tools for this purpose, including the Quick Selection Tool, Pen Tool, and Select Subject feature. The choice of tool depends on the subject’s shape, background contrast, and edge complexity.
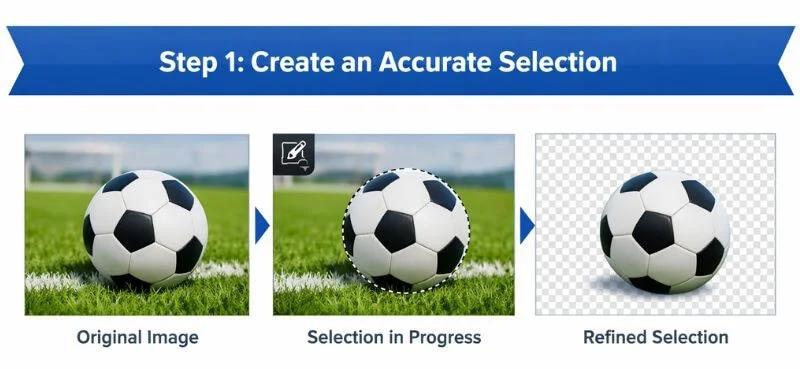
For subjects with soft or detailed edges—such as hair, fur, or textured fabric—the Select and Mask workspace provides enhanced edge detection and refinement controls. This step is critical because masking quality directly depends on the accuracy of the initial selection.
In simple cases, such as a clearly defined product against a contrasting background, automated selection tools can produce reliable results. However, complex images often require manual refinement for optimal precision.
Step 2: Add the Layer Mask
Once the selection is refined, the next step is converting it into a layer mask. This transforms the active selection into a non-destructive mask, allowing editors to hide or reveal areas without permanently deleting pixels.
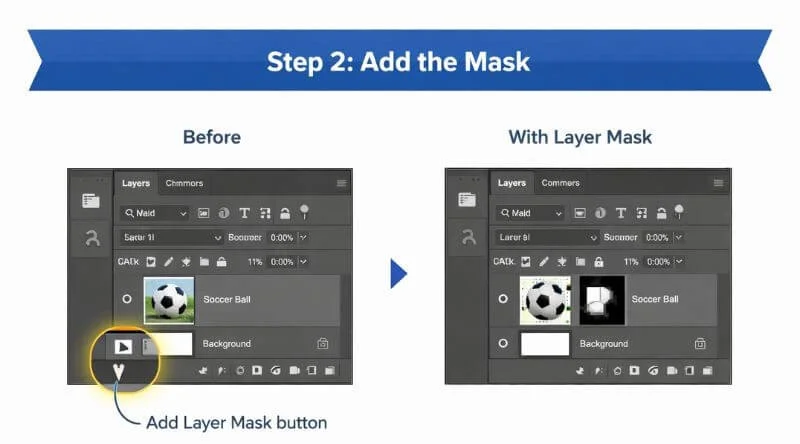
Photoshop offers multiple ways to add a mask:
- Use the Add Layer Mask button in the Layers panel
- Open the Select & Mask workspace and output the selection as a Layer Mask
By converting selections into masks rather than deleting pixels, editors retain full flexibility to refine edges or adjust visibility at any stage of the workflow. Photoshop’s Select and Mask workspace provides advanced edge detection and refinement options, as explained in Adobe’s official guide.
Step 3: Refine the Edges
After applying the mask, edge refinement ensures realistic and natural transitions. Editors adjust properties such as feathering, contrast, and edge detection to smooth out harsh lines or preserve fine details.
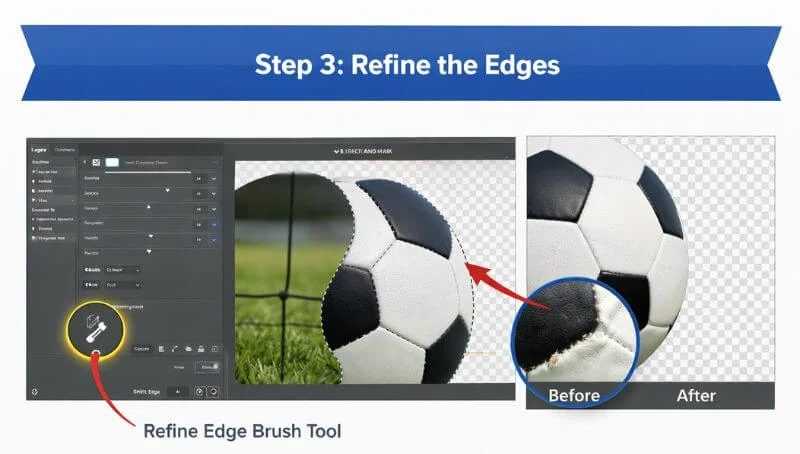
This stage is especially important for:
- Hair and fur
- Transparent or semi-transparent objects
- Soft shadows
- Fabric textures
Proper edge refinement separates professional-quality masking from basic background removal.
Step 4: Save and Export
For maximum flexibility, it is recommended to save the working file in PSD format to preserve layers and mask information. Once final adjustments are complete, the image can be exported in JPEG, PNG, or TIFF format, depending on its intended use.
Saving properly ensures that future edits remain possible without reconstructing the entire masking process. By preserving layers and mask information, editors can revisit the file, refine edges further, or adapt the image for different platforms without starting from scratch.
Image Masking vs Background Removal
While background removal refers broadly to separating a subject from its background, image masking is the advanced technique used when standard methods are insufficient. Although image masking is a form of background removal, it offers significantly greater precision and flexibility for complex subjects.
| Aspect | Background removal | Image masking |
| Best for | Simple objects with clear edges | Hair, transparent or soft edges |
| Accuracy level | High (with limitations) | Very high |
| Editing flexibility | Moderate | Very high |
| Typical use case | General image editing | Professional workflows |
In professional environments where edge precision matters, image masking becomes the preferred solution. It ensures natural-looking transitions, preserves fine details, and delivers the level of accuracy required for high-quality commercial and advertising work.
Image Masking vs Clipping Path
Image masking and clipping path are both background removal techniques, but they serve different purposes depending on image complexity. While clipping paths are ideal for hard, well-defined edges, image masking is better suited for soft, intricate, or semi-transparent elements that require higher precision.
To explore a detailed breakdown with real-world examples, read our complete guide on the difference between image masking and clipping path.
| Feature | Image Masking | Clipping Path |
| Best for | Soft or complex edges | Hard, defined edges |
| Transparency support | Yes | No |
| Editing flexibility | Very high | Moderate |
| Common use | Hair, fur, fabric | Products with solid edges |
Image masking is better suited for complex images that require precise edge control and fine detail preservation. It allows editors to maintain natural transitions in elements like hair, fabric, smoke, or transparency without losing realism.
Common Uses of Image Masking
Image masking is widely used in:
- Ecommerce product editing
- Fashion photography
- Advertising campaigns
- Portrait retouching
- Creative compositing
- Graphic design projects
It ensures realistic subject isolation while preserving image integrity. For a complete breakdown of real-world applications, practical examples, and industry-specific use cases, explore our detailed guide on Common Uses of Image Masking.
When Should You Use Image Masking in Photoshop?
Use image masking when:
- The subject contains soft or intricate edges
- Transparency must be preserved
- Precision is required for commercial output
- Non-destructive editing is necessary
For simple objects with hard edges, basic background removal or clipping path may be sufficient. However, for professional-quality results, masking remains superior.
FAQ | Image Masking in Photoshop
Image masking in Photoshop is a non-destructive editing technique that isolates a subject by hiding or revealing parts of an image using a layer mask instead of deleting pixels. It is mainly used to preserve complex edges like hair, fur, smoke, and transparency.
The purpose of image masking is to remove or replace backgrounds while preserving the original image data. It provides precise control over soft and detailed edges, ensuring realistic results in professional editing, ecommerce product images, and advertising visuals.
Yes, image masking is completely non-destructive. It hides pixels using a layer mask rather than permanently deleting them. This allows editors to modify, refine, or reverse changes at any stage without damaging the original image.
Image masking is better than a clipping path when working with soft, complex, or semi-transparent edges such as hair, fur, fabric, smoke, or glass. Clipping paths work best for hard, solid edges, while masking preserves fine details and natural transitions.
Background removal is a broad term for separating a subject from its background, while image masking is a specific non-destructive technique used when standard selection tools cannot preserve fine details or soft edges accurately.
You should use image masking instead of clipping path when the subject contains intricate details, transparency, or soft edges that require high precision. It is ideal for professional workflows where realism and edge accuracy are critical.
Conclusion
Image masking in Photoshop is one of the most powerful non-destructive background removal techniques available. It enables precise subject isolation, advanced edge refinement, and full editing flexibility.
While automated background removal tools work for simple images, professional workflows rely on masking for complex subjects where precision matters most.
For large-scale commercial projects or highly detailed images, structured masking workflows ensure consistent, realistic, and production-ready results across multiple platforms.