
To remove a mannequin from a photo in Photoshop, you need to isolate the garment using tools like the Pen Tool or Layer Mask, remove the mannequin areas carefully, merge the back neck portion, and refine shadows to create a realistic ghost mannequin effect. This process helps maintain the natural shape and depth of clothing without visible support structures.
Ghost mannequin editing is widely used in ecommerce product photography because it presents apparel in a clean, professional, and distraction-free way. Unlike simple background removal, this technique goes beyond standard background removal techniques by reconstructing the garment structure.
In this step-by-step guide, you’ll learn how to remove a mannequin from clothing photos in Photoshop using precise selection, alignment, scaling, and shadow refinement techniques for production-ready results.
Quick Steps to Remove Mannequin from Photo
Removing a mannequin from a photo requires combining front and back images in Photoshop to create a realistic ghost mannequin effect. Follow these simple steps:
- Open the front and back images in Photoshop
- Select the garment using the Pen Tool
- Remove the mannequin parts carefully
- Add the backside neck portion
- Adjust scaling and apply Liquify
- Add realistic inner shadows
- Final retouch and background cleanup
How to Remove Mannequin from Photo in Photoshop (Step-by-Step)
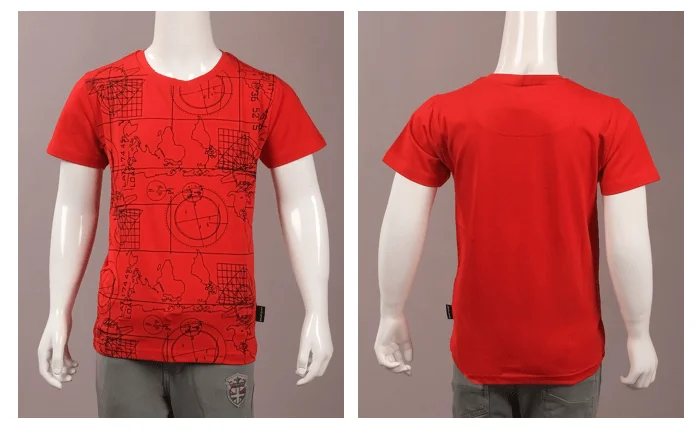
Below is a professional step-by-step workflow used in ecommerce ghost mannequin editing. First, you will need the following two images for this example. One photo is for the front side of the T-shirt, and the other is for the backside.
We will start editing by opening these two images in Photoshop. Make a duplicate layer of the Background for these photos. Now, you are set for the next step.

Now, we must use an image selection tool to select the t-shirt. We will be using the Photoshop Pen tool for this tutorial. The Photoshop Pen tool allows you to select any object in the image professionally. You can also use the Photoshop masking tool to make the image selection process more accurate.
For complex edges like fabric folds, soft collars, or fine garment details, our complete guide on image masking in Photoshop explains advanced non-destructive techniques in detail.
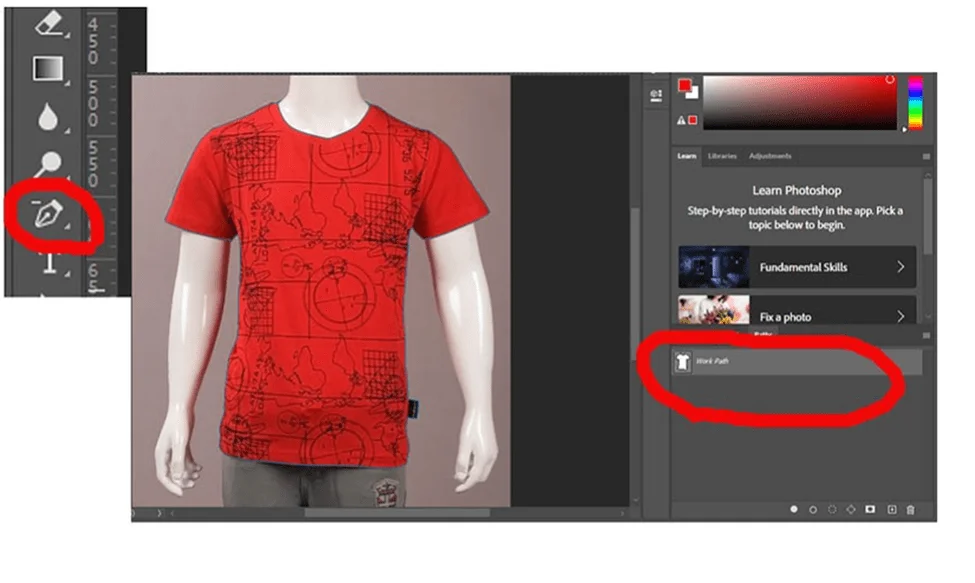
Using the Photoshop Pen tool, we will carefully draw a path around the t-shirt. Remember, we will not select any portion of the dummy. So, zoom in on the photo to get the pixel scale view and draw the path around the edges. Hold the pen tool and drag it to create a curved path around the curved areas of the t-shirt.

Then press Ctrl+Enter to clip the selected area. You can also make a selection by right-clicking the mouse and selecting the “Make a selection” option.

Press Ctrl+J to take the selected portion to a new layer with a transparent background.
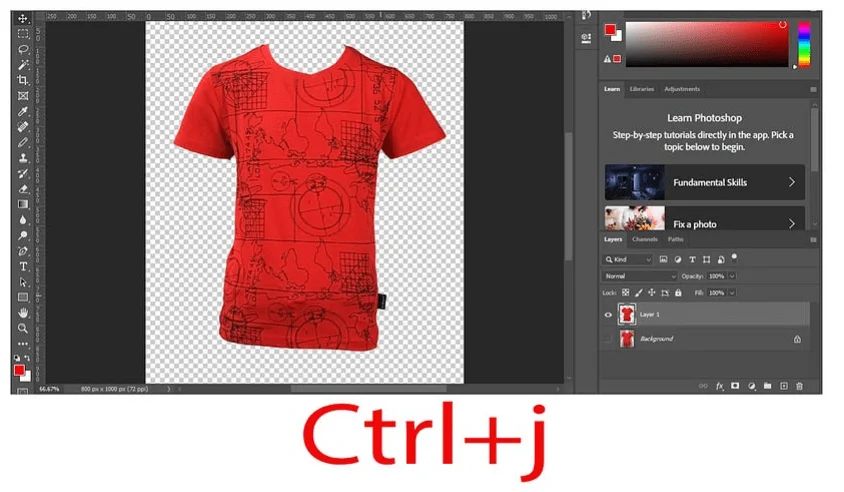
Then, create a new layer and set the foreground and background color to white. Press Alt + Backspace to fill the layer with pure white, placing the subject on a clean background.
If you need a detailed walkthrough on creating a professional pure white background for ecommerce product images, you can explore our step-by-step guide on how to make a white background in Photoshop.

How to Create the Ghost Mannequin Effect in Photoshop
So, we have removed the dummy part from the front of the t-shirt. Now, we must add the backside image with the front-side image to transform it into a ghost mannequin photo.
Step: 01
First, we must apply scaling and liquify the image to make it look consistent. Press Ctrl+R to get the scale in Photoshop. Then select the transparent background layer and drag the ruler to a suitable place to create fisheye distortion. Using these four rulers, you can fasten the top, right, left, and bottom of the image to set a bar for the scale.

Step: 02
Now, click the filter from the top options bar and select Liquify from the dropdown. Carefully wrap the distorted part to make it look consistent.

Step: 03
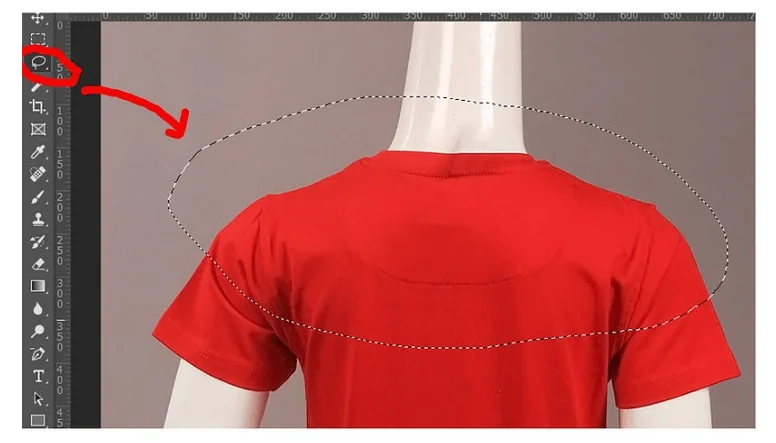
Now, we have to work on the backside portion of the t-shirt. Select the backside portion; to be precise, we need the neck portion. As we removed the mannequin from the front, the neck part of the t-shirt became incomplete. We will use the Lasso tool to select this portion from the back side image.
Step: 04
We will copy this portion by pressing Ctrl+C and paste it on the front side image by Ctrl+V. Drag this new backside layer behind the frontside layer. Then, carefully adjust this layer to fill the neck part of the t-shirt. Using the erase tool, you can remove the leftover area of the back side layer.

Step: 05
We are almost done. Now, we will add a drop shadow in the interior portion of the garment. To do this, we will create a new layer between the font side layer and the back side layer.
Choose the brush tool from the toolbar and adjust its size. Then, set the foreground to a lighter shade of black and simply darken the inner areas on the neck, sleeve, and bottom parts of the t-shirt.

Can AI Remove Mannequin from Photos?
Yes, AI tools can remove mannequins from photos automatically. Several AI-powered image editing tools use background removal and object detection technology to isolate clothing from mannequins.
However, AI is not always accurate for complex garments. Items with detailed collars, inner neck areas, folds, transparent fabrics, or overlapping parts often require precise manual editing. In such cases, AI may leave rough edges or unnatural shadows.
Manual Photoshop editing provides better control and higher-quality results, especially for ecommerce product images where accuracy matters. A hybrid workflow is often the best solution. AI can handle the basic mannequin removal, while professional editors refine the details, adjust shadows, and perfect the ghost mannequin effect.
While many users search for simple mannequin removal, professional ghost mannequin editing requires merging multiple images to reconstruct the garment realistically.
Why Ghost Mannequin Editing Is Important for Ecommerce
Ghost mannequin editing plays a crucial role in ecommerce product photography. It allows online stores to present clothing items in a clean, distraction-free, and professional way. By removing the mannequin and creating a 3D invisible mannequin effect, customers can clearly see the natural shape, fit, and inner structure of the garment.
Unlike flat lay photography, ghost mannequin images provide depth and dimension, helping shoppers visualize how the apparel would look when worn. This improves customer confidence, reduces return rates, and increases conversion rates.
Although ghost mannequin editing is often considered a form of background removal, it serves a very different purpose in apparel photography.
| Feature | Ghost Mannequin | Background Removal |
|---|---|---|
| Purpose | Apparel display | General product editing |
| 3D effect | Yes | No |
| Backside merge | Required | Not required |
| Ecommerce use | Apparel & fashion brands | All product types |
While standard background removal simply isolates a product, ghost mannequin editing reconstructs the garment by combining front and back images to create a realistic 3D presentation. This makes it especially valuable for fashion ecommerce brands that need consistent and professional apparel visuals.
For bulk apparel editing, many ecommerce brands rely on professional ghost mannequin services.
This ensures consistent, high-quality results across all product images while maintaining a strong and professional brand appearance.
Final Thoughts
Removing a mannequin from a photo is more than just a basic editing task. To create a realistic ghost mannequin effect, you need precision, proper image alignment, and natural shadow adjustments. When done correctly, this technique enhances product presentation and gives apparel photos a clean, professional 3D appearance.
If you regularly work with clothing images, mastering how to remove mannequin from photo in Photoshop can significantly improve your ecommerce visuals. However, for bulk editing or complex garments, working with experienced professionals ensures consistent, high-quality results and saves valuable time.
If you need fast and consistent results for bulk apparel images, professional ghost mannequin editing services can help streamline your workflow.
In Summary
To remove mannequin from photo in Photoshop, isolate the garment, merge backside details, refine alignment, and add realistic shadows to create a professional ghost mannequin effect.
FAQ | How to Remove Mannequin from a Photo
You can remove a mannequin from clothing photos in Photoshop by carefully selecting the garment, separating it from the mannequin, and combining front and back images. Tools like the Pen Tool, Lasso Tool, and Layer Mask help achieve precise results.
The ghost mannequin effect is a photo editing technique where the mannequin is removed from clothing images to create a 3D, invisible mannequin look. It helps ecommerce businesses showcase apparel professionally.
Ghost mannequin editing usually costs between $0.50 to $1.00 per image, depending on complexity. Pricing may vary based on neck joint work, shadow creation, and bulk quantity.
Creating a ghost mannequin image typically takes 10–30 minutes, depending on garment complexity. Simple items require less time, while detailed clothing with collars or layers may take longer for precise editing.
Yes, you can remove a mannequin without a back image, but the result may look flat or incomplete. Without the backside fabric details, recreating the inner neck and structure becomes difficult, reducing realism in ghost mannequin editing.
Ghost mannequin is generally better for apparel ecommerce because it creates a realistic 3D worn effect that shows garment shape and structure. Flat lay works for simple displays, but lacks depth and professional presentation quality.