
To smooth skin in Photoshop, remove blemishes using the Healing Brush Tool, then apply non-destructive techniques like High Pass filtering, Camera Raw adjustments, or Dodge and Burn to soften skin while preserving natural texture.
Smoothing skin is a common portrait retouching technique used by photographers and designers. The key is reducing imperfections without over-blurring or destroying skin texture.
In this step-by-step guide, you’ll learn professional skin smoothing methods that keep pores visible and make portraits look natural, not artificial. This guide covers both beginner-friendly and professional skin retouching methods.
Quick Answer: How to Smooth Skin in Photoshop
To smooth skin in Photoshop without losing texture, first remove blemishes using the Healing Brush Tool. Then apply non-destructive techniques like High Pass filtering, Dodge and Burn, or frequency separation. Always use layer masks to apply smoothing selectively and preserve natural skin texture.
How to Smooth Skin in Photoshop (Step-by-Step Methods)
There are several professional techniques to smooth skin in Photoshop while keeping natural texture intact. Below are the most effective methods used in portrait retouching:
- Healing Brush Tool
- High Pass Technique
- Camera Raw Filter
- Frequency Separation (Advanced Method)
- Dodge & Burn
Method 1 – Remove Blemishes Using Healing Brush
The first step to smooth skin in Photoshop is removing temporary blemishes using the Healing Brush Tool. This method targets acne, dark spots, and small imperfections without affecting natural skin texture.
Select the Healing Brush Tool from the toolbar, hold the Alt/Option key to sample clean skin, and gently paint over blemishes. Work in small areas and zoom in for better accuracy. This ensures the skin remains realistic while eliminating distractions.
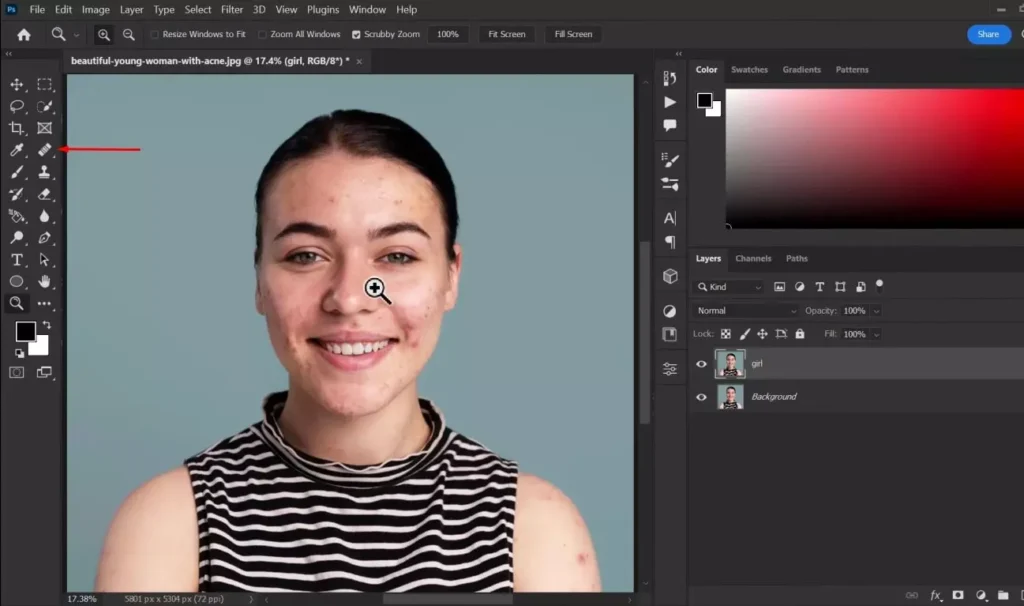
Step 1: Create a Layer
First, duplicate the Background layer by pressing Ctrl + J (Cmd + J on Mac). Rename the new layer to something descriptive, such as Skin Retouch, to keep your workflow organized.


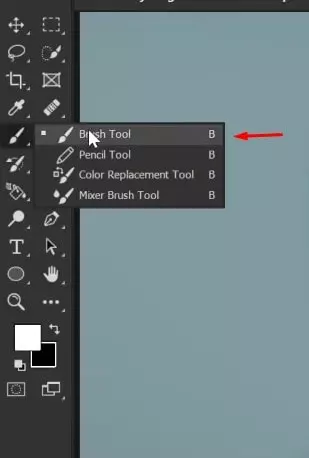
Step 2: Add Brushing Tools
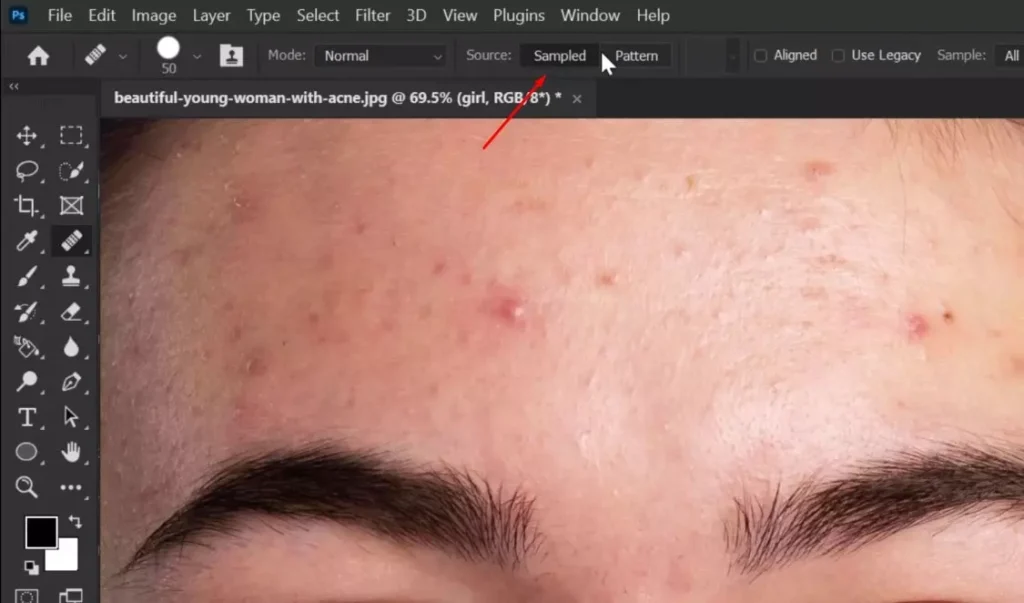
To remove dark spots from the portrait, select the Healing Brush Tool from the toolbar. This tool allows you to blend imperfections with nearby skin for a natural result.

Step 3: Remove Blemishes
Hold the Alt key (Option on Mac) and click on a clean area of skin to take a sample. Then gently paint over blemishes to remove spots and imperfections while maintaining natural skin texture.
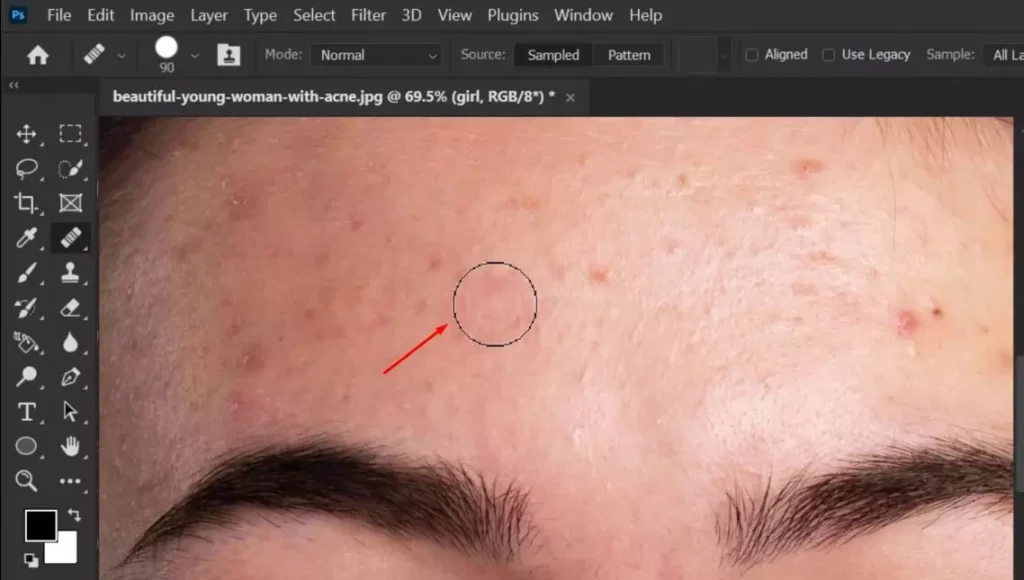
This method helps remove temporary blemishes without affecting skin texture. For a complete step-by-step guide on removing acne, pimples, and dark spots, see our How to Remove Blemishes from Photos tutorial.
Method 2 – High Pass Skin Smoothing Technique
The High Pass technique is a popular professional method for smoothing skin in Photoshop while preserving natural texture. Unlike simple blur effects, this method softens skin without removing important details like pores and fine lines.
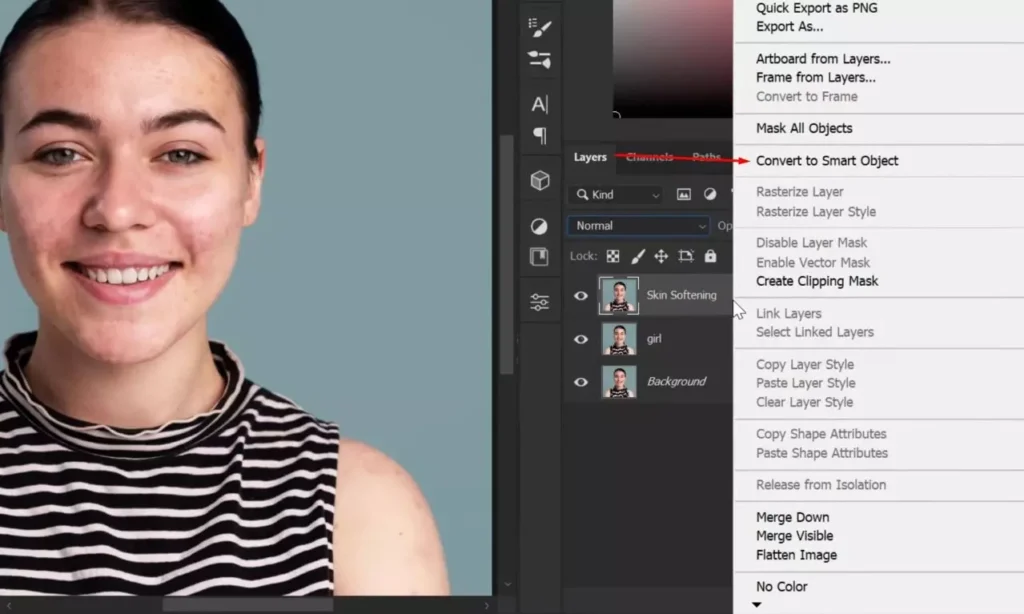
Step 4: Duplicate the Layer Again
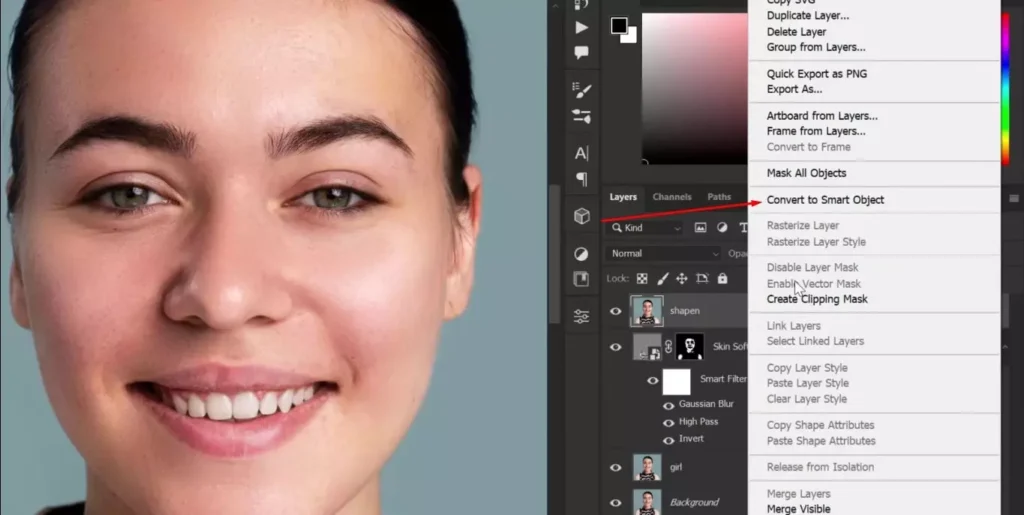
Duplicate the previously edited layer and rename it if needed. Then right-click on the layer and choose Convert to Smart Object to ensure a non-destructive workflow. After converting it, change the blending mode from Normal to Vivid Light. This prepares the layer for the High Pass skin smoothing process.


Step 5: Change Image Adjustment & Filter
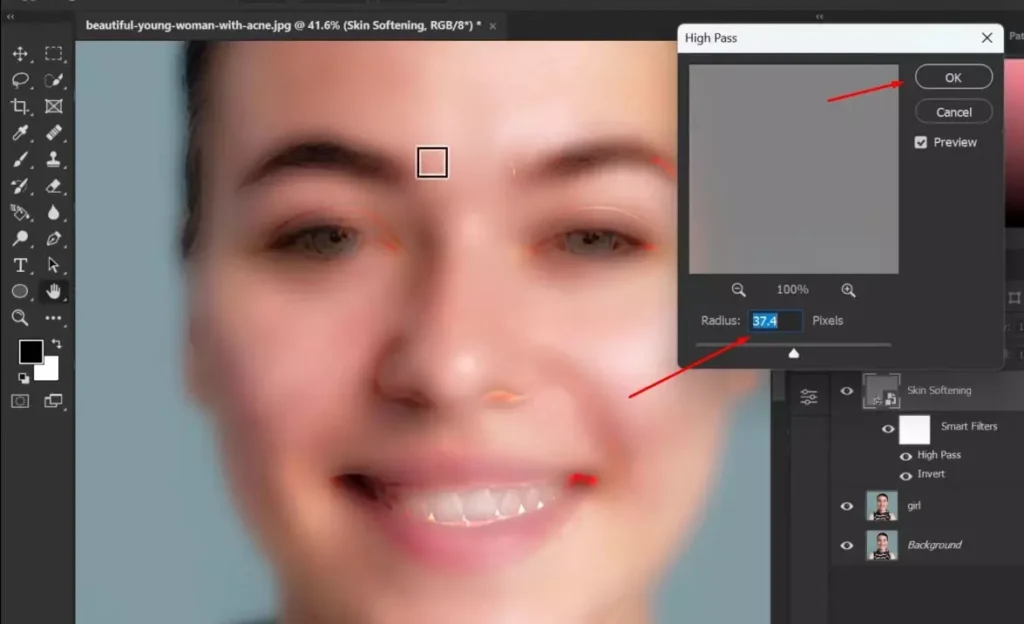
Next, go to Image > Adjustments > Invert or press Ctrl + I (Cmd + I on Mac) to invert the layer.
Then navigate to Filter > Other > High Pass. Increase the Radius gradually until the blemishes blend smoothly while the skin texture remains visible. Once satisfied, click OK.


Step 6: Add Gaussian Blur
Next, go to Filter > Blur > Gaussian Blur. Gradually increase the Radius value until the skin appears smoother but still retains natural texture. Once satisfied with the result, click OK.

Step 7: Create and Invert Layer Mask
After applying the blur effect, add a Layer Mask to the skin-softening layer. Then press Ctrl + I (Cmd + I on Mac) to invert the mask. This hides the smoothing effect completely, allowing you to apply it only to selected areas of the skin using a brush.

Select the Brush Tool, set the Opacity and Flow to 100%, and make sure the foreground color is white. Adjust the brush size as needed, then gently paint over the areas of the skin where you want to apply the smoothing effect.
Focus on dark spots and uneven areas, but avoid overpainting to preserve natural skin texture.

Method 3 – Camera Raw Skin Softening
The Camera Raw Filter is a powerful, non-destructive method for smoothing skin in Photoshop. Instead of manually painting, you can adjust Texture, Clarity, and Noise Reduction to achieve balanced skin softening while preserving realistic pores and fine details.
Step 8: Create a Stamp Visible Layer
To create a combined layer of all visible edits, press Ctrl + Alt + Shift + E (Cmd + Option + Shift + E on Mac). This will generate a new Stamp Visible layer at the top of your layer panel.
Next, right-click on the new layer and choose Convert to Smart Object to maintain a non-destructive workflow before applying Camera Raw adjustments.
Step 9: Adjust Texture & Clarity in Camera Raw
Go to Filter > Camera Raw Filter. In the Basic panel, increase the Texture slider slightly to enhance fine details, then reduce the Clarity slider to soften the skin gently. Adjust these sliders carefully to maintain natural skin texture while reducing harshness.


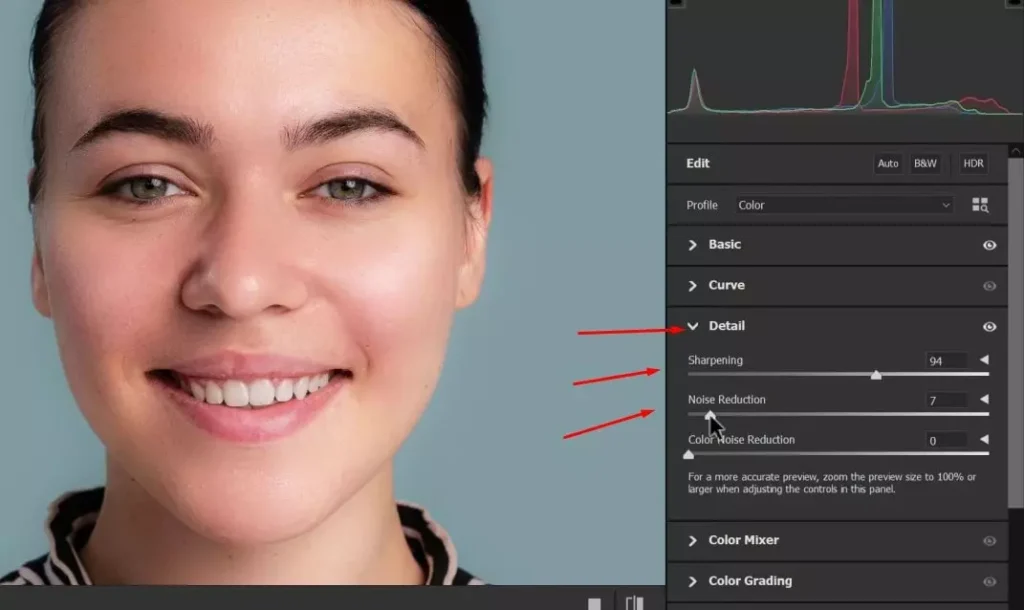
Step 10: Fine-Tune Sharpening & Noise Reduction
In the Detail panel, adjust the Sharpening, Luminance Noise Reduction, and Color Noise Reduction sliders to refine the skin. Reduce sharpening slightly to avoid emphasizing pores, and apply noise reduction carefully to smooth uneven areas while preserving natural texture.
Method 4 – Frequency Separation (Advanced Method)
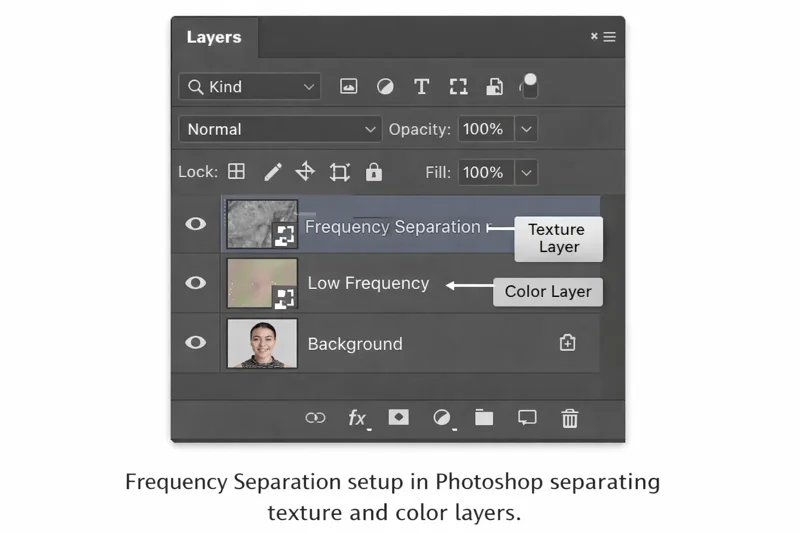
Frequency separation is an advanced skin retouching technique that separates skin texture and color into two separate layers. This allows you to smooth uneven tones without affecting natural skin detail, making it ideal for high-end beauty and portrait retouching.
Unlike simple blur methods, frequency separation gives you precise control over texture and color correction. It is commonly used by professional retouchers when working on commercial, fashion, or magazine-quality images.
This technique is widely used in beauty, fashion, and commercial photography retouching.
Method 5 – Dodge and Burn for Even Skin Tone
Dodge and Burn is a professional retouching technique used to balance light and shadow on the skin. This technique is also useful when correcting under-eye shadows. For detailed instructions, see our How to Remove Eye Bags, Dark Circles, and Wrinkles in Photoshop guide. Instead of blurring texture, this method corrects uneven tones by brightening dark areas and subtly darkening overly bright areas.
Step 11: Create a Curves Adjustment Layer (Brighten)
If one side of the face appears darker than the other, create a Curves Adjustment Layer. Click on the center of the curve line and drag it slightly upward to brighten the image. This layer will be used for dodging (brightening) the darker areas of the skin.


Step 12: Invert the Layer Mask & Paint
Select the Layer Mask of the Curves adjustment layer and press Ctrl + I (Cmd + I on Mac) to invert it. This will hide the brightening effect. Then choose the Brush Tool, set a soft round brush with low opacity (around 5–10%), and gently paint over the darker areas of the skin to brighten them gradually.


Step 13: Create a Second Curves Layer (Darken)
Create another Curves Adjustment Layer, but this time drag the center point of the curve slightly downward to darken the image. Invert the layer mask (Ctrl + I / Cmd + I) and use a soft brush with low opacity to gently paint over areas that appear too bright. This will help balance the overall skin tone.

Step 14: Adjust Feather in Properties Panel
Open the Properties panel (Window > Properties) and make sure the Layer Mask is selected. Increase the Feather value slightly to soften the edges of the adjustment. This will help blend the dodge and burn effect more naturally into the skin, creating a smooth and balanced result.


Final Touch – Enhance Lips & Blend Naturally
This final step enhances lip color and refines the overall blending for a polished portrait. Subtle adjustments ensure the retouch looks natural and professional.
Step 15: Create a Solid Color Adjustment Layer
Create a Solid Color Adjustment Layer and choose a soft red tone. Click OK, then change the Blending Mode to Multiply. Reduce the layer Opacity to achieve a natural look. Next, invert the Layer Mask (Ctrl + I / Cmd + I) so the color effect is hidden.


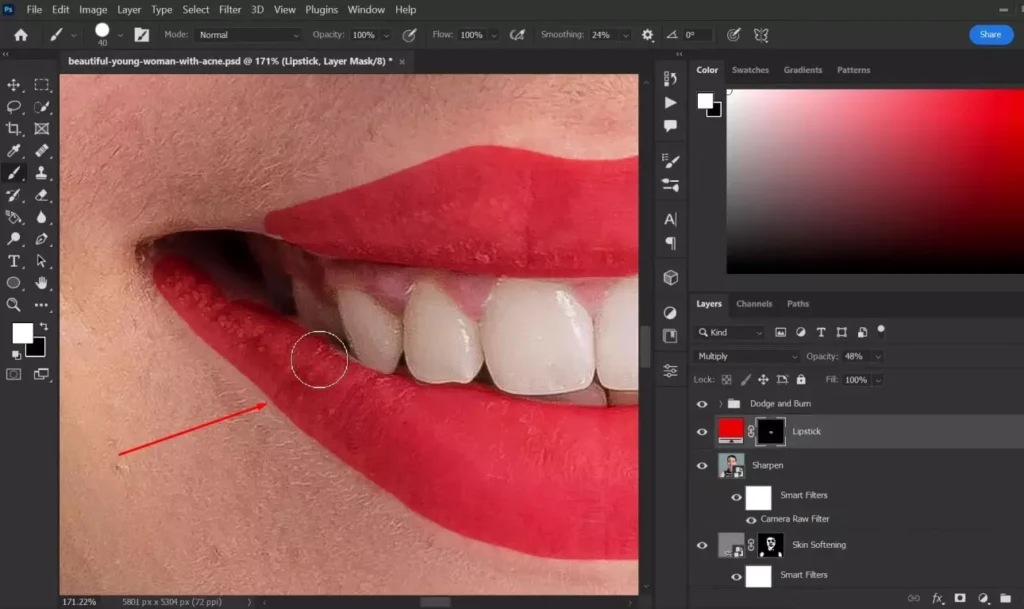
Step 16: Paint Over Lips with Brush Tool
Select the Brush Tool and choose a soft round brush. Adjust the brush size to match the lips and keep the opacity between 20–40% for better control. Carefully paint over the lips to reveal the color effect gradually, building up the intensity in light strokes for a natural finish.

Step 17: Refine Using Blending Options
Set the layer Opacity back to 100%, then double-click the layer to open the Layer Style panel.
Under Blending Options, adjust the Blend If sliders. Hold the Alt key (Option on Mac) and drag the white slider to split it for smoother transitions. Repeat the same for the underlying layer if needed, then click OK.
This helps blend the color naturally with the skin tones and prevents harsh edges.


Skin Smoothing Methods Comparison
Choosing the right skin smoothing method depends on your experience level and the desired result. The table below compares the most effective techniques used in Photoshop retouching.
| Method | Difficulty | Best For | Texture Control |
|---|---|---|---|
| Healing Brush Tool | Easy | Removing blemishes | High |
| High Pass Technique | Medium | Skin softening | Medium–High |
| Camera Raw Filter | Easy | Quick adjustments | Medium |
| Frequency Separation | Advanced | High-end retouching | Very High |
| Dodge & Burn | Advanced | Pro skin retouch | Very High |
The right skin smoothing method depends on your project and skill level. For quick edits, simpler tools like Healing Brush or Camera Raw work well. For professional portrait retouching, advanced techniques such as Frequency Separation or Dodge and Burn offer greater control and more natural results.
Commercial retouchers use advanced skin refinement techniques that influence overall retouching service cost per image.
Common Mistakes When Smoothing Skin in Photoshop
Even experienced editors can make mistakes when retouching skin. Avoid the following common errors to maintain a natural and professional look:
- Over-blurring the skin
- Removing natural skin texture
- Ignoring color correction
- Using excessive Clarity or Texture reduction
- Not working non-destructively
- Applying smoothing to the entire face evenly
- Using a hard brush instead of a soft brush
- Over-sharpening after smoothing
- Failing to zoom in and check details
- Creating an unnatural, plastic look
The goal of skin retouching is enhancement, not over-processing.
When to Outsource Skin Retouching?
Photographers and agencies often outsource high-end skin retouching to save time and ensure consistent, professional results. Advanced techniques like Dodge and Burn or frequency separation can be time-consuming, especially for large batches of images. For a complete professional workflow, see our How to Do Headshot Retouching in Photoshop tutorial.
Outsourcing allows creatives to focus on shooting and client work while experienced retouchers handle detailed skin corrections efficiently. If you need consistent, high-end skin retouching for professional projects, explore our professional photo retouching service for studio-quality results.
Final Result: How to Smooth Skin in Photoshop
Here is the final result of smoothing skin in Photoshop. As you can see, the skin appears softer and more even while maintaining natural texture and realistic details.
By following these professional techniques, you can enhance portraits without creating an artificial or over-processed look. Practice these methods to refine your retouching skills and achieve consistently polished results.

Frequently Asked Questions (FAQs)
To smooth skin without losing texture, use non-destructive methods like High Pass, Dodge and Burn, or frequency separation instead of heavy blur. Apply smoothing selectively with layer masks to preserve natural pores and fine details.
Frequency separation is a retouching technique that separates skin texture and color into two layers. This allows you to smooth uneven tones without affecting natural skin detail, making it ideal for professional portrait retouching.
The Blur Tool can soften skin slightly, but it often removes important texture and detail. For natural-looking results, professional techniques like Dodge and Burn or High Pass filtering are more effective.
Professionals retouch skin using non-destructive workflows, including Healing Brush for blemishes, Dodge and Burn for tone balancing, and frequency separation for advanced corrections. The goal is to enhance skin naturally without over-smoothing.
The best skin smoothing method depends on your goal. For quick edits, Camera Raw adjustments work well. For high-end retouching, Dodge and Burn or frequency separation provide the most natural and professional results.