‘How to Vectorize an Image in Photoshop’. Really? Yes, it is. If you are a Photoshop user but do not know how to use Adobe Illustrator, this tutorial is for you. Amazingly, you can convert a Raster image into a Vector, and the look is quite satisfying.
Inserting multiple colors in a Vector image is a little more difficult than a single-colored subject. So, we will go with that some other time. But here, we are discussing converting a raster image into a Vector in Photoshop. This will be easy and interesting. So, without any further ado, let’s begin.
What is a Vector in Photoshop?
In the amazing world of graphic editing, a Vector is an artwork created by lines and colors. And this kind of artwork does not contain any pixels. So, no matter how big or small you make the image, it never loses details. Vector artworks are important for industrial production purposes.
Also, for advertisements where you need to use huge images as a presentation, Vector is the option. However, this is a creative work that is better in Adobe Illustrator. But we will vectorize in Photoshop during the conversion of a Raster image. The result may not be as good as Illustrator, but good enough for Photoshop.
How to Convert Raster to Vector in Photoshop (Step-by-Step)
The conversion of Raster to Vector is very simple but technical. So, you need to follow every step properly and not miss one. Otherwise, the result may not be satisfactory or not even close to the targeted graphics. For the time being, we will go with complex vectorization processes.
Step 1: Choosing A High-Resolution Image

The image resolution is one of the most important things for Vector conversion. The image resolution should be 300 DPI, and for best results, the height should be at least 2000 pixels
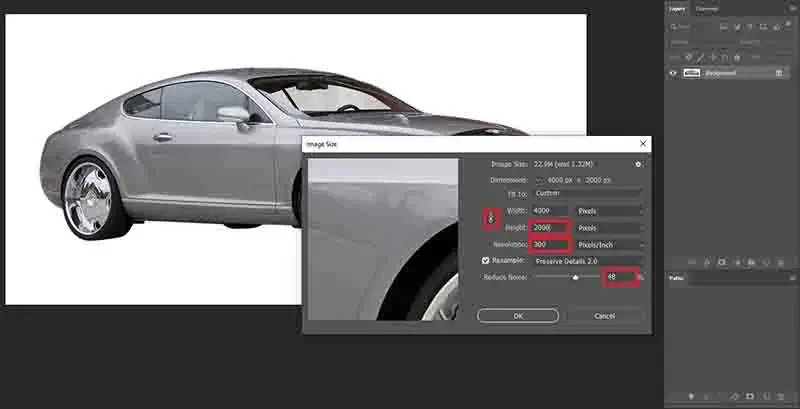
As I am using an image with low resolution, it needs to be increased. So, go to Image>Image size and make the changes as below. From Photoshop CC2019 or higher versions, you can have an additional option for better increase. Press OK to continue.
Step 2: Isolating The Subject
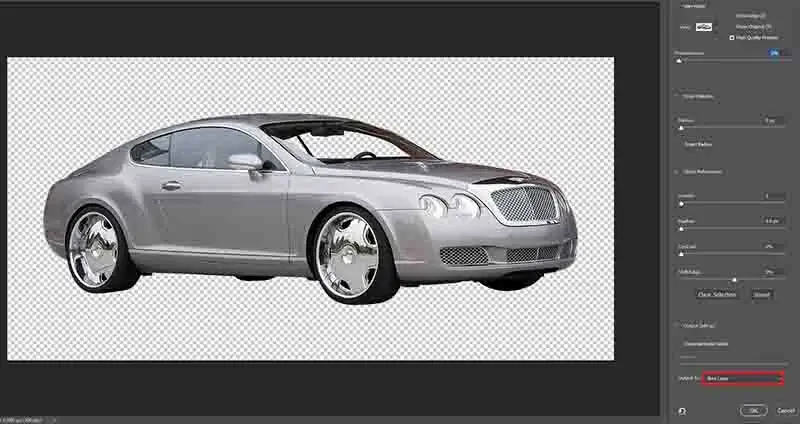
The subject needs to be separated from the background for further operation. You can use any selection tool that suits the subject. The pen tool is the best option for the subject with hard edges. You can make a precise selection. For the image, I am using the ‘Select & Mask’ option for convenience. Choose the output option ‘New Layer’ and press OK to continue.
Step 3: Oil Paint Filter
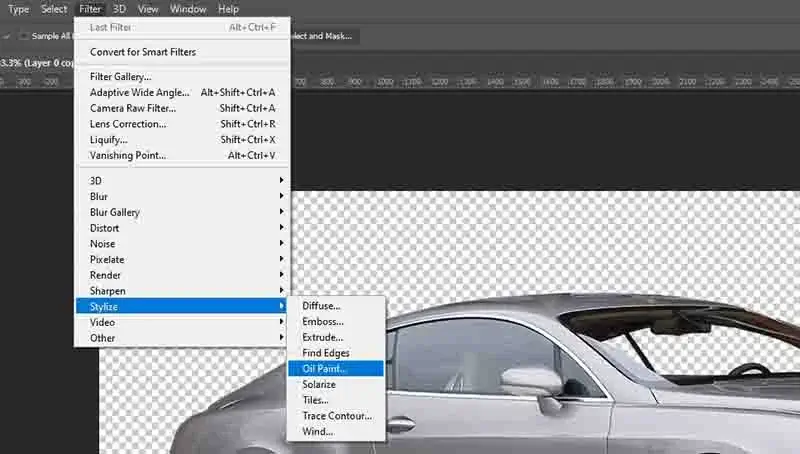
Now we have the subject in a new layer. And, we will add ‘Oil Paint Filter’ on that. You can have the option in Filter>Stylize>Oil Paint or in some Photoshop versions, Filter>Oil Paint.
Step 4: Set Values for Oil Paint Filter
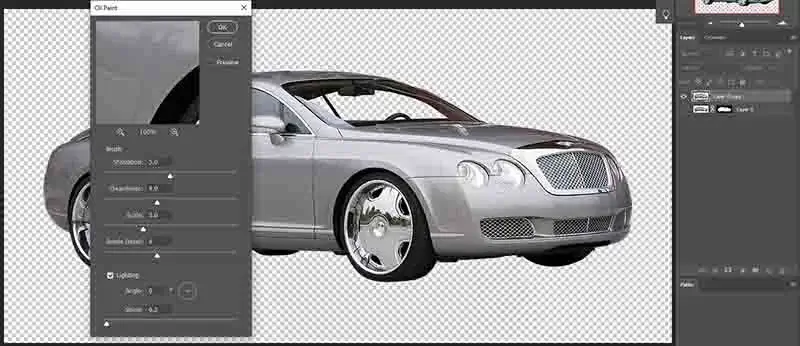
Enter the Oil Paint filter and set values as below. All the options control individual changes to the subject. Here, the shine value is the unit that controls the oil detail. You can follow the values as mentioned, or you can use Photoshop Action to do that.
Step 5: Desaturate the Image
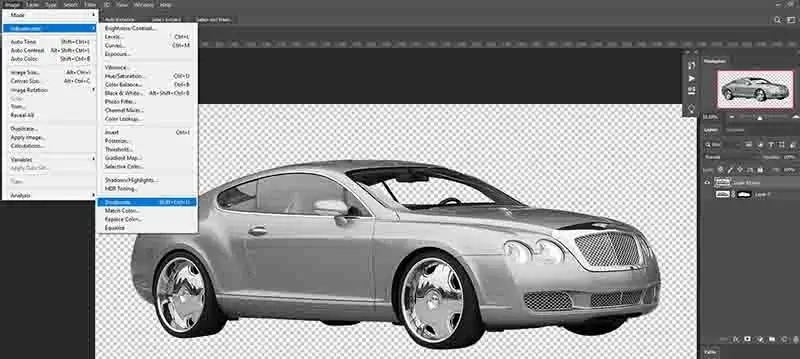
For this purpose, you need to take away the colors of the subject. So, go to Image>Adjustments>Desaturate. Or you can use Ctrl/Command+Shift+U for Win or MAC. Both procedures do the same.
Step 6: Levels And Posterizing
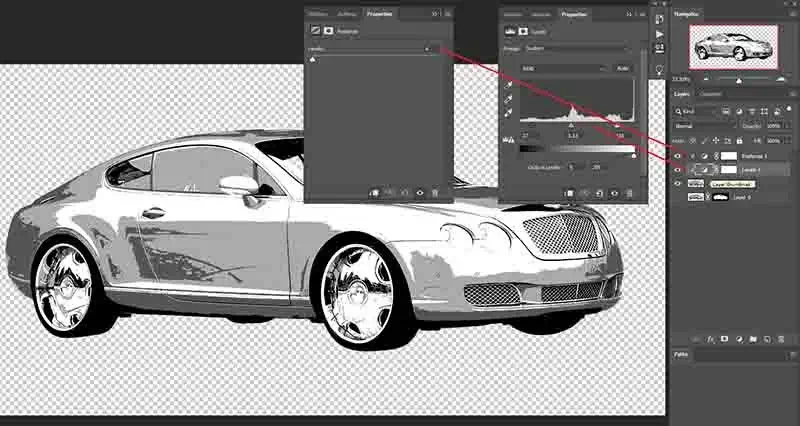
After desaturating the subject, it is time to adjust Levels and Posterizing. The Levels adjustment layer is used to set the black and white percentage. Posterizing is to determine the black and white tones you want to use in the subject.
For example, if you input the value ‘2’, you will have black and white only. If it is ‘3’, you will have black, white, and grey. We use the value 4 and adjust the levels to add white to the subject. You can add both of them from the Adjustment layer option. Mask them both with the topmost layer. Change the layer name to ‘Base’.
Step 7: Oil Paint Filter Again
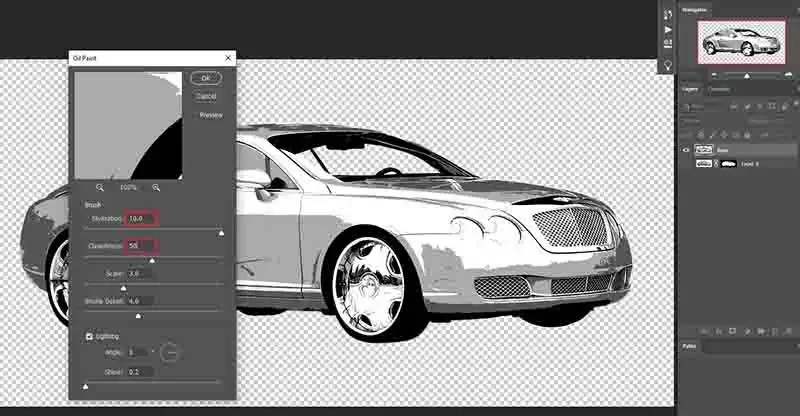
Before using the Oil Paint Filter again, you need to merge all layers. Select the Pestorize layer over the Base Layer by pressing the shift key. Right-click on the selection and choose Merge Layers. Then, apply the Oil Paint Filter again. This time, change the values as image below. Click OK to continue. Also, you can add this filter with the action that we mentioned before.
Step 8: Vectorizing Highlights
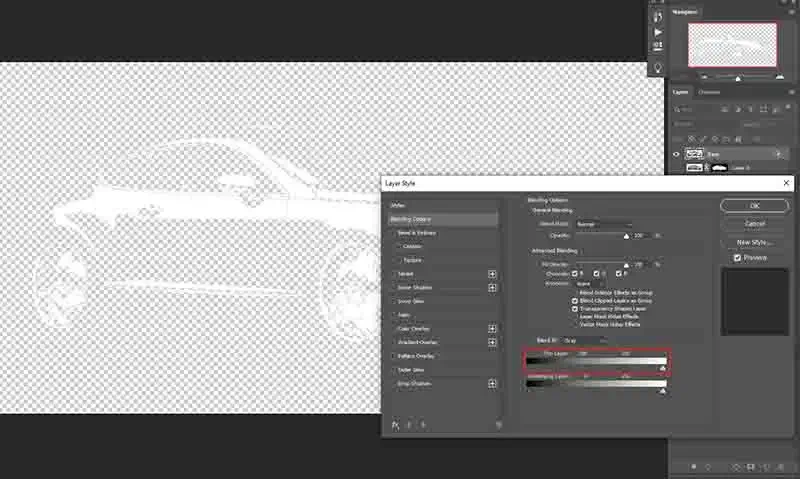
Double-click on the Base Layer and choose Blending Options. Move the slider of the black area to the right to hide all the dark areas. Click OK to continue.
Select the Base Layer and use Ctrl/Command+J for Windows or MAC to make a copy. Convert the copy to a smart object by right-clicking on the layer and selecting ‘Convert to Smart Object’. Press and hold Ctrl/Command for Windows or MAC and click on the thumbnail to make a selection.
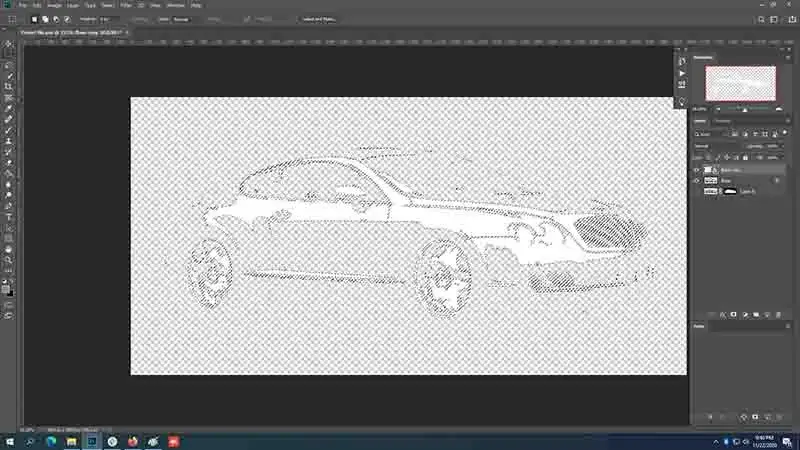
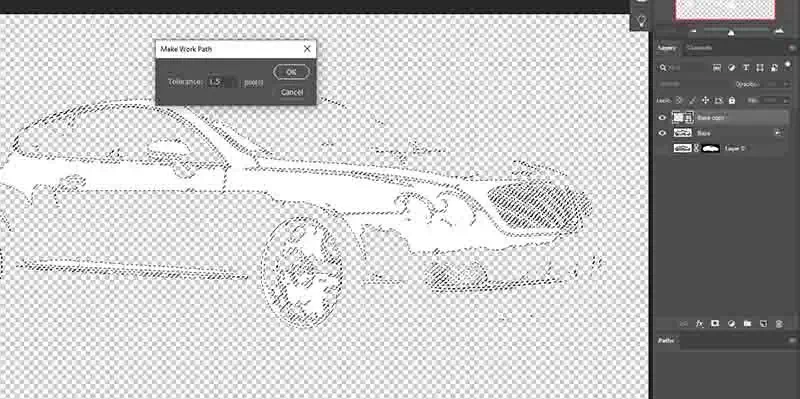
Choose any selection tool, right-click on the selection, and choose Make Work Path. Keep Tolerance to 1.5 and click OK to continue. And, you will have the path.
Add a solid color adjustment layer with the color white. Click OK to continue. And, you will have the highlights.
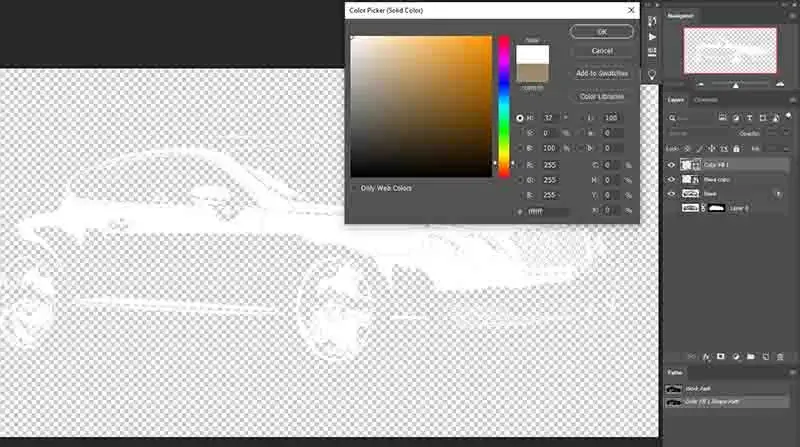
Change the name of the solid color layer ‘Highlights’ and delete the duplicate Base Layer. Hide the Highlights Layer and move on to the next steps.
Step 9: Midtone 1, Midtone 2, Shadow
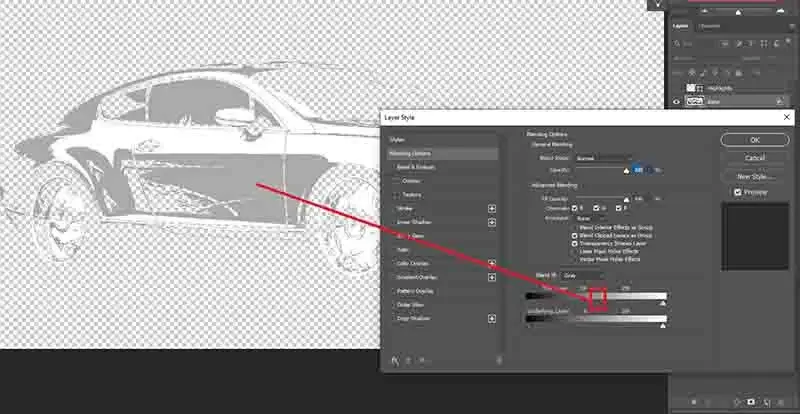
For this step, you need to repeat the same procedure as the above step. The only difference is that you need to move the slider of the blend every time you work on other tones.
Moving the slider to the left, you can have the Light Grey color that is Midtone 1. If you move more, you will see the Dark Grey color that is Midtone 2. And, at the end of the left, you have Black, which is Shadow.
And follow the steps below each time you work on individual tones.
- Blend it by double-clicking on the Base Layer.
- Copy the layer by pressing Ctrl/Command+J for Windows/MAC.
- Convert the copy into a smart object.
- Make a selection by pressing Ctrl/Command for Windows or MAC and clicking on the layer thumbnail.
- Create a clipping path by right-clicking on the selection and choosing ‘Make Work Path’. Tolerance 1.5.
- Fill the path with a solid color adjustment layer to create a Vector Layer. Choose different colors for each tone. For Shadow, select the black color.
- Delete the Base Layer copy.
- Hide the new Path Layer and show the Base Layer to move to the next Path Layer.
Or you can use an action to do the same. Just download the action from below and load this into your Photoshop Actions. Run each action of the action set at a time over the Base Layer. If you have already created the Highlights Layer, skip this action and start with Midtone 1.
Step 10: Making A Group | Vectorize an image in Photoshop
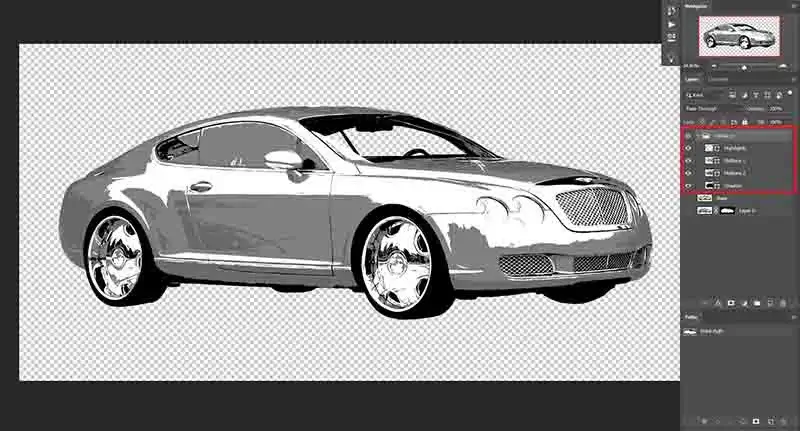
As we have 4 separate Vector layers, we can make a group with them. Unhide all the Vector layers and hide any other layers you have. To select layers, you can press and hold Ctrl/Command for Win/MAC and click each layer individually.
Also, you can select the top layer and hold the Shift key, then click on the fourth layer to select all. So, select the first Vector Layer to the fourth and use Ctrl/Command+G for Win/MAC. Or you can select them and click and drag them to the folder icon at the bottom of the Layers panel.
You can also right-click after selecting the layers and choose ‘Group from Layers’. All the procedures do the same. Now, you have a complete Vector group. You can stop right here or go further if you want to. So, we will take a few more steps.
Step 11: Changing the Color of a Vector Layer
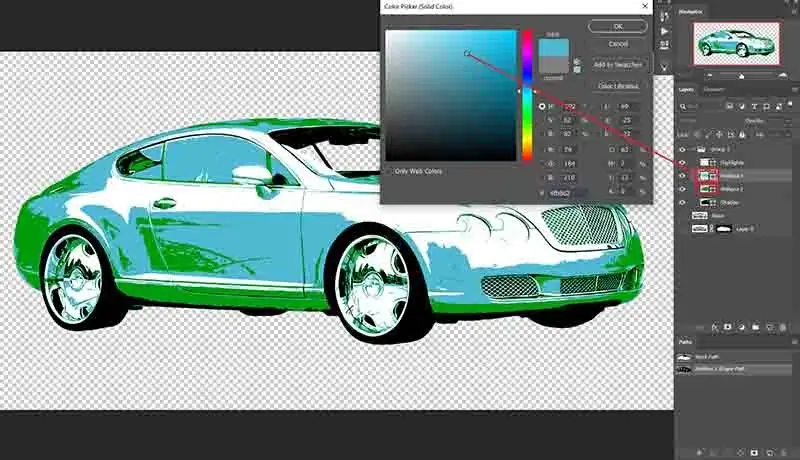
To change the color of a vector layer, you need to double-click on the small sign of the layer thumbnail. This will show the color panel. You can choose any color that you want to apply and hit OK to continue.
But it is better to leave the highlights and shadows as they are. So, you can change any other from the mid-tones.
Step 12: Specific Area Color Change
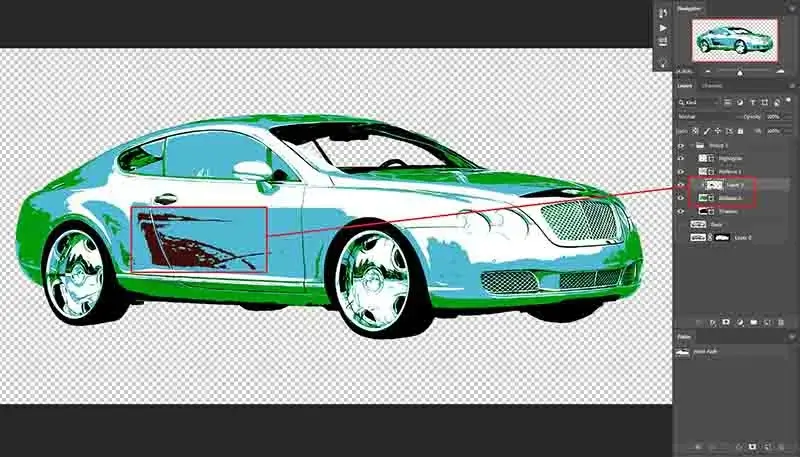
If you need to change the color of any specific area, choose the vector layer first. We are applying color to ‘Midtones 2’. See the image below. First, add a new layer above the Midtones 1 layer and add the Clipping Mask.
You can press and hold Alt/Option for Win/MAC and click between these layers. Or you can right-click on the blank layer and choose ‘Add Clipping Mask’.
Then, take the Brush tool and select a color you like. Brush on a specific area, and you will find the color is limited to the specific vector layer. For reference, we are using bright colors only. You can choose any color you want.
Step 13: Add Stroke | How to Vectorize an Image
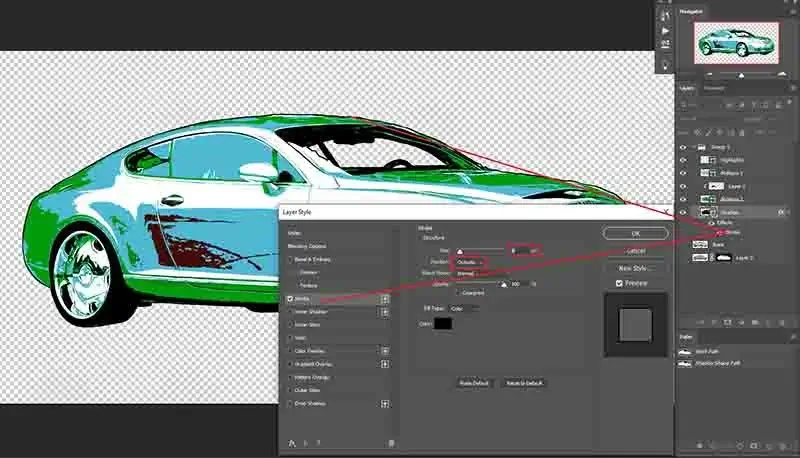
As we are done with the actual vectorization, it is time to add a stroke. Just double-click on the ‘Shadow’ layer and click on Stroke. Use Size 8 pixels and Position outside. Click OK to continue.
Now, the subject is ready with vector lines and color. Use the transform tool by Ctrl/Command+T for Windows/MAC. Now, resize the subject as you want and check if it is working or not. No worries, it will work beautifully if you follow every step properly. Finally, save the image in PSD format.
So, here is our image after vectorizing. No matter how big or small you make the artwork, it will never be pixelated. You can follow the steps and convert any image to a vector with an artistic look. If you use one color, the operation is less lengthy. And, if you use more colors, you can have an image with more details and art.
Conclusion | How to Vectorize an Image
Vectorizing images in Photoshop is an additional option. If you use a single color for vectorization, the process will be less complicated. But it works beautifully. Make sure to check the image after completing the editing. Otherwise, you may lack a step that could ruin your great effort. So, if you want to use Photoshop to create a vector format, follow the steps properly, and that’s it.

