
The foggy glass effect creates a stunning look in images, especially when applied to transparent glass. Unlike traditional image manipulation, this effect appears in front of the subject, making it more visually appealing.
Applying this effect in Photoshop is simple and works on most images. However, avoid using it randomly, as not all images need it. While InDesign offers a frosted glass effect, Photoshop provides built-in tools to achieve a similar look.
You can add this effect using Filter > Filter Gallery > Distort > Glass, but in this tutorial, we’ll take a different approach. Instead of built-in filters, we’ll use an image with foggy effects and water droplets. This method is easy, and effective, and gives your photos a unique and professional touch.
Editing Method: Foggy Glass Effect in Photoshop
- Open Your Image – Load the subject image in Photoshop.
- Add the Foggy Glass Effect – Place a foggy glass texture over the subject.
- Use Color Range for Selection – Use the Color Range tool to simplify the process.
- Apply a Mask – Refine the effect by adding a mask to the subject copy.
- Adjust the Blend Mode – Set it to Hard Light for a natural and seamless effect.
- Modify Opacity – Fine-tune the opacity to enhance blending.
- Enhance with Color Lookup – Add a Color Lookup adjustment layer for a dramatic touch.
Additional Tips
- Using Photoshop’s frost texture will create a different result.
- If you have a frosted glass Photoshop action, apply it to save time.
- You can also find free Photoshop effects online for more creative options.
By following these steps, you can create a stunning foggy glass effect with ease, enhancing your images with a professional touch.
The Process of Foggy Glass Effect
For editing, we will take two images. One is the subject, and the other one is with the foggy glass. We will open the subject image (below left) first then add the foggy glass (below right) image.
Step 1 – Blurring
Let’s open the program Adobe Photoshop and open the subject image in that. Make a copy of the image to add a blur in the image. Convert the image into a smart object so that you can edit them anytime you need to.
Go to Filter>Convert for smart filters or just right-click on the layer and select ‘Convert to smart object’. They both do the same. For this project, we will not use the regular ‘Gaussian Blur’.
The blur will not give the best result for this project. We will use the ‘Box Blur’ for a more realistic result. However, you can try other blur effects if you want for checking purposes. We will use the Box Blur Radius of 15 pixels for this image. Press ‘OK’ to apply changes.
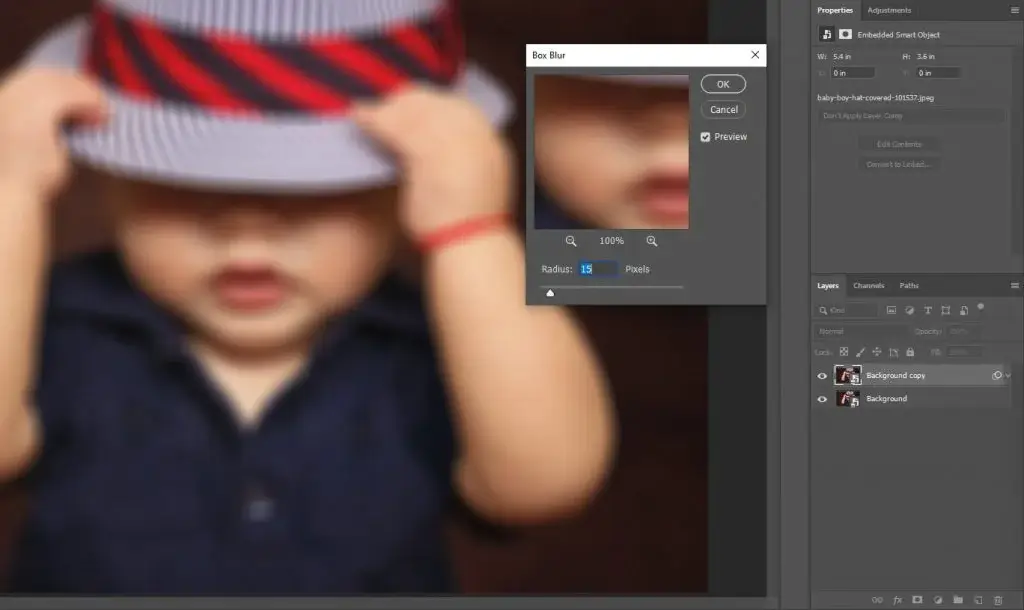
I am naming the Background Copy layer the ‘Box Blur’. Well, it doesn’t matter if you rename it or not, this is for a better understanding, nothing more. By the way, the frost effect in Photoshop by built-in options is limited in effect.
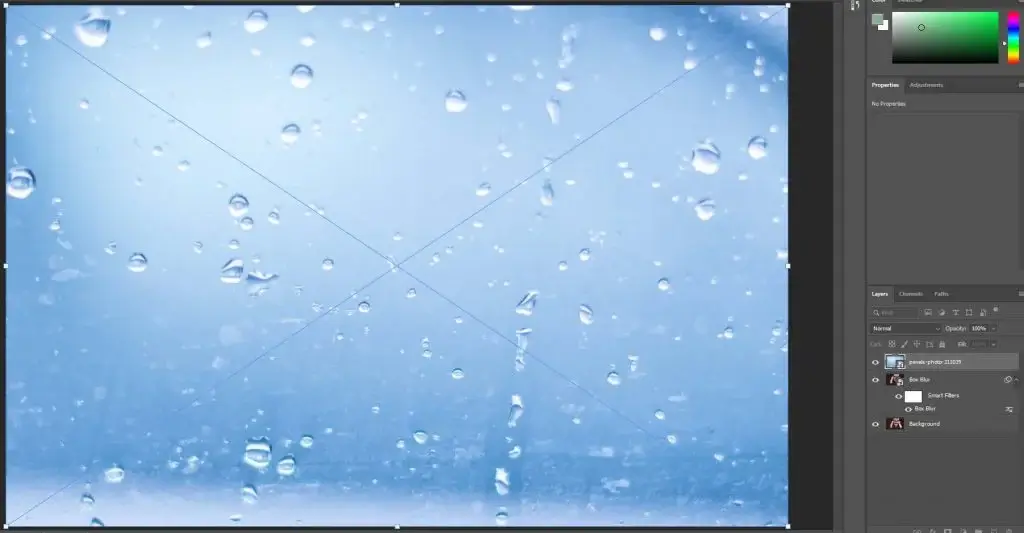
Step 2 – Foggy Image Addition
Drag and drop the foggy glass image over the project and resize it according to the subject. To resize, you need to use the corners of the image. If you are using Photoshop CC2018 or earlier versions, press and hold the shift key to maintain the aspect ratio. From Photoshop CC2019, you can directly resize it without holding a key. Press Enter for Win or Return for MAC to apply.
Step 3 – Making A Selection
Next, we will make a selection using the ‘Color Range’ on the foggy glass layer. Select the layer go to Select>Color Range and make some settings as below. Use the first eye-dropper tool to select the grey point. To identify the grey point, check out the blog “Automatic Photo Color Correction in Adobe Photoshop CS6”.
Then, select the ‘+ eye-dropper tool to select more of the areas. Try to select the areas that are not 100% transparent. Doing so you will have the foggy effect selected to apply to the blurred image.
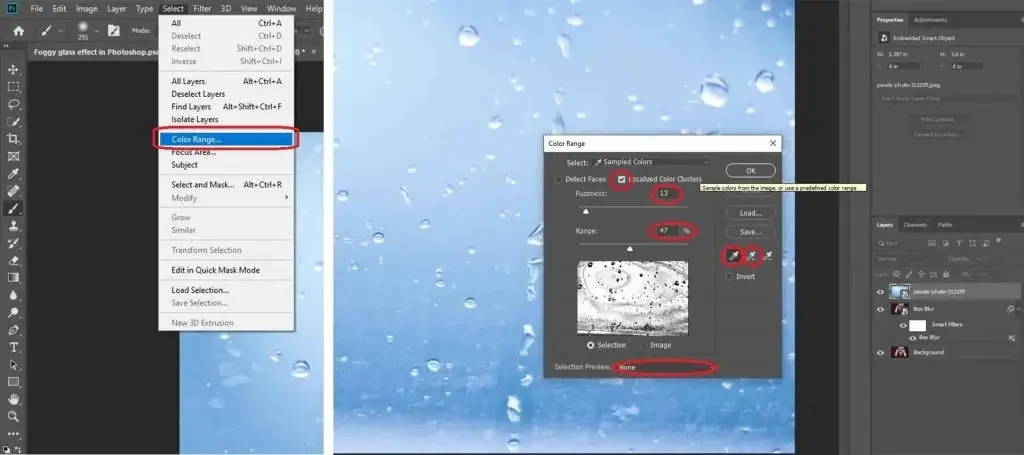
We have selected ‘Localized Color Clusters’ so that when you click on one color it will select the specific area only. The other portions of the same color will not get selected. Adjust the fuzziness for a better output so that you can select what you want. Press ‘OK’ when you have selected all the grey points.
Step 4 – Adding A Mask and Blend Mode Changing
Click the ‘Box Blur’ layer and click on the Mask button. You will see no change because the foggy glass layer is on top. Hide the glass layer and you will see the changes.
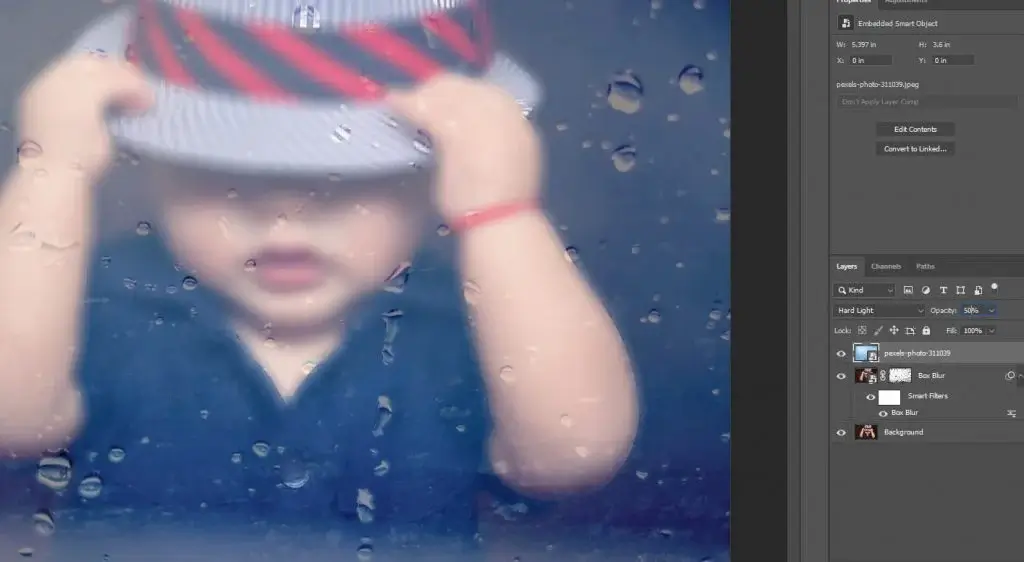
Select the foggy glass layer again and change the Blend Mode to ‘Hard Light’.
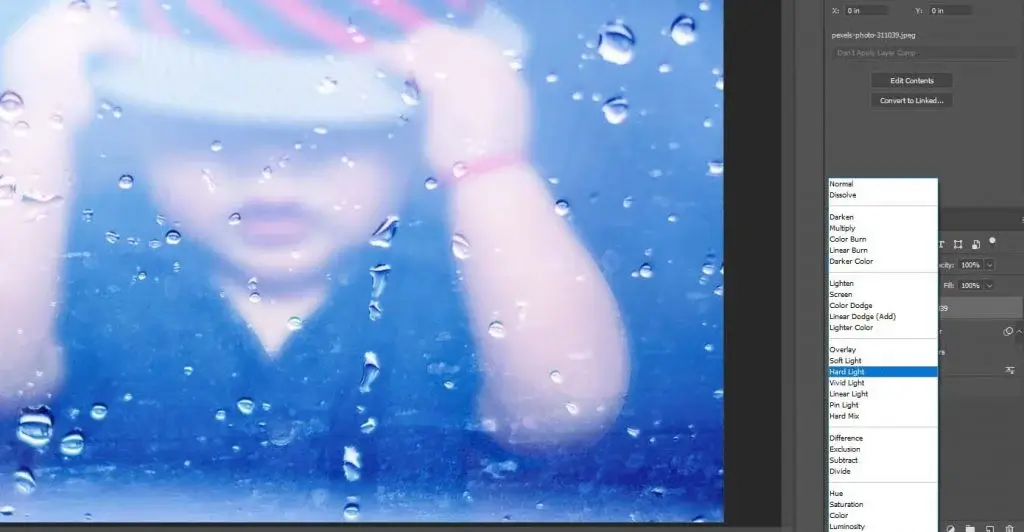
The view is too harsh. So, the opacity for this image should be decreased to 50%. Well, other images require opacity values may be different. You can keep it this way or you may want to change a bit.
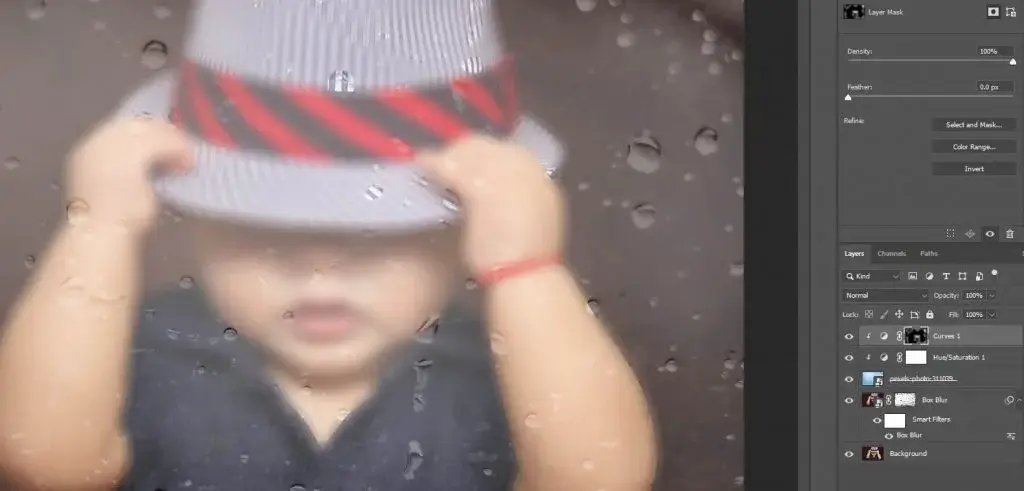
Step 5 – Hue/Saturation and Curves
To change the look, you can add a Hue/Saturation adjustment layer. Decrease the saturation to ‘- 100’ (No. 1 on the below image). Click on the Clipping Mask button (No. 2) so that the changes apply only to the foggy glass layer.
Add a Curves Adjustment layer and increase the brightness a little bit (No. 4). Again, click on the Clipping Mask Button (No. 5) to apply on the below layer only. Now, press Ctrl+I for Win or Command+I for MAC to invert the mask.

Select the mask, take the brush, set the foreground color white, and set the flow at 15%. Brush over some areas that you want to brighten. You can also darken any portion if you want. Just select the Curves Adjustment layer, darken the level, mask it, and brush over the areas. The process is pretty simple, isn’t it?
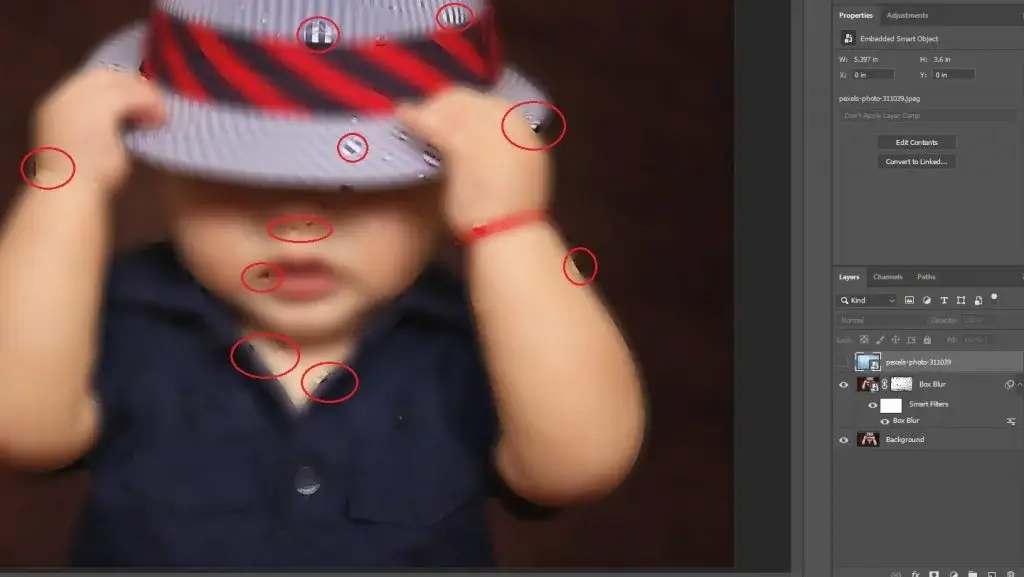
Step 6 – Sharpening Some Areas
The image processing is almost done. Also, you can make some areas of the subject more visible. To do so, copy the background layer, and place the layer below the foggy glass layer. Press Alt for Win or Option for MAC and click on the Mask button. You will have an inverted mask. Now, take the brush, foreground color white, set the flow at 5%, and brush on the areas that you want sharp.

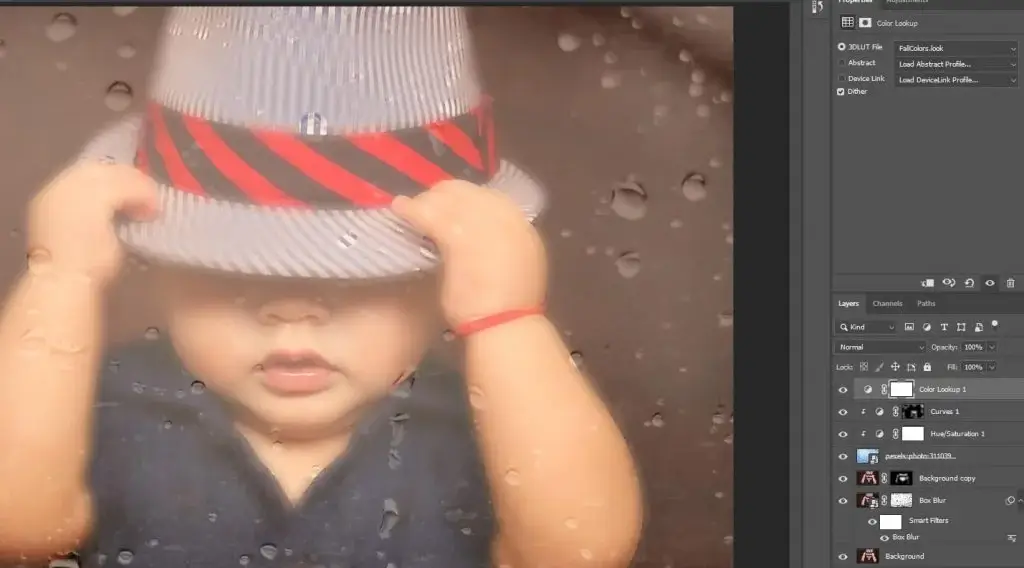
Additional Effect | Photoshop Foggy Glass Effect
The image already looks amazing. You can stop editing right here or you can add a Color Lookup layer from the New Adjustment layer button. For this image, I am using ‘Fall Colors’. You can try other color lookups and select anyone you want. Make sure the effect matches the subject and the environment. That’s it.
The Finishing
You can make a group of all the layers except for the background layer. You can also rename the group as you want. I am naming it the ‘Foggy Glass Effect’. Well, it does not create any value whether you name the group or not. Even, it is not important to make the group.
You can see the overall before and after of the whole project. Press Alt for Win or Option for MAC and click on the ‘eye’ of the Background layer. You will see the before. Same way clicks again, and you will see the after. The final output is as follows.
Conclusion
The foggy glass effect in Photoshop is quite amazing. You can play with the editing however you want. Your creativity and good sense will help you for a better output. The effect is not mandatory to add. But, if you want some of your images to look different behind a foggy filter, this is amazing.
You can also try frosted glass texture from Photoshop for a different effect. Well, not every image looks better with these kinds of effects, we have already mentioned that. Select the image that applies to editing. And, use your best editing technique.
Related Article-
FAQ | Foggy Glass Effect
How to Create a Frosted Glass Effect in Illustrator?
Adobe Illustrator is a design-based program. You can make beautiful designs with this one. The frosted glass effect in Illustrator is different from Photoshop. We are using raster images for the process. For Illustrator, you need to create a frosted glass to apply to the image.
How To Make Translucent Glass in Photoshop?
To make a translucent glass in Photoshop, you need to use a couple of techniques. You need to add an image and reduce the opacity first. Then you need to use blending options considering the subject. You may also need to change the blend mode if necessary.