
Cropping a whole image or photo is a coherent process of Photoshop with the help of the Crop Tool. But, “how to crop a layer in Photoshop” is a matter where you need to have some knowledge.
Well, the process is simple if you have a good hold on Photoshop. Also, if you are a beginner, you can learn some techniques that can give you the perfect cropping in no time.
So, we bring you some easy instructions to follow your instinct in doing the job properly. Well, it is a matter of using the right tool in the right direction.
You can call this cropping Photoshop Isolate Layer content without harming others. However, the original purpose is to keep the required portion intact and make changes as required.
Brief On “How to Crop a Layer in Photoshop”
Bringing on the theme of how to crop one layer in Photoshop without the Crop Tool. We know several tools that we can use for making a selection. yes, this is the solution.
So, when you can make a selection, you can crop the area without any effort.
There is another question and that is, “How to crop a photo in Photoshop CS3”. Well, the methods we are presenting are good with Photoshop CC2021.
But you can use the Marquee Tool and Pen Tool methods. You can also use the shape tool that we have not mentioned here.
Four Ways Of “How to Crop a Layer in Photoshop”
Let’s jump into the main episode where we will learn the ways of cropping. Photoshop crop layer only indicates working on a specific layer. So, we will go with a single layer for this operation.
The methods we are discussing here are easy and convenient to select.
However, there are other methods you can use, and they might be a little more complicated. As we are going with the cropping options, the Crop to Selection under simple operation is good enough.
01. Using The Marquee Tool

The first method we are about to discuss is using the Marquee Tool. As we have mentioned the significance of selection in Photoshop, is the easiest way of cropping. You can use the Marquee Tool to make a rectangular selection in no time.
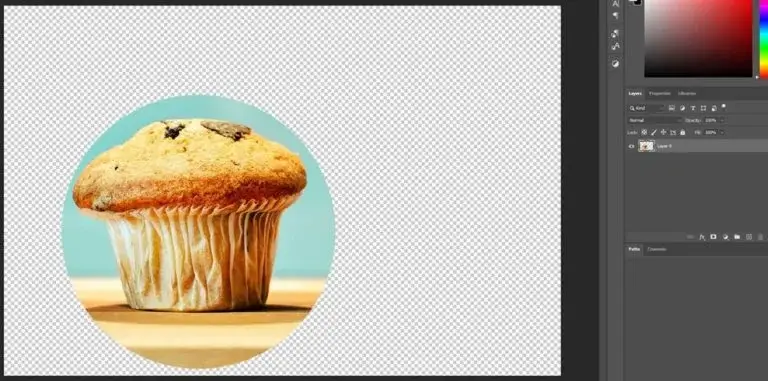
The muffin image we are using for this is taken from the website pixabay.com. You can have more photos from here or use any photo you want.
Still, there is a question, “how to square a photo in Photoshop?” Well, we are going to instruct at the end of this content. Also, I need to mention that, if you want to crop in a square, you need to use the Crop Tool for the whole document.
You can also crop an image in a document and then drag and drop it to another document as a layer. For the time being, we are going to crop a layer using the Marquee Tool.
Step 1: The Selection

First, you need to pick the Marquee Tool from the tools panel. The location is on the left of the project window and right below the Move Tool. You will see four options to choose from. For learning, we will use the Elliptical Marquee Tool.
Now, it is time to make a selection. We have made the selection already, see the below image. The selection is elliptical and properly rounded.
Click and hold on to the Marquee Tool and wait till all the options are revealed. Select the Elliptical Marquee Tool and go to the project photo. You can control the circular form by using the keyboard key ‘Shift’, Alt/Option, and Spacebar for Win/MAC. Click and drag to select a round area from the image.
If you use the Shift key, the selection will be perfectly round. And, if you release the Shift key, you can have a free selection. Also, you can move the selection by pressing and holding the Spacebar for both Win and MAC. And you can reverse the selection by using Ctrl/Command+D for Win/MAC.
Step 2: Inverse Selection

At this point, we will select inverse except for the muffin photo. To do this, just right-click on the selection and choose ‘Select Inverse’. You will have a selection of the photo except for the area you selected earlier.
One mentionable thing is if you are working on the background layer, unlock it before cropping. Otherwise, you will have a dialogue box with options to fill the selection.
Well, you can do that even if the layer is unlocked. Just, right-click on the selection and choose ‘Fill’. For the time being, we will not go further with that and stay on the flow.
Step 3: Cropping
We are at the end of the process with the Marquee Tool. You just need to press the ‘Delete’ button to remove the unwanted area. See the below image. In the meantime, if you make any mistake, use Ctrl/Command+Z for Win/MAC to go back or undo.
You can also access Photoshop history to return to any position you like. Well, this procedure is applicable for further cropping methods and any other editing you do.
02. Easy Framing by Using the Frame Tool

Suppose you are in the middle of a large project and do not want to go back or start another one. But, you need to add some photos to the existing project by framing them according to the necessity. What will you do? Do not think of using the Marquee Tool and cutting off additional parts in layers.
Here we have a tremendous option to use in such situations. Well, need to mention that if you need to add more photos to the same project without framing, be sure to hide the layer before that.
For this method, we are using a cute Macaw cartoon image collected from the renowned stock photo website ‘Freepik’. You will have the answer to, “How to make a picture square in Photoshop?
You can make rectangle or square-shaped frames on your document by using the tool in no time. We are coming up with the operation below.
Well, you cannot have any other shapes with this but the facility you get by this is truly amazing. And, for the record, you may love to use it and forget to use other methods.
Step 1: The Framing

The location of the Frame Tool is in the tools panel, the 6th position from the top. Also, you can figure out every tool name if you cannot locate it directly. And, for that, you need to move your mouse cursor over a tool to know the name. However, there may be several options in a tool group.
So, you need to left-click on that and wait until others are revealed. But, for the Frame Tool, you do not need to do so as it is individual and without any group.
From now you are free to create a frame over the project. Just, click and drag over the canvas to create your required frame.
Well, you can create rectangular frames without using any extra keys. But, when you need to create a square, just press and hold the ‘Shift’ key while operating for both Win and MAC.
Release the mouse click when you have your desired frame shape layer and size then release the Shift key. In the above image, we have created both frames for your understanding. However, you can create more frames if you need to.
Step 2: Placing Photos in The Frames
The use of the frame tool makes placing photos in a frame more convenient. Instead of trying to use the home of Photoshop, you need to drag and drop an image in the frame.
Well, if you try to use recent photos from the Photoshop Home panel (Photoshop tool panel), it is useless. You cannot do it.
So, the only way you can proceed with the operation is by opening your folder where your images are kept and clicking & dragging over Photoshop then placing it on a frame.
You can see the image is placed inside the frames beautifully according to the shape. And, that also means, you can use any image according to the frame by height or width that suits by filling.
So, if your image frame is a rectangular shape and needs to be used as a square, you can do it. And the reverse is also possible without any extra effort.
Step 3: Resizing Frames and Images

Well, this is very important to change the size of the frame or the image while using the Frame Tool. What if there is no option of doing so? Nothing to worry about. Photoshop keeps the option open to modifying the size of both frame and image.
All you need to do is select the one you want to resize. See the below image. The left one is for the frame and the right one is for the image in the layers.
Now, if you need to resize the frame, it is simple to use the transformation points. Click at any point as you need and drag to fit the size you want. Well, one mentionable thing is, that you cannot skew or rotate the frame like the transformation tool.
As for the image, you need to click on the thumbnail and use Ctrl/Command+T for Win/MAC for the transformation tool. And, here you can resize, rotate, skew, or any other modifications you may need.
So, you need to use the Alt/Option, Shift, and Ctrl/Command for Win/MAC. We believe you can figure out the rest.
Step 4: Finalizing
When you have your desired look with the tool, just end the session. No further operation will be needed.
However, if you think that something about the frame or the image needs to be modified, click on the specific thumbnail and work on that. One thing we need to mention in this regard.
Suppose you need to add another image without using the Frame Tool. So, you should hide the layers with the frames and then include an image. Otherwise, you may face difficulty with the implementation and the frame will be disturbing.
03. Get Photoshop AI with the Selection Tool

Step aside from regular selection and go with artificial intelligence. Photoshop CC2021 brings you an automated selection option to redeem your effort.
Now you can select, refine, and use further modifications through masking. And, for the record, this is a total revolution to blow your mind.
You do not need to have a vast idea. Just click on some buttons and the job is done. Also, you can access other options like blend mode, properties, and more.
Photoshop AI is a smart advantage of CC2021 with automatic selection. And the selection to shape Photoshop performance was never better. You can do a selection of complicated subjects within a few clicks.
However, this is artificial intelligence and can give you performance in mathematical terms. Convert to a smart object, Photoshop AI is your best solution.
The real creativity is in your hands with proper activity. You may not get the perfect selection or result all the time. But the support you can get is remarkably amazing.
Step 1: Automatic Selection
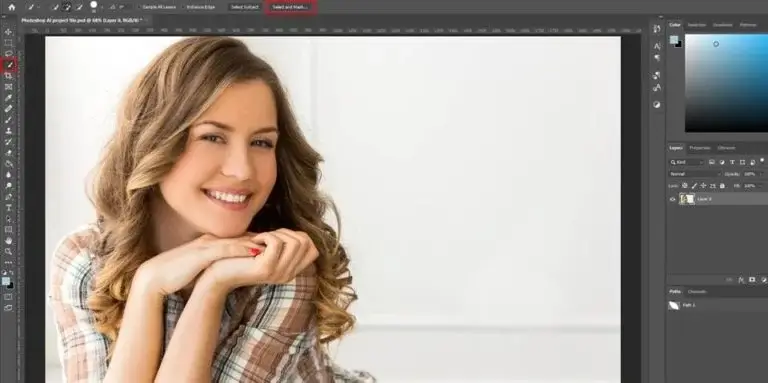
First, you need to upload the image that you want to select by AI in Photoshop. In the above image, you will find a portion in the middle showing the onion skin that indicates transparency in Photoshop.
Well, that is just to make you understand the theme. The girl in the photo was labeled and we did remove the area on purpose.
However, the final result will come up with a completely transparent background. See the below image which is original when we uploaded it in the Adobe Photoshop project.
Select the ‘Quick Selection Tool’ from the tools panel and click on ‘Select and Mask’. Both are marked by red rectangles. You will have your subject selected or most of it. A further modification is coming up in step 2.
We need to clarify another thing about the selection tools. You will find two other options in the group named ‘Object Selection Tool’ and ‘Magic Wand Tool’. Magic Wand Tool has limited selection capability for the same and seamless areas.
However, you can do more by adding or removing selections if required. You can have a draft idea from the attached blog at the beginning of this tutorial. The Object Selection Tool is the new addition of Photoshop CC2021 that can assist you with the selection by locating a specific area.
Photoshop will do the rest to select the subject for you. Well, we will go with the regular Quick Selection Tool for the time being.
Step 2: Select and Mask
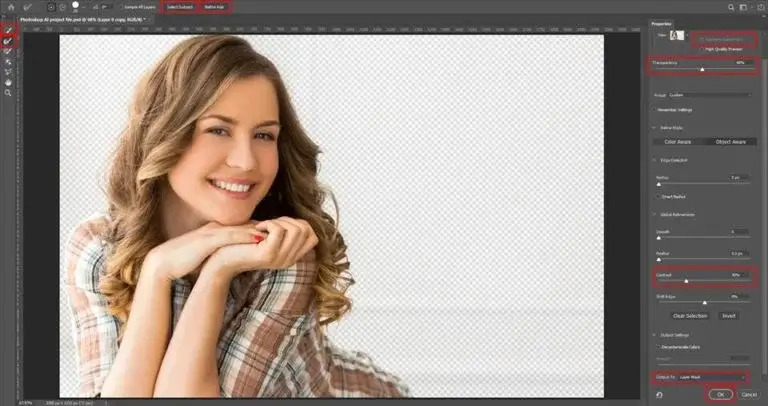
As soon as you click on the ‘Select and Mask’ option, you will enter another window where all the tools are present. Click on ‘Select Subject’ and wait for a while for Photoshop to select it for you.
Then click on ‘Refine Hair’ if your photo is a portrait or of any complex subject. Well, the image we are working with requires some more Tools implementation to make the selection perfect.
Keep the transparency level at 50% and make changes to some of the options that give you good output. We have done it according to the subject and found it perfect all the way. One mentionable thing is, that you need to be tricky with the Contrast slider.
You cannot go more or less and need to stop at the best position. As a common suggestion, we prefer not a higher value of the contrast to keep the background peek through soft edges.
When you are all done, choose ‘Output’ to Layer Mask. Press OK to continue.
Step 3: Applying Layer Mask

So far, we are done with the procedure, it is time to apply the layer mask. Well, you can modify the mask until you apply it. And, you will lose further modification ability once it is done.
However, it is important to apply a layer mask to avoid mistakes while proceeding with further editing.
We have two different contents based on the Image Masking Service Photoshop. One is, “What Is Image Masking And Common Uses of It” and another is, “Image Masking in Photoshop, How and Why”. You can check both of them to have more ideas on this.
So, right-click on the mask and select ‘Apply Layer Mask’ for this. Make sure you select the mask area from the layer for this. Otherwise, you will not find the option to choose.
Well, you can keep the mask unchanged if you think that you may need to modify the look later. The background will be transparent, and all other activities are as good as without it.
04. Manual Operation with the Pen Tool

The last method to crop a layer in Photoshop is using the Pen Tool. We all know the significance of the Pen Tool and how important it is for hard-edged subject isolation. We have a small tutorial in this regard named, “Understanding And Become A Master In Photoshop Pen Tool”.
You can have a visit to know the excellence of the tool. Also, crop multiple images at once Photoshop comes using the tool in single or multiple layers paths.
Here is something that you should learn about the Photoshop pen tool invert selection. Well, you cannot do the invert selection using the Pen Tool. But what you can do is create a path according to the subject and make a selection. And, to do so, you need to use the keyboard shortcut Ctrl/Command+Enter/Return for Win/MAC.
The selection will be made according to the path creation. So, if you forget to create the path, in the beginning, this is not worth it.
Step 1: Creating A Path

The path creation operation is pretty simple using the Pen Tool in Photoshop. All you need to do is start creating a path from an anchor point and draw around the subject edge. In the end, you need to stop at the point where you have started from.
However, for multiple path creation, you can use one path layer for all the subjects or separate path layers for each. Well, one thing is mentionable, you need to do the path creation leaving two pixels outside. And, that means, you have to create a path around a subject with two pixels inside of the subject edge.
We are not going through all the activities related to the path creation as you can have a better idea from the linked content above. The mentionable part is, to save the path as soon as you create one.
So, you need to double-click on the path and a message box with the default name ‘Path 1’ will appear. You can rename it if you want but it is not mandatory. But it is important to save the path. Otherwise, you may lose your progress by mistake.
Step 2: Selection

As you are done with the path creation the next step is making a selection. And this is just a matter of simple command. Use Ctrl/Command+C for Win/MAC when you are on a specific path. Also, you can do Ctrl/Command for Win/MAC and right-click on the layer path thumbnail. They both do the same and you will have your selection.
You can see the selection face in the above image where the subject is surrounded by ants. In the real scenario of working on a Photoshop project, you will see that running. Now, you are only a step ahead of the cropping method with the Pen Tool.
Step 3: Isolation

You can use two ways for the isolation after the selection is made. The first one is, to use Ctrl/Command+J for Win/MAC to copy selected subjects to a new layer.
Then hide the layer where you implemented the clipping path operation. And, you will have the subject without the surroundings. Also, you can use the mask option to hide the additional areas except for the subject.
Later apply the layer mask to make the subject cropped without any additional surroundings.
But wait this is not a final technique. There is another way to do this isolate the subject selected by the Pen Tool method. Use the keyboard command Ctrl/Command+Shift+I for Win/MAC when you have the subject selected.
Now, press the ‘Del’ button for both Win and MAC to delete that. Use Ctrl/Command+D for Win/MAC to deselect. And, you will have your cropping only the subject and the rest of the area is transparent.
Well, if you are working on the background, you need to make sure the layer is unlocked. Otherwise, you will not be able to delete the background directly.
Condensation Of Image Resize in Adobe Photoshop
The tutorial is based on the subject’s isolation from a whole photograph. So, figuring out the perfect layers tool for the process is not difficult, isn’t it? However, there are some more methods for similar kinds of operations but minor.
The thing is, it doesn’t matter which way you follow, doing the job perfectly is the goal. Sometimes, you may need to use complex procedures, and sometimes simple ones. And, if you do it properly, the result will be appealing.
Conclusion Of Layer Crop in Photoshop
The above methods should be helpful for how to crop a layer in Photoshop in words. You can try this yourself to learn and implement it better. Except for these, the Crop Tool is always in the tools panel for you for the whole canvas.
The target is, you do not need to crop the whole canvas unless it is necessary. Moreover, the methods will give you some creative thinking about the presentation of any layer you are handling. So, learn and do the best of them.
FAQ | How to Crop a Layer in Photoshop
What Does 100 Crop Mean?
The actual meaning of 100 Crop or 100% crop is taking out a small area from the whole photo. And, the image is not resized where the aspect ratio, pixel count, etc. are intact.
How To Crop a Single Layer in Photoshop?
The cropping of a single layer in Photoshop is the same as we explained right above. Just select the layer and do the cropping as mentioned.