
Hello everyone. Welcome to another blog. Today we will learn ‘How to face swap in Photoshop CC2019’. This one is a tricky but easy job to do. You need to maintain some conditions to perform accurately. Clipping World outsources convenient Face Swap in Photoshop services to you. In this blog, we will try to show you the easiest way to do face-swapping. Without any further talking, let’s start working.
Conditions Need to Match
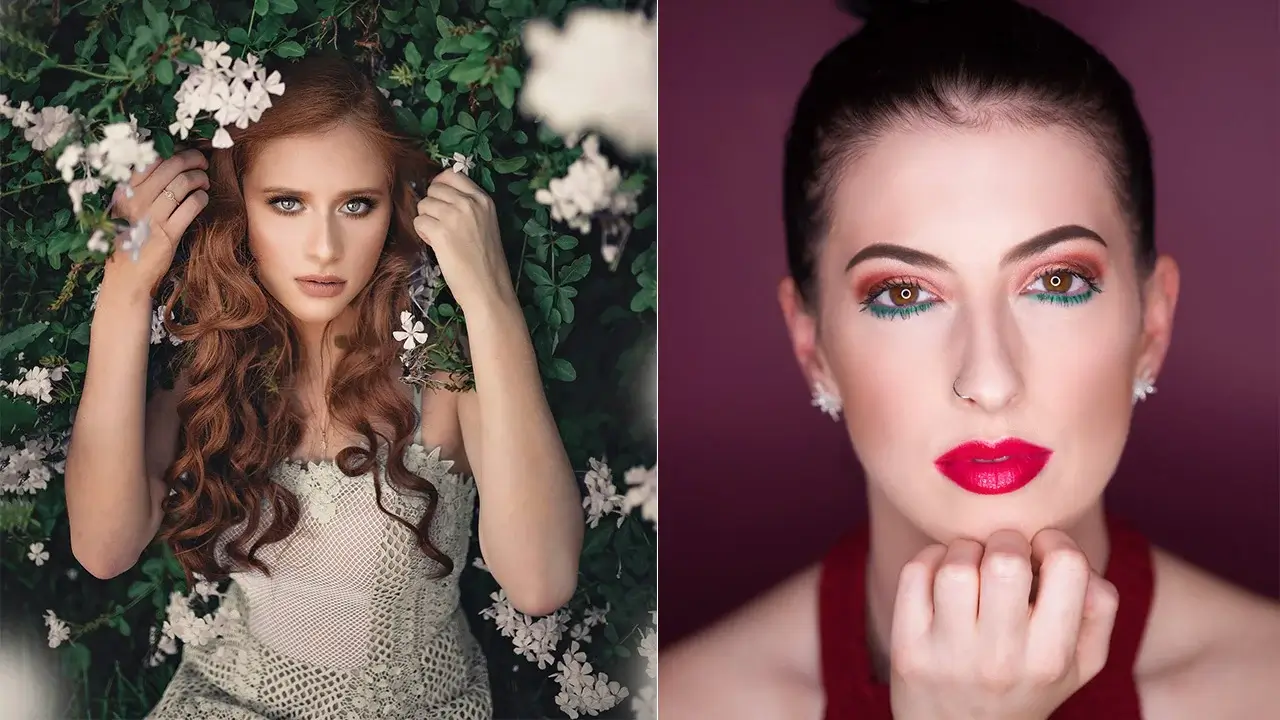
The conditions that need to match both subjects for the processing are vital. So, ‘how to swap heads in Photoshop’? For example, you cannot swap blackface with white or white with black. And, both images need to maintain the same kind of resemblance. They are –
- The face angle should be the same. It is alright if one is turned left and another one to the right. But the angle ratio maintenance is the first thing to focus on.
- The color depth should be similar or closer. If the difference is too much, it would be complicated for the job.
- Image resolution should be the same or closer to both subjects. If the difference is huge, the implementation will not be accurate.
- The editing software version needs to be up to date. Because, with the previous versions of software, the processing may be less than expected.
- The graphic designer should have the expertise for the job. With raw hands, the result will be a mess or lose more details.
Photo Editing Process | Face Swap in Photoshop
The editing process is the key to job perfection. The more efficiently the way editing is handled, the better the output you get. You need to follow some steps for that. And it is mandatory to go step by step. If you miss any steps, you may get into trouble with the editing.
Steps 01: Software For Editing
Using convenient software is the most important one for the job. We use the most renowned software Photoshop. There may be a question, “How to swap faces in Photoshop CS6?”. Well, the process is a little different, but the basics are the same. Besides, Photoshop is much easier and lighter, but we will use the latest version for this purpose.

Though the program is heavy, it has integrated features for better performance.
Steps 02: Open Both the Files
You need to open both files side by side tab in Photoshop. The reason is, that you can check and compare both of them for similarities. Check and recheck the images for all the conditions mentioned above.
If any of them do not match or are closer, stop right there. They are not good for swapping. Try to get other images that match.
Steps 03: Select the Face with a Better Path
Make sure both faces have the same spacious look. If one image has the hair in front of the face and another one does not, they are not applicable for swapping. Next, make a selection of the face you want to place on the other image.
There are several ways of making the path for selection. The easy ones are with the Photoshop Pen Tool or the Lasso Tool. Mark the face as much as it can replace the other image’s face. A little more or less is tolerable.

After you make the path with the Pen Tool, press Ctrl+Enter for Windows or Command+Return for Mac to make the selection. You can also right-click inside the path and select ‘Make Selection’ for the same.
Steps-04: Copy the Face to Another One That Needs to Replace
After making the selection, press Ctrl+C for Win or Command+C for Mac to copy the selection. Then press Ctrl+V for Windows or Command+V for Mac to paste the other image that you want to replace. It is a ‘Cut and Paste’ face Photoshop action.

Adjust the size to match the bottom layer’s face. Reduce the opacity/transparency to 65% to 70% of the copied face to see the face below to match the position. I am using 68% for my convenience.
Steps-05: Make A Selection of the Image to Swap
As you have adjusted the copied face with the one that needs to be replaced, you are halfway through. Let’s name the copied layer ‘Face for Swapping’. Now, copy the background layer and name it ‘Face to swap from.’ Hide the background layer. It does not matter whether you name it or not; follow the steps.
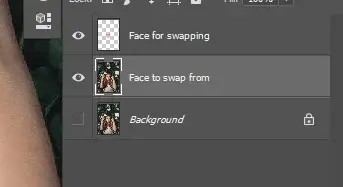
Press Ctrl for Windows or Command for Mac and click on the ‘Face for swapping’ layer image. You will see a selection is made.
Steps 06: Remove The Face You Want to Replace
Now hide the ‘Face for swapping’ layer and see that the selection is on the ‘Face to swap from’ layer. Go to the Photoshop menu ‘Select’ then Modify>Contract.

Select the value 10 Pixels and press ‘OK.’
![]()
Add a layer mask and press Ctrl+I for Win or Command+I for Mac to inverse the mask. The face is removed.

Now select the ‘Face for swapping’ layer. Increase the opacity to 100%. Press Ctrl for Win or Command for Mac again and click on the layer image to select. Add a layer mask.

Steps 07: Select Both the Layers of the Faces
To select both the layers named ‘Face for swapping’ and ‘Face to swap from,’ select one layer, then press and hold Ctrl for Win or Command for Mac and click on another. You will see both layers are selected.

Steps 08: Use The Blending Option
Go to the Photoshop menu ‘Edit,’ then select ‘Auto-Blend Layers.’ It’s the smart way to face-swap auto-blend layers.

Select Panorama and check the boxes named ‘Seamless Tones and Colors’ & ‘Content-Aware Fill Transparent Areas.’ Press ‘OK.’

Photoshop will do some calculations using artificial intelligence and merge both layers. With this, you can also learn how to do eye swaps in Photoshop.

Steps 09: Retouch For the Matching
Now, zoom in on the image and see there are some mismatches with the image. The correct the impurities, you need to retouch them.

I am using the soft brush tool with an 8% flow. Take a sample near the impurities by pressing & holding Alt for Windows or Option for Mac and clicking from a clean area. Brush over the impurities that match the tone. Please do not use the same tone in all places; it would be a catastrophe.
Take a sample and brush it over. Maintain this until all the impurities are gone. You can also use the ‘Blur Tool’ to hide some places. I have done the retouching for the image, and the final output is as below.

Punch Line: Flowless and accurate face swap editing, leaving no trace. Get a Quote
Final Thought | Face Swap in Photoshop
I hope you have enjoyed the tutorial. Now you have learned ‘How to replace a face in a photo.’ There are other ways to face-swapping. I have described the most convenient one for you. Face swapping is also possible if the color tones are different from one to another.
That is a complex process and needs extra steps to perform the job perfectly. Clipping World gives you the perfection of the images you want the swap.
Related Tutorial
- How to Swap Body in Photoshop
- How To Make A Clipping Mask In InDesign
- How Big Is A 5×7 Photo? (Pixels, mm, cm & Inches)
FAQ | Face Swap in Photoshop
What is the Key to Face Swap?
The key to Face Swap is the conditions to match for the processing. If the resolution, face angle, skin tone, etc., are a match, the swapping is convenient.
Is the Face Swap Editing Process Effective?
The editing process of Face Swap is effective if the elements used for the process match. If they do not match in some conditions, it can be considerable. But not always.
What is the Cost of Face Swap?
Face Swap service cost is variable depending on the image quality and subject complexity. Sometimes it’s a tough job to do that takes more time and labor. Our starting cost for the service is $2 per image.
How Long Does It Take Face Swapping Per Image?
The time needed for the editing is variable depending on the condition of the image. It is hard to mention a fixed amount of time for the job. Sometimes it takes 5 minutes, sometimes more than an hour.