Most smartphone photography guides repeat the same generic tips—use grid lines, buy a tripod, download presets. But those tips rarely explain what actually improves photo quality in real-world situations.
This guide focuses on practical smartphone photography techniques, exact camera settings, and common mistakes to avoid, so your photos look professional—without buying new gear or paid apps.
Who This Guide Is For
- Beginners learning smartphone photography
- Content creators & influencers
- Bloggers and small business owners
- Anyone who wants professional-looking photos from a phone
All techniques in this guide are based on real-world smartphone shooting, not theory or presets.
What Makes Smartphone Photos Look Professional?
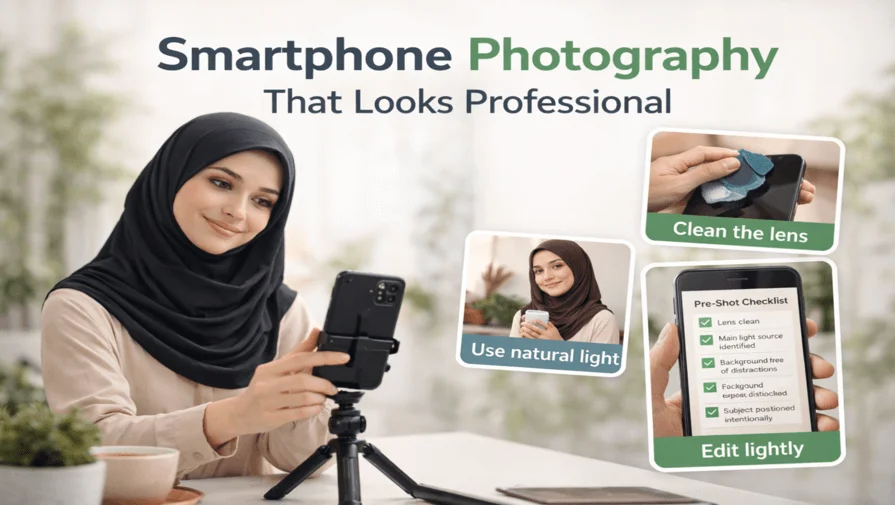
Smartphone photography looks professional when you control lighting, use simple backgrounds, clean the lens, and manually adjust exposure instead of relying on filters or auto mode. Good light, intentional composition, and light editing matter more than expensive phones or camera apps.
Now let’s break down the exact techniques that make the biggest difference in real-world shooting.
Practical Smartphone Photography Techniques
The techniques below focus on real-world shooting situations, not camera specs or apps. Each method explains when to use it, why it works, and how to apply it using any modern smartphone.
1. Use Window Light Instead of Flash for Portraits

Natural window light is the easiest way to make smartphone portraits look professional.
How to do it
- Place your subject 1–2 feet from a window
- Turn off the phone flash
- Angle the subject 45° toward the light
- Use a curtain or sheer fabric to soften harsh light
Best camera settings
- Exposure: –0.3
- HDR: OFF
- Portrait mode: ON (check edge detection)
Common mistake
Shooting in direct midday sunlight, which creates harsh shadows and blown highlights.
2. Clean the Lens Before Every Important Shot
A dirty smartphone lens is one of the biggest hidden reasons photos look blurry or dull.
Why this matters
- Low contrast
- Hazy highlights
- Soft-looking images
What to do
- Use a microfiber cloth or clean cotton fabric
- Wipe the lens before every shoot
This single step improves image quality more than changing camera settings.
3. Use RAW Mode Only When Lighting Is Good
RAW mode gives more editing flexibility—but it’s not always better.
Use RAW mode when
- Lighting is bright and even
- The subject is not moving
- You plan to edit the photo
Avoid RAW mode when
- Shooting at night
- Capturing moving subjects
- Storage space is limited
RAW photos need good light. In poor lighting, they often look worse than JPEG.
4. Lock Focus and Exposure Manually
Auto focus and auto exposure constantly change and ruin consistency.
How to lock exposure
- Tap and hold on your subject
- Lock AE/AF
- Adjust the exposure slider manually
Why this matters
Locked exposure keeps brightness consistent across multiple photos. It is essential for professional-looking results.
5. Simple Backgrounds Matter More Than Camera Quality

A clean background instantly makes smartphone photos look professional.
Rule to remember
If the background distracts, the photo fails.
How to fix it
- Move the subject instead of zooming
- Use walls, sky, curtains, or shaded areas
- Avoid cluttered scenes
Background control matters more than megapixels.
6. Use Simple Composition Rules
Professional-looking smartphone photos rely on basic photography composition and framing principles more than advanced camera features.
Key composition tips
- Use the rule of thirds to position your subject
- Avoid placing the subject dead center
- Use natural lines (walls, paths, windows) to guide the viewer’s eye
These simple composition rules help guide the viewer’s eye and create more balanced smartphone photos.
7. Use HDR Only for Landscapes
HDR is useful—but only in specific situations.
Use HDR for
- Landscapes
- Buildings
- High-contrast outdoor scenes
Avoid HDR for
- Portraits
- Food photography
- Product photos
HDR often flattens skin tones and removes natural depth.
8. Crop Photos Instead of Using Digital Zoom
Digital zoom reduces image quality and detail, which is why understanding aspect ratios is important when cropping photos.
Better approach
- Shoot wide
- Crop later during editing
- Apply the rule of thirds
Cropping preserves more detail than digital zoom.
9. Edit Lightly for a Natural, Professional Look
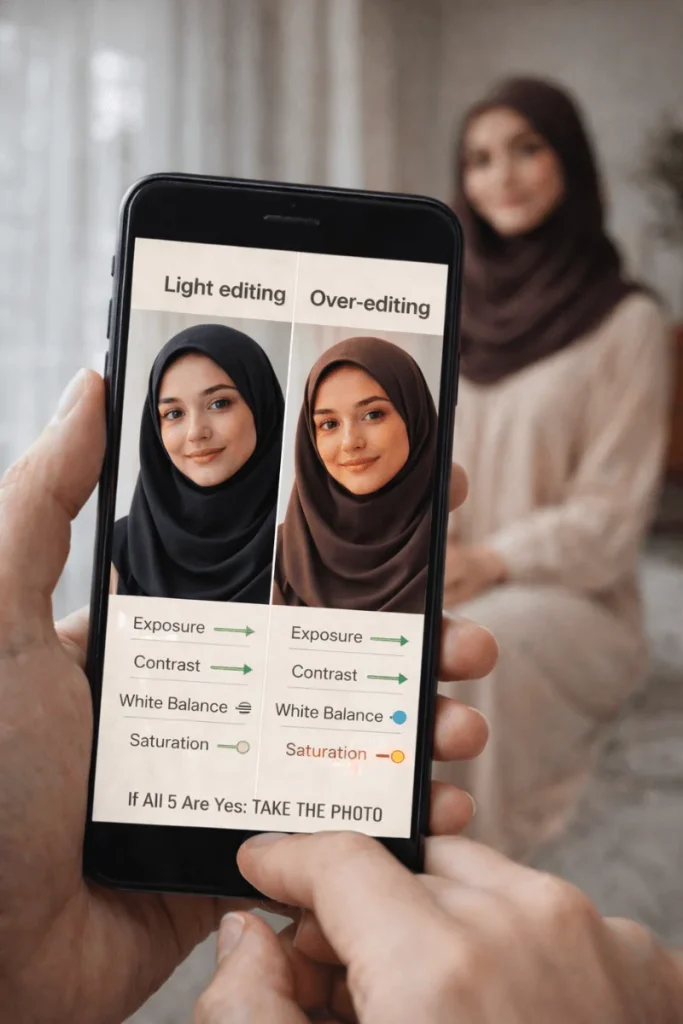
Over-editing is the fastest way to ruin smartphone photos.
Editing priority
- Exposure
- Contrast
- White balance
- Sharpness (very light)
Avoid
- Heavy presets
- Oversaturation
- Extreme clarity
Light editing is often enough for most smartphone photos. Many creators prefer to focus on shooting correctly and handle editing separately to keep results consistent and natural.
10. Take Fewer Photos and Think Before Shooting
Professional photography is about intention, not volume.
Ask yourself before shooting
- What is the main subject?
- Where is the light coming from?
- What can I remove from the frame?
Thinking first leads to better photos.
Quick Pre-Shot Checklist (10 Seconds)
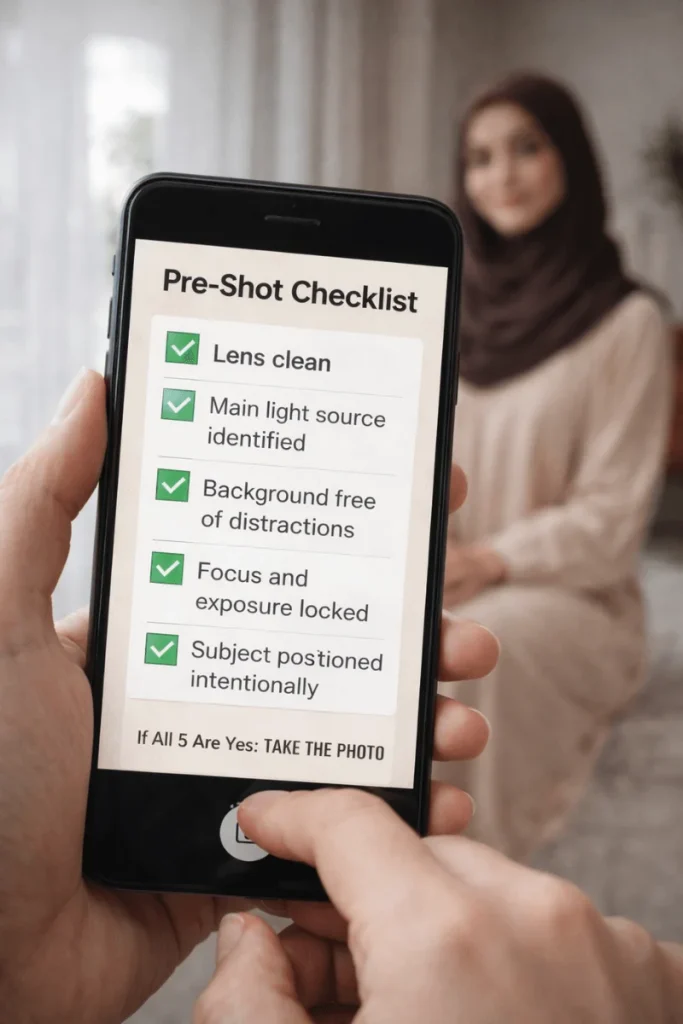
Before pressing the shutter, quickly check:
- Lens clean
- Main light source identified
- Background free of distractions
- Focus and exposure locked
- Subject positioned intentionally
If all five are yes, take the photo.
Frequently Asked Questions
Yes. With good lighting, clean lenses, simple backgrounds, and manual exposure control, smartphone photos can look professional.
No. Use portrait mode only when the subject edges are clear, and the background is simple.
No. Lighting and composition matter far more than megapixels. Modern smartphone photography depends more on lighting and image processing than megapixel count.
Because phones rely on auto processing, which struggles with mixed lighting, cluttered backgrounds, and moving subjects.
Not always. But if you’re creating content for a brand, business, or online store, professional photo editing saves time and ensures consistent, natural-looking results.
Final Tip
Many creators shoot their photos using these techniques and then handle editing separately to maintain a consistent, professional look—especially when working on brand, business, or product content. This approach helps keep editing consistent across projects and workflows.
If you improve only three things—light, background, and exposure—your smartphone photos will already look better than most photos online.