Photo editing is a crucial service for different kinds of businesses, like E-commerce, real estate, clothing, and so on. But how to edit a product’s photo professionally is a major concern. We have referred here to the 6 major steps to edit product photos, such as
- Image Cropping and Straightening
- Image Background Removing
- Color Correction and White Balance
- Image Sharpening
- Adding A Clean White or Custom Background
- Export Your Product Image in the Right Format (JPEG or WEBP) For Your Platform.
Which tools are used for professional product photo editing? Many tools are used, but Adobe Photoshop and Lightroom are very renowned. If you look for free alternatives, like Canva and Remove.bg, you can help you achieve professional results. However, if you would like to assign your business image editing to any of the best photo editing service providers, then you may contact Clipping World. Clipping World provides
- Clipping Path Service
- Image Background Removal
- Multi Clipping Path
- Photo Cutout Service
- Photo Retouching Service
- Image Masking
- Color Correction
- Image Restoration
- Image Manipulation
- Jewelry Photo Editing
- eCommerce Photo Editing
- Product Photo Editing
However, let’s see the 6 important steps to edit product images. These product photography tips will assist you in editing your product photo easily.
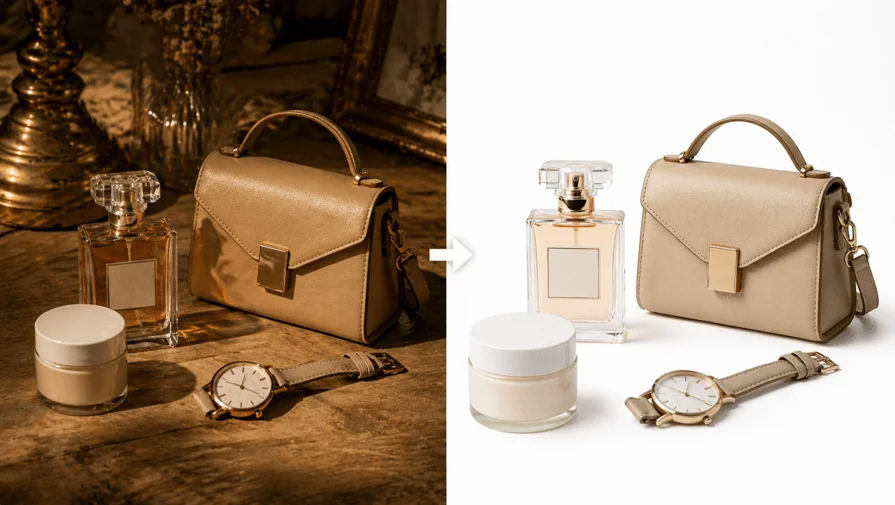
Why Product Photo Editing Matters for Online Sales
An image is a visualization object that lets people know what it means. A single image carries thousands of words’ meaning. The best edited image increases customer interest in purchasing products. For a product-based business, business growth, sales, customer engagement, and buying interest rely on images. For managing and balancing those important things, photo editing matters.
High-quality product photo editing directly impacts online sales. It is because shoppers can’t touch or try products before buying. So professionally edited images build trust, reduce returns, and increase conversion rates.
How Bad Product Images Hurt Conversion Rates
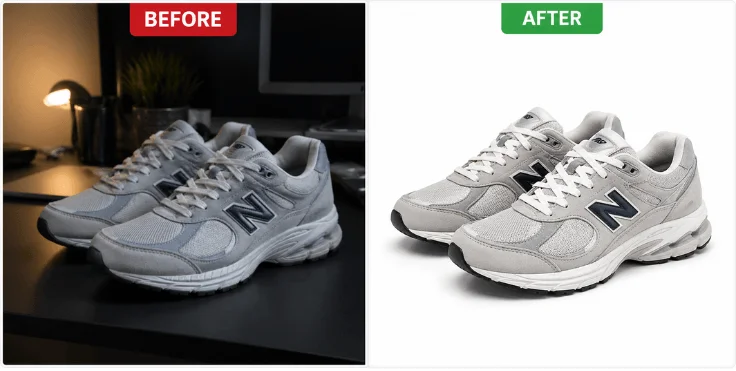
The photo is a visual merchandising. Bad product image hinders user engagement due to obscure visualization. Bad image restrains audiences from making a decision to buy any specific products.
Indeed, blurry, dark, or cluttered product photos send one message to shoppers: this seller doesn’t care, and the moment that thought hits, they’re gone, clicking straight to your competitor who took the time to show their product properly.
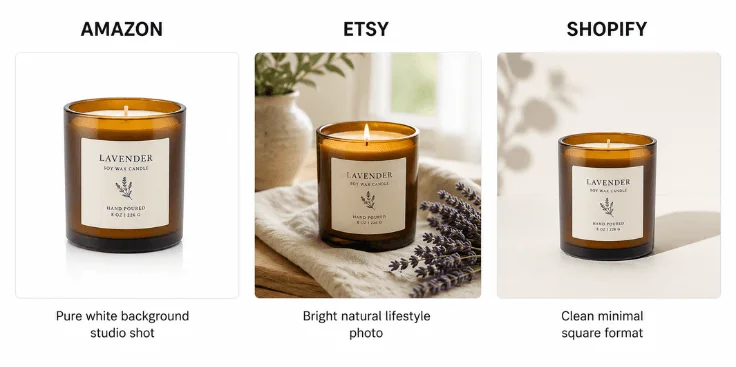
What top-selling Amazon and Etsy listings have in common
The secret behind every top-selling Amazon and Etsy listing isn’t the price or even the product itself. It is that every single image makes the shopper feel like they already own it, showing the product so clearly, so beautifully, and from so many angles that clicking Add to Cart feels like the obvious next step.
Best Tools to Edit Product Photos (Free & Paid)
Free and Paid tools are available online. Is a free tool enough to edit a product image? Yes, if you have a simple requirement like removing image background, stripes on an image, making an exact shape of an image, etc., then a free tool is sufficient.
Therefore, for advanced service, like batch editing, shadow creation on image, advanced color correction, AI-enhancement, etc. In that case, premium features are required. Here is a quick comparison table between free and paid product photo editing tools.
| Feature | Free Tools | Paid Tools |
|---|---|---|
| Cost | 100% free with limited features | Subscription or one-time payment |
| Features | Basic (crop, resize, color adjust) | Advanced (retouch, AI, masking) |
| AI Tools | Limited | Advanced & automated editing |
| RAW Support | Limited or slow updates | Full & fast support |
| Batch Editing | Limited | Powerful bulk editing |
| Ease of Use | Beginner-friendly | Slightly complex |
| Support | Community or forums | Official support + tutorials |
| Updates | Irregular | Regular & stable updates |
| Performance | Good for small work | Best for professional workflow |
| Best for | Beginners or low-budget person | Professionals and business use |
However, let’s see some of the best free and paid product photo editing tools and what they do best.
Free Tools
In a free session, most of the free tools give access to limited features. Here are some free tools that can be used for business photo editing solutions.
- Adobe Lightroom Mobile: best free product photo editor for color correction and brightness on phone or desktop.
- Canva: drag and drop editor, perfect for beginners, adding backgrounds and text.
- GIMP: a powerful Photoshop alternative, great for advanced editing at zero cost.
- Pixlr E: browser-based editor with professional-level tools, no download needed.
- Remove.bg: AI-powered background removal, free for low-resolution images.
- Snapseed: best free mobile app for quick color and sharpness fixes.
Paid Tools
Paid tools are faster, consistent, and allow more features to use. We have referred here to some of the best-paid tools widely used for product photo editing services.
- Adobe Photoshop: industry standard, best photo editing software for background removal, retouching, and batch editing.
- Adobe Lightroom (Desktop): best for color grading and editing hundreds of photos at once.
- Luminar Neo: AI-powered photo editor edits photos with one-click product enhancement features.
- Photoroom: built specifically for product photo editing, background removal, and faster results.
- Pixelcut: affordable mobile-first tool loved by Etsy and Amazon sellers.
- Canva Pro: unlocks background remover, brand kit, and premium templates.
Note: Premium or paid tool requires meeting their pricing limits (monthly). Need to hire photo editors, because premium features are a bit complex. In that case, to sweep a hassle away, contact a product image editing service provider for editing your bulk images.
How to Edit Product Photos (06 easy Steps)
There are some crucial ways to edit product photos for a business. Your product image is the first handshake between your brand and your customer. These six steps will turn any ordinary product photo into a scroll-stopping, trust-building image that sells.
Step 1. Crop and Straighten for a Clean Composition
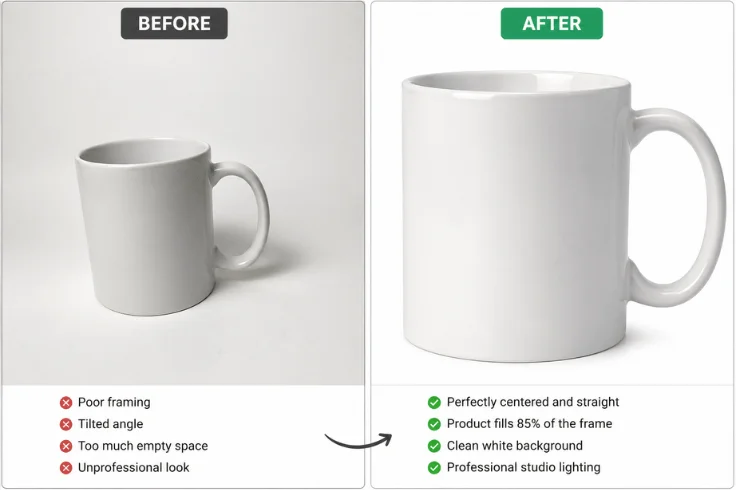
Think of cropping like putting your product in a spotlight. Everything outside that spotlight is a distraction. Start by straightening the product so it sits perfectly upright or at a natural angle.
Image Cropping
- Open your image in Photoshop, Lightroom, or Canva.
- Select the Crop Tool (shortcut: C).
- Set ratio to 1:1 (square) or 4:3 for lifestyle shots.
- Drag edges until product fills 85% of the frame.
- Leave a small equal breathing space on all four sides.
- Press Enter to confirm.
Image Straightening
- Lightroom: Use the Angle slider under the Transform panel.
- Photoshop: Draw a line along the product edge using the Straighten Tool.
- Canva: Drag the rotation handle until the product sits perfectly upright.
- Zoom in to 100% and double-check alignment before saving.
This is the simple process to edit a product photo for your business. If the photo cropping is tight enough, then your product fills at least 85% of the frame. A clean, well-cropped image tells the customer exactly where to look.
Step 2. Remove Background from Product Images
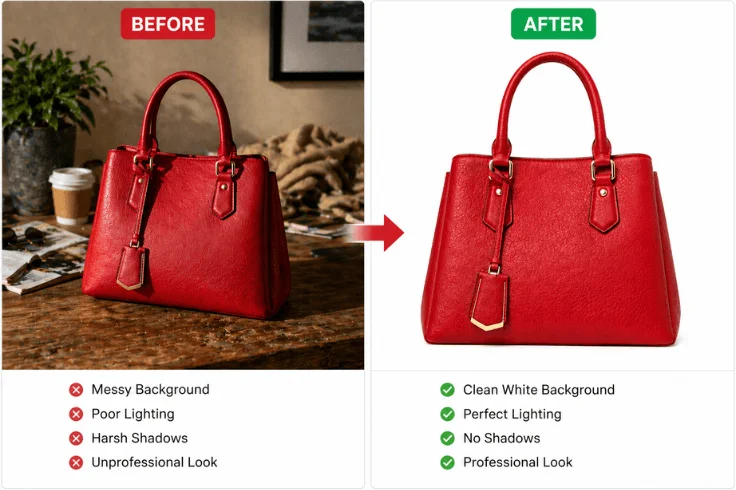
The background is the enemy of focus. The moment a customer’s eye lands on a messy background, like shadow, sketch behind the image, cluttered table, shadow on the wall, etc. Remove them completely. Let’s see how to remove the product image background using different tools.
Photoshop (Best Quality)
- Open image in Photoshop
- Go to the Properties Panel – click Remove Background from product photo.
- Or use Quick Selection Tool – select the product – press Delete.
- For complex edges – use Refine Edge to clean hair, fur, or transparent areas.
- Add a Solid Color Layer (white RGB 255,255,255) behind the product.
- Export as PNG (transparent) or JPEG (white background product image).
Canva (Easiest for Beginners)
- Upload the image to Canva.
- Click the image and select Edit Image.
- Click Background Remover (Canva Pro only).
- Erase remaining spots manually using the Restore/Erase brush.
- Download as PNG with transparent background.
On the other hand, if you have a bulk image, then contact a professional image background service provider. To ensure a sufficient quality and attract audiences, need a professional image background service provider.
Step 3. Color Correction and White Balance
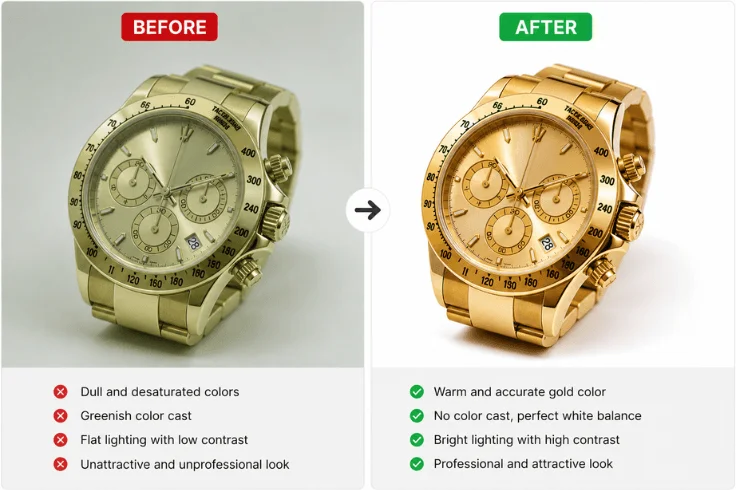
Color correction is an important part of making and editing an image. A statistic shows that more than 45% image attractiveness and the audience engagement ratio increase with aesthetic color. Now, how to edit an image using tools like Canva, Photoshop, or Adobe Illustrator. Let’s see them step by step.
- Set White Balance First from Lightroom or Camera Raw.
- Fix Exposure and Brightness.
- Correct Colors Accurately.
- Adjust the Tone Curve from the Lightroom tool.
- Final Check (Toggle Before/After view in Lightroom).
- Check on the phone screen.
These steps are available in Lightroom. These options may vary depending on the updated software version. But if you become familiar with Lightroom, then you may easily get that.
To make those things appropriate, an image color correction service is needed. In this case, you may use a free tool, but a better option is a premium one. On the other hand, you may choose a professional image color correction service provider.
Step 4. Phot Sharpening, Noise Reduction
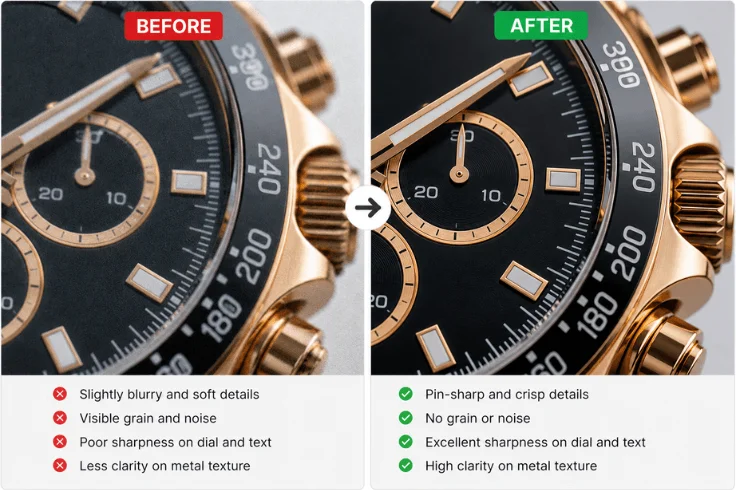
Photo sharpening pulls out the fine details that make customers lean into the texture of a fabric, the finish on a gadget. These tiny details build confidence and push people closer to buying. At the same time, reduce digital noise. Noise makes images look cheap regardless of how premium the product actually is. However, take a look at some of the easiest steps for photo sharpening and noise reduction.
Step 1. Zoom to 100% First
- Always zoom the image to 100% view before sharpening.
- Use shortcut Z in Lightroom or Ctrl+1 in Photoshop.
- Judge the sharpness on the most detailed part of the product.
Step 2. Apply Sharpening in Lightroom
- Go to the Sharpening section.
- Start at 60 – 80 for product photos.
- Keep radius at 1.0 – 1.5 for fine product details.
- Push to 50 – 70 to bring out texture and edges.
- Hold Alt + drag the slider, only sharpen the product, not the background
Step 3. Sharpen in Photoshop (Advanced)
- Go to Filter – Sharpen – Smart Sharpen.
- Set the amount to 100 to 150%.
- Radius to 0.5 to 1.0px for fine detail products.
- Radius to 1.5 to 2.0px for larger products.
- Remove Lens Blur for a cleaner, more natural sharpening result.
- Never use the basic Sharpen filter; always use Smart Sharpen.
Step 4. Noise Reduction
- Go to the Detail Panel: Noise Reduction section in Lightroom.
- Luminance slider: start at 20 to 30 for mild grain.
- Push to 50 to 60 only for very noisy low-light shots.
- The detail slider is to keep at 50 to avoid losing product texture.
- Color Noise Reduction is set to 25 to remove color speckles.
- In Photoshop – Filter – Noise – Reduce Noise for manual control.
Step 5. Add a White or Custom Background
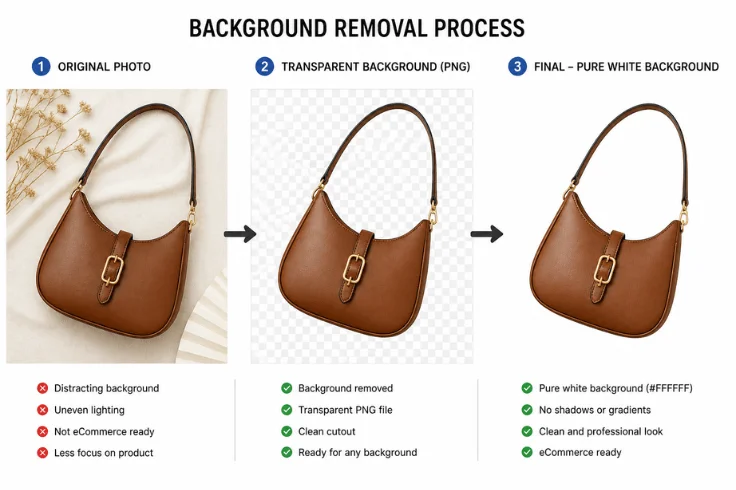
A custom background is a design created with color or anything that is kept behind the image. If you would like to set a custom background, then you need to know the process. Indeed, multiple options are available for a custom background. We are giving one of the popular methods. So, let’s see how to add a custom background. These steps are given to add a pure white background in Photoshop.
- Open your background-removed product image (PNG file).
- Go to Layer – New Fill Layer – Solid Color.
- Enter color code #ffffff (hexadecimal color code) (pure white RGB 255,255,255).
- Drag the white layer below the product layer in the Layers Panel.
- Check edges – no grey fringe or halo remaining around product.
- Flatten image – File – Export – save as JPEG.
Step 6. Resize and Export for Web (JPEG, PNG, WEBP, etc.)
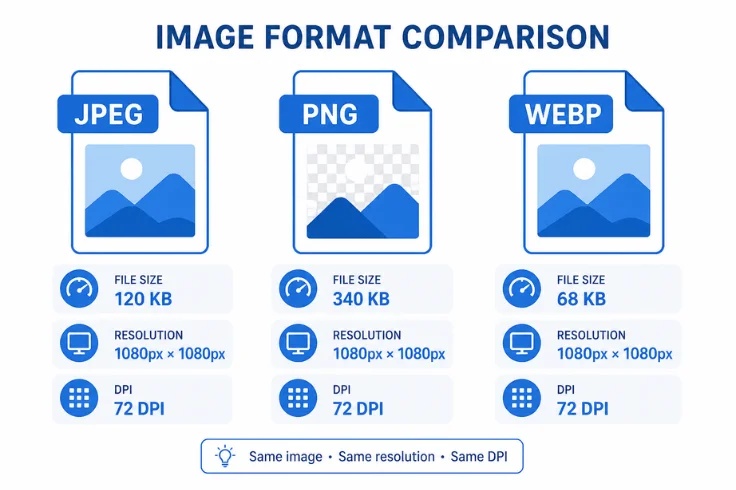
It means adjusting an image to the correct web size and saving it in optimized formats like JPEG, PNG, or WEBP to load the image faster. Here we have given how to resize and export from one image format to another image format.
- Open your design in Photoshop / Canva.
- Go to Image Size / Resize option.
- Set width & height for web use (1080px, 1200px, 1920px).
- Keep 72 DPI for web optimization.
Choose format:
- JPEG: for photos (small size, fast loading).
- PNG: for transparent background.
- WEBP: best quality + smallest size.
- Now adjust quality (70 to 85%) for balance of speed and clarity.
- Click Export.
- Rename the file using an SEO-friendly name (product-photo.jpg).
- Save in optimized folder (Web Assets / Final Export).
Note: Many free tools can be used for resizing and exporting business or product photos. That can be easily done. If you have bulk images, then you may require premium features. On the other hand, if you look for a professional image editing service provider, then you may contact Clipping World as your trusted assistance.
Are there Platform-Specific Product Photo Requirements
Indeed, Ecommerce business relies on image quality. Over 90% audiences hardly focus on product image quality. To get better visibility, higher clicks, and a better conversion, product photos must be optimized according to each platform’s guidelines.
Proper image size, quality, and background style can significantly impact the purchase and marketplaces stores. For this reason, the product photo must be unique and look good. Here are some of the renowned business platforms. Let’s see their image requirements.
Amazon Product Image Guidelines
Amazon has strict image requirements to maintain a professional shopping experience. The main product image should have a pure white background, high resolution, and the product must clearly fill the frame. Blurry or low-quality images can reduce ranking and conversions. Here are Amazon’s image guidelines.
- Pure white background of the main image.
- High-resolution image (clear and sharp).
- The product should cover 85%+ of the frame.
- No watermarks.
- No extra text.
Shopify and WooCommerce Image Size
For Shopify and WooCommerce, product images should be optimized for fast loading without losing quality. Square images are preferable because such images work best across themes. Clean backgrounds, proper lighting, and uniform style help create a professional store appearance
- Use square images (1000×1000 px).
- Maintain consistent image style.
- Use clean and distraction-free backgrounds.
- Ensure mobile-friendly image display.
Etsy and eBay Listing Photo Editing
Etsy and eBay focus heavily on visual appeal and storytelling. Sellers should use bright, natural-looking images that highlight product details clearly. Avoid over-editing, but ensure colors are accurate and backgrounds are distraction-free.
- Use bright and natural lighting.
- Show multiple product angles.
- Include close-up detail shots.
- Use lifestyle images for context.
- Keep colors accurate and realistic.
For a detailed platform-by-platform breakdown, read our ecommerce image guidelines guide.
Common Product Photo Editing Mistakes
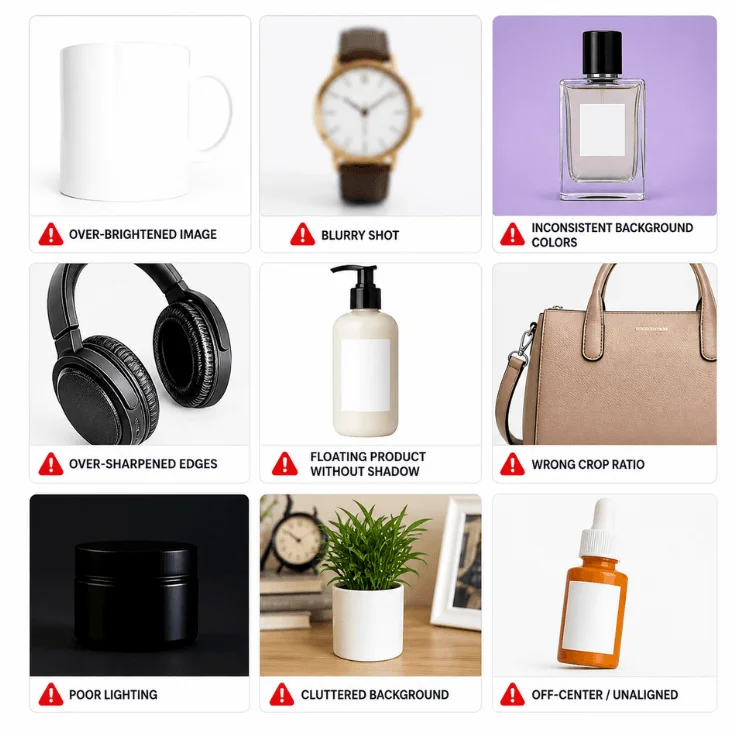
There are some regulations for image editing. The editor must be conscious of that thing. One mistake that kills sales before they even start. We have referred to some common mistakes that happen during product photo editing.
- Over-brightened product beyond real-life appearance.
- Imbalance or unnatural color.
- Use too much contrast.
- Unnatural Product floating.
- Inconsistent background style.
- Over-sharpening and white glow.
- Too much noise reduction destroys product image texture.
- Applying the same sharpening settings to every product type.
- Upload images over 500KB, which slows page speed.
- Using PNG for every image makes the website heavy.
- Different crop sizes across product photos.
- Edit every product with different color settings.
- Never check the final image on a mobile screen.
How Do I Fix a Blurry Product Image?
Blurry images cannot be fully fixed. Sharpening tools reduce blur but never fully restore lost detail. Always shoot in good lighting, use a tripod, and reshoot if the original is too soft. Prevention beats correction every time.
Why Does My Product Look Fake After Background Removal?
Because the edges were cut too harshly and the natural shadow was deleted along with the background. A product without shadow floats unnaturally. Fix it by softening edges using Refine Edge in Photoshop and adding a subtle drop shadow beneath the product.
Note: Photo editing mistakes, a drop in product image quality, improper image file size optimization, realistic product photos, and oversaturated product images are common problems. Most often, these mistakes happen from unskilled persons. To avoid those mistakes and make your product image more appropriate, you should hire a professional product image or ecommerce image service provider.
Frequently Asked Questions (FAQ)
Not really. Adobe Photoshop is a powerful tool used by professionals. It’s not a must for everyone. If you’re just starting out, many easier tools can handle basic edits like background removal and color correction. Photoshop becomes useful when you need advanced control.
Yes, you can. Modern smartphones and apps make it surprisingly easy to edit product photos. Apps like Canva or Snapseed offer simple tools for background cleanup, brightness, and color adjustments. It’s more than enough for small businesses and beginners.
It depends on the complexity. A simple edit, like removing a background or adjusting brightness, might take 5 to 10 minutes. More detailed edits, like retouching, shadow creation, or fixing imperfections, can take 20 to 30 minutes or more.
Yes, free tools are actually a great starting point. Many platforms offer solid features for basic editing, including cropping, color correction, and background removal. They help you learn the basics without spending money.
Canva can handle basic product photo editing quite well, especially for beginners or small businesses. It offers easy background removal and design features. However, for high-end or detailed editing, it may feel limited compared to advanced tools.
AI tools are becoming very popular for fast and efficient editing. Tools like Remove.bg, Adobe Firefly, and Canva AI can quickly remove backgrounds, enhance image quality, and even generate new visuals. They save time, but for perfect accuracy, manual editing is still important.
Final Thought
Editing product photos isn’t just about making images look nice. It’s about helping customers trust what they see. With simple steps like clean backgrounds, accurate colors, and subtle shadows, your products can appear more polished and realistic.
Stay consistent across all images and focus on clarity. Whether you handle edits yourself or hire professionals, well-edited photos can significantly improve engagement, build credibility, and ultimately increase your online sales.