Want your text to stand out in your designs? Learn how to outline text in Photoshop in just a few simple steps and give your graphics a professional edge. Text outlines add a clean border around your letters, making them more visible and visually striking against any background.
Whether you’re creating social media graphics, posters, or digital art, mastering text outlines in Photoshop will elevate your design skills. In this step-by-step tutorial, we’ll show you the easiest ways to add outlines to your text, so even beginners can achieve stunning results
What is Text Outline?
A text outline is like a border around your letters. It can be a solid color or a gradient, depending on your design needs. Sometimes, you can hide the text fill entirely and just show the outline for a striking effect. This tutorial will guide you through the simplest ways to outline text in Photoshop.
Ways To Add Text Outline: Photoshop Text Effects
Creating outlined text in Photoshop is quick and easy. Anyone can do it using Photoshop’s tools. With a little creativity, you can make clean, professional text outlines in just a few steps.
01. Using the Blending Option
The most common and useful one is the ‘Blending’ option to add an outline to text in Photoshop. We will start a new project from Photoshop’s ‘File’ menu. The size of the image is variable according to your needs. So, we are not giving you any suggestions about it. We are taking a frame size that we generally use.
Step 1: Add Your Text
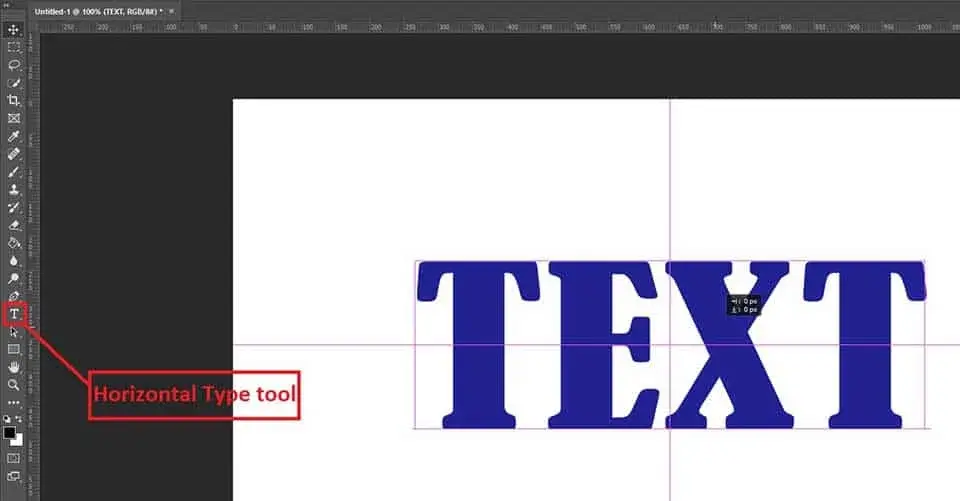
Before adding the outline of the text in the Photoshop program, you need to add text first. So, select the ‘Horizontal Type tool’ from the Photoshop tools panel and type whatever you need. We are using a white-colored background to create a better visualization. Also, we are placing the text in the middle of the Photoshop document.
Step 2: Apply the Blending Option
Using the Blending option proceeds you to the Photoshop outlining text step. You will see multiple options here. Select ‘Stroke’ and you will have other options to modify inside. Change the options according to your needs. Some of the options have sub-options as well. You can try them one after one and choose what you need.
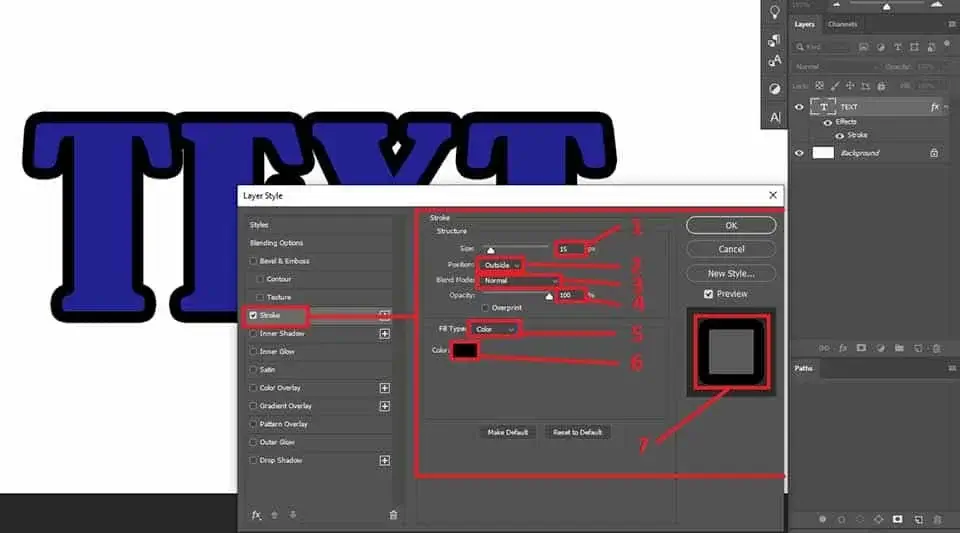
We are mentioning the usage of the options so that you can get help to decide your required ones. See the above image and follow the description below.
- The size in pixels shows the spread of the outline. We have used 15 pixels and the outline
- The position option is to choose the outline position. You can add an outline on the outside, inside, or in the center.
- The Blend Mode option allows you to modify the outline in multiple ways. Try one after one and choose whatever you need.
- Opacity is to differentiate the outline, whether you like it more visible or less.
- Fill Type lets you choose whether you need a solid color, gradient, or pattern.
- The color option is to choose the outline color you need.
- The preview shows you the changes you are making by tuning options.
Step 3: Adjusting the Text Fill
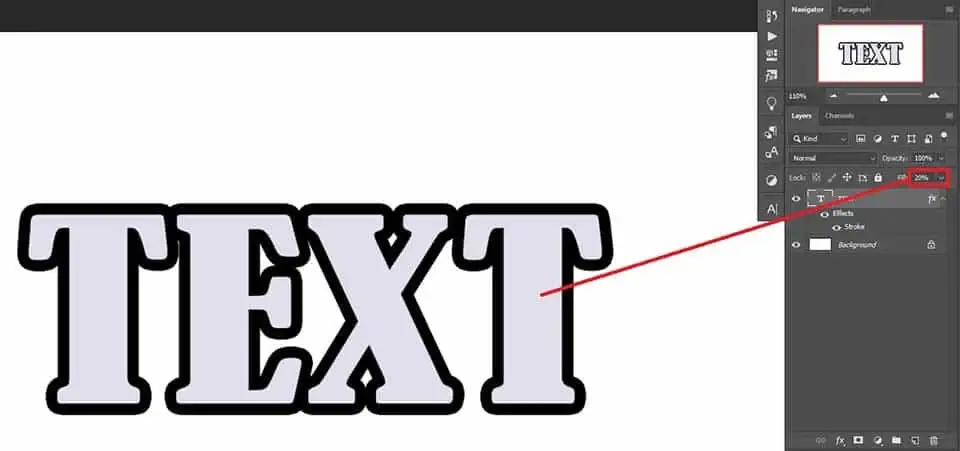
We have chosen blending options as needed. Hit OK to continue. Now, let’s talk about the Text Fill. You can control the fill from the layer. See the image below where we have located the option in red. The lower the opacity, the more transparency you will have. And that’s it.
02. Using Expanding Selection
Expanding selection is another convenient option to outline text. You do not need to use the blending option. However, the outline is limited to adjustment options. And, you can have a quick operation for this.
Step 1: Make A Text Selection
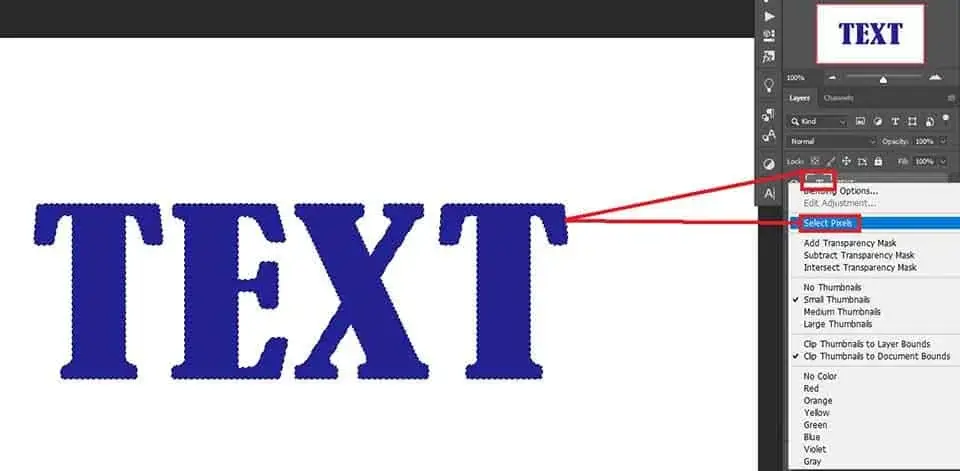
Open a new Photoshop document and add text to that as you did with the above option. Now you need to make a selection of the text. So, use Ctrl/Command for Win/MAC and left mouse click on the text layer. You will see the selection around the text only. The other option to do it is to right-click on the ‘T’ icon on the text layer and choose ‘Select Pixels’ from the drop-down menu.
Step 2: Add A New Layer
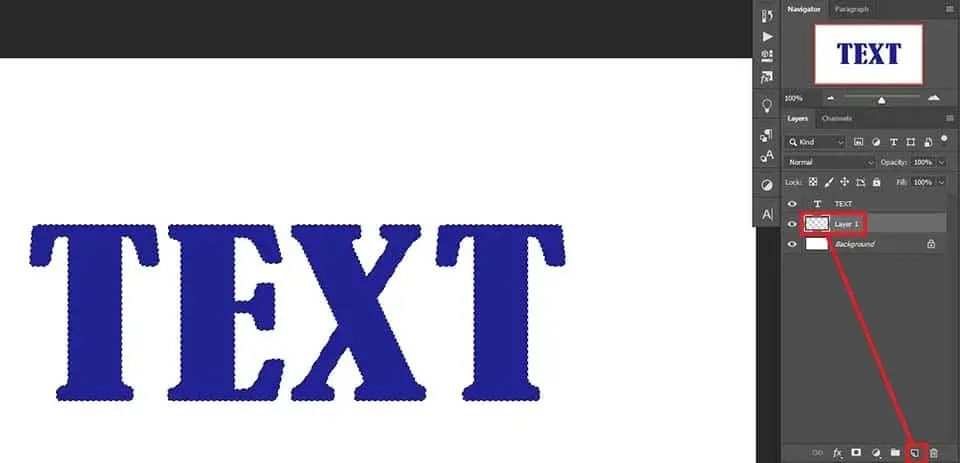
Now add a new layer and place it below the text layer. See the image below for a better understanding.
Step 3: Expand Selection
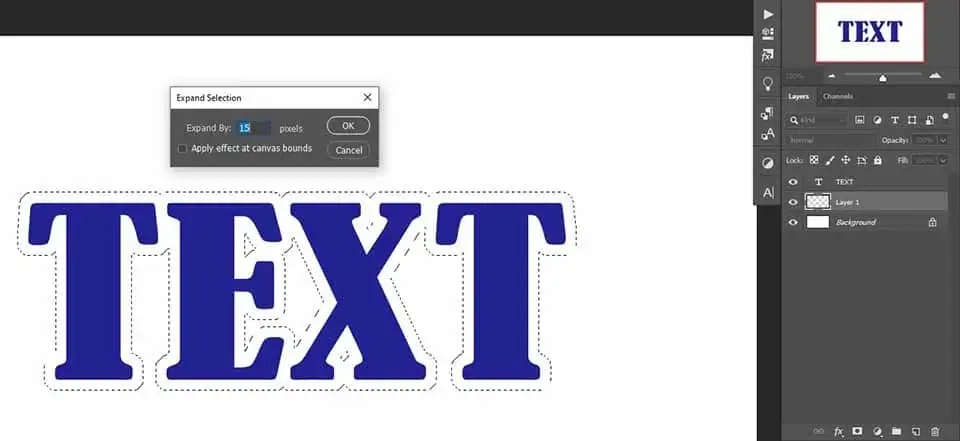
Keeping the selection, go to the Photoshop menu, Select>Modify>Expand. A message box will open where you can input the unit to expand the selection. We are using 15 pixels. Hit OK to continue.
Learn how to apply multiple strokes to your text for layered, eye-catching effects.
Step 4: Adding Outline Color in the Selection
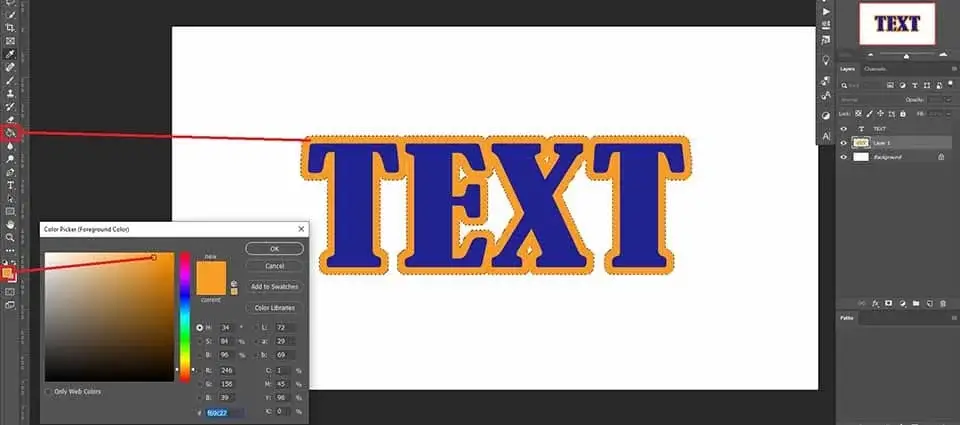
Choose a color for the text outline (see the image below) and press OK to continue. Now, use the paint bucket and drop the color inside the selection. Use Ctrl/Command for Windows/MAC to deselect. You can also control the fill for the text or the outline by selecting the layer and decreasing the percentage. You are all done.
Pro Tips for Outlined Text in Photoshop
- Combine your text outline with a subtle drop shadow to create a 3D effect.
- Try using gradient fills or patterns for your text outline to make it unique.
- Lowering the outline opacity creates softer, elegant effects on busy backgrounds.
- Placing the outline Inside, Outside, or Center can change your design’s feel.
Frequently Asked Questions
You can add an outline using the Blending Options. Right-click the text layer, choose Blending Options, check Stroke, and customize the size, color, and position of the outline.
Yes! Reduce the Fill Opacity of the text layer to 0% after applying a stroke in Blending Options. This way, only the outline will be visible.
Adjust the Size value in the Stroke settings under Blending Options. Higher values make the outline thicker; lower values make it thinner.
Yes! You can use the Expand Selection method. Select your text, expand the selection, create a new layer below, and fill it with your outline color.
Absolutely. In the Stroke settings of Blending Options, change the Fill Type to Gradient or Pattern to apply creative and colorful outlines to your text.
Conclusion
Outlining text in Photoshop is simple once you know the steps. You can use either the Blending Option for more flexibility or the Expanding Selection for quick results. Try these methods in your projects, experiment with colors, gradients, and shadows, and make your text designs truly stand out.
Now it’s your turn! Practice these techniques and see how your text can pop with professional-style outlines.

