
Ever tried removing a background and ended up with messy hair edges or jagged cutouts? You are not alone. It is one of the most frustrating problems in photo editing, and it is exactly the problem that professional image matting solves.
Photo matting is a term that means different things depending on who you ask. A photographer might think of a physical mat board inside a frame. A designer might picture a clean cutout in Photoshop. In this guide, we will break down exactly what photo matting means, the different types, and when you need a professional service to get it done right.
What Does It Mean to Mat a Picture?
Matting a picture means adding a decorative border (mat board) around a printed photo or digitally separating a subject from its background using advanced editing techniques like masking. It helps improve visual presentation, whether for framing a photo or creating clean, professional images for eCommerce, design, and advertising.
Two Types of Photo Matting You Should Know
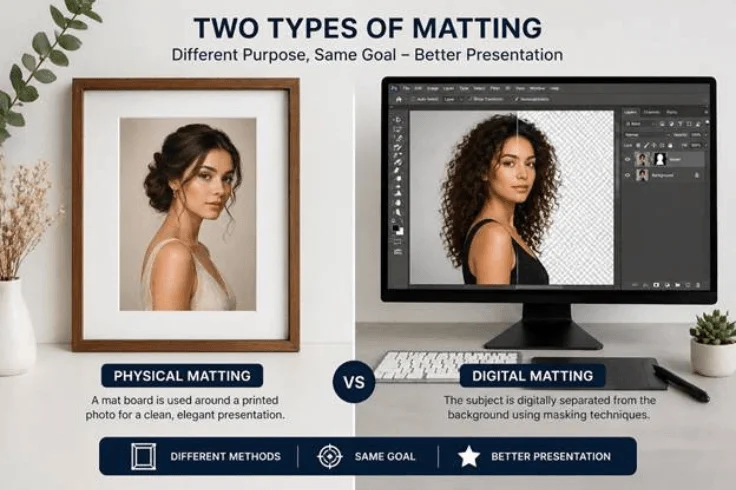
1. Physical Matting — For Printed Photos
Physical matting is purely about presentation. A mat board is cut to size and placed around a printed photo inside a frame. It is widely used in:
- Home decor and gallery displays
- Professional photography printing
- Art exhibitions and framed portraits
2. Digital Matting — For Photo Editing
Digital matting is what most online businesses and designers actually need. It refers to the process of isolating a subject from its background in software like Adobe Photoshop. The result is a clean cutout that can be placed on any background or used in composite designs.
This is where professional image masking comes in, especially when the subject has complex edges like hair, fur, soft fabric, or semi-transparent areas that simple tools cannot handle accurately.
For example, a fashion model with curly hair shot against a busy background requires precise masking to preserve every hair strand naturally. Automatic tools often miss fine details or create rough edges, while professional matting ensures a clean, realistic cutout.
Photo Matting vs Image Masking — Is There a Difference?
This is a common point of confusion. Here is the simple version:
| Aspect | Image Matting | Image Masking |
|---|---|---|
| Definition | Overall process of subject isolation | Technique used within matting |
| Scope | Broad concept | Specific method |
| Usage | Simple + complex images | Mainly complex edges |
| Examples | Background removal | Hair, fur, transparency |
For simple images with clean edges, clipping path may be enough, but complex subjects require advanced masking techniques. But for fashion photography, hair, or transparent objects, layer masking or alpha masking is the only reliable approach.
When Do You Need Professional Image Matting?
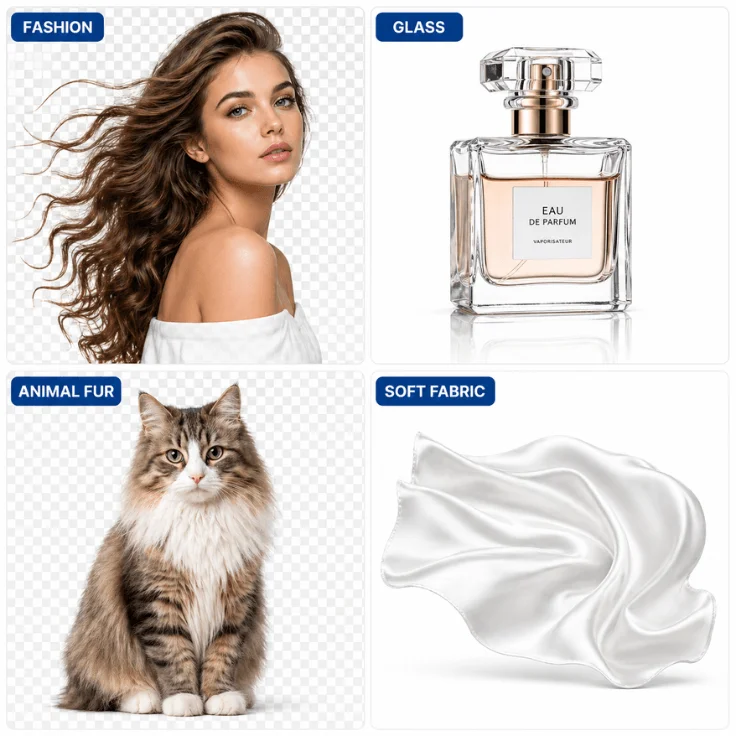
Not every image needs professional editing. But these situations almost always do:
- Fashion or portrait photos where hair needs to be precisely separated from the background
- Product images with reflective, glass, or transparent surfaces
- Animal fur or soft fabric textures that require pixel-level accuracy
- Large volume eCommerce catalogs where consistency and speed both matter
How to Mat a Photo in Photoshop — Step by Step
If you want to try digital matting yourself, here is a simple step-by-step process using Adobe Photoshop. Keep in mind that for complex images like hair or glass, professional masking will always deliver more accurate results.
Step 1: Open Your Image in Photoshop
Go to File > Open and select your image. Make sure your image is high resolution for the best matting results. Low-resolution images will produce rough, pixelated edges even with the best masking techniques.
Step 2: Duplicate the Background Layer
Right-click the Background layer and select Duplicate Layer. Always work on a duplicate — never edit your original image directly. This keeps your original safe and allows you to undo changes at any point.
Step 3: Select the Subject
Use the best selection tool for your image type:
- Quick Selection Tool — for simple subjects with clear edges
- Select Subject — Photoshop’s AI tool for automatic subject detection
- Pen Tool — for precise manual selection of complex edges
Step 4: Refine the Edges
Go to Select > Select and Mask. Use the Refine Edge Brush Tool to paint over hair, fur, or soft edges. Increase the Radius slider for better edge detection. This is the most critical step — poor edge refinement is the main reason DIY matting looks unnatural.
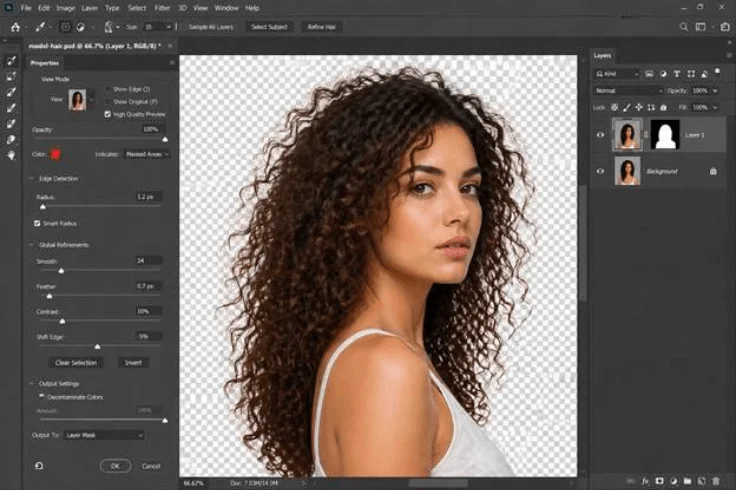
Step 5: Add a Layer Mask
Click Output To: Layer Mask in the Select and Mask panel. This creates a non-destructive mask that hides the background while keeping the subject intact. You can go back and refine the mask at any time without losing your original image.
Step 6: Place on a New Background
Open your desired background image and drag it below the masked layer. Adjust the position and scale as needed. Export as PNG to preserve transparency, or as JPEG if placing on a solid background.
Pro Tip: For hair, fur, or transparent objects, even Photoshop’s best tools often miss fine details. Professional image masking services use advanced manual techniques that automated tools simply cannot replicate.
Photo Matting Tools — Photoshop vs Canva vs Online Tools

Not sure which tool to use for digital matting? Here is a quick comparison of the most popular options:
Adobe Photoshop
The industry standard for professional image matting. Offers the most control with tools like Select and Mask, Layer Masking, Alpha Channel, and Refine Edge. Best for complex images, but requires skill and practice to use effectively.
- ✅ Best quality results for complex images
- ❌ Steep learning curve, paid subscription required
Canva
Canva’s Background Remover tool is quick and easy for simple product images. It works well for subjects with clear edges but struggles with hair, fur, and transparent objects.
- ✅ Fast and beginner-friendly
- ❌ Poor results for complex edges, limited control
Online Background Removal Tools (remove.bg, etc.)
AI-powered online tools are fast and require no design skills. They work well for standard product shots but often produce rough, unnatural edges on complex images.
- ✅ Instant results, no software needed
- ❌ Inconsistent quality, not suitable for professional use
Professional Image Masking Services
For eCommerce, fashion photography, and advertising, where quality matters, professional manual masking services deliver the most accurate and consistent results. Skilled editors use advanced Photoshop techniques to handle even the most complex images.
- ✅ Pixel-perfect results for any image complexity
- ✅ Fast turnaround, bulk pricing, free trial available
5 Common Photo Matting Mistakes to Avoid
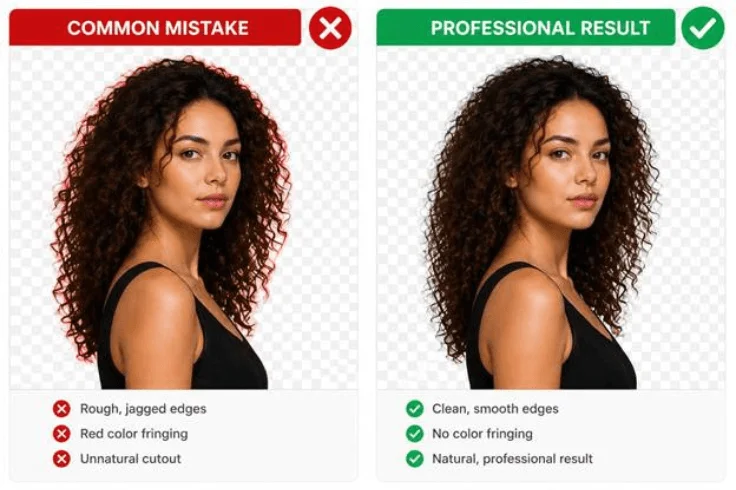
Even experienced editors make these mistakes. Avoiding them will save you hours of rework and ensure your cutouts always look professional.
1. Using a Low-Resolution Image
Low-resolution images make precise edge selection nearly impossible. Fine details like hair strands become blurry pixels that no masking tool can cleanly separate. Always start with the highest resolution version of your image.
2. Skipping Edge Refinement
Making a quick selection without using Select and Mask or Refine Edge leaves hard, unnatural borders around the subject. This is the most common reason DIY cutouts look fake. Always refine your edges, especially around hair and fur.
3. Ignoring Color Fringing
Color fringing happens when background colors bleed into the edges of your subject. It makes the cutout look unnatural on a new background. Use the Decontaminate Colors option in Select and Mask, or manually clean edges with the Burn or Smudge tool.
4. Working Destructively
Directly erasing the background instead of using a Layer Mask means you permanently lose pixel data. If you need to make corrections later, you have nothing to work with. Always use non-destructive masking techniques.
5. Using the Wrong Tool for the Image Type
Using a simple online tool for a fashion photo with complex hair, or using the Pen Tool for a simple product box, wastes time and produces poor results. Match your tool to your image complexity or outsource to a professional when the stakes are high.
Frequently Asked Questions
Matting a picture means placing a decorative mat board around a printed photo inside a frame, or digitally isolating a subject from its background in photo editing software. It improves presentation for both physical display and digital use in eCommerce, design, and advertising.
Not exactly. Background removal is the end result. Photo matting is the process used to achieve it. For simple images, basic tools work. For complex edges like hair or glass, professional image masking is used to deliver clean, natural-looking results.
Matting is the general concept of separating a subject from its background. Masking is the specific Photoshop technique used to achieve precise digital matting. In practice, professional image matting always relies on masking tools like Refine Edge, Layer Mask, or Alpha Channel.
Professional image matting services start from $1 per image. Layer masking is the most affordable option. Alpha masking and transparent masking for complex images cost slightly more. Bulk orders typically qualify for discounts of up to 50%.
Use a professional service when your images have fine hair, fur, soft edges, glass, or transparent areas. DIY tools often leave rough edges on complex subjects. Professional masking ensures pixel-accurate cutouts that look natural on any background.
Need Perfect, Professional Image Cutouts?
Clipping World delivers 100% hand-edited image masking services starting from just $1 per image. Ideal for eCommerce, fashion, and product photography where clean, natural edges matter most. We specialize in complex images like hair, fur, glass, and transparent objects — ensuring pixel-perfect, realistic results that look flawless on any background.
👉 Upload your image today and get a free trial within 24 hours — no commitment, just quality you can see.