

Selling on Etsy takes more than creating great products. Your product photos also play an important role in attracting shoppers and building trust. Since buyers cannot touch or examine your products in person, clear and well-presented images help them understand what they are buying.
Etsy product photo editing can improve the quality of your listing images by correcting lighting, balancing colors, removing distracting backgrounds, sharpening important details, and fixing minor imperfections. Well-edited photos can make your products look more polished and consistent while keeping their appearance realistic.
In this guide, we’ll cover practical Etsy photo editing techniques, image requirements, editing tools, common mistakes, and when it makes sense to hire a professional eCommerce photo editing service.
Why Professional Photo Editing Matters for Etsy Sales
Etsy is a competitive marketplace with millions of product listings. Your product photos help attract shoppers and build buyer confidence. Clear, well-edited images can make your products easier to notice.
A blurry photo, inaccurate color, or messy background can reduce buyer interest. Professional editing removes distractions and highlights important product details. The goal is not to change the product’s appearance. Instead, editing helps present the product clearly, accurately, and professionally.
Makes a Strong First Impression
Etsy shoppers often browse many listings at once. Your main photo gives them an immediate view of the product. A clean, well-lit image can make your listing easier to notice. It also helps shoppers understand the product at a quick glance.
Highlights Product Details
Many Etsy products are handmade, which means the craftsmanship, texture, and material quality are key selling points. Professional editing enhances these details through sharpening, lighting correction, and careful retouching.
Builds Buyer Confidence
Accurate colors and clear images help set buyer expectations. They give shoppers a better view of the product. Inaccurate photos can create confusion after purchase. This may lead to dissatisfaction, returns, or negative reviews. Well-edited photos present products clearly and realistically. This helps shoppers make more confident buying decisions.
Helps Products Stand Out in Search
Etsy considers listing quality when determining search visibility. Your primary photo also shapes the buyer’s first impression. Dark, blurry, or unclear images can reduce buyer interest. Clear photos make products easier to understand and compare.
Reduces Returns and Negative Reviews
Clear product photos help shoppers understand what they’re buying. Accurate colors, visible details, and proper framing can reduce confusion. Professional editing can correct colors, improve details, and remove distractions. This helps buyers form more accurate expectations before purchasing.
What Etsy Product Photo Editing Includes
Etsy product photo editing involves more than adding a filter or increasing the brightness. Professional editing focuses on improving the product’s appearance while keeping its colors, shape, texture, and details as realistic as possible.
Depending on the product and the listing requirements, an editing service may include background cleanup, color correction, lighting adjustments, retouching, cropping, sharpening, and shadow effects.
The right combination of edits depends on the original photo and the type of product being sold. For example, a jewelry image may need detailed retouching and reflection control, while a handmade clothing photo may benefit more from background cleanup, color correction, and wrinkle removal.
Here are some of the most common editing techniques used for Etsy product photos:
Background Removal and Replacement
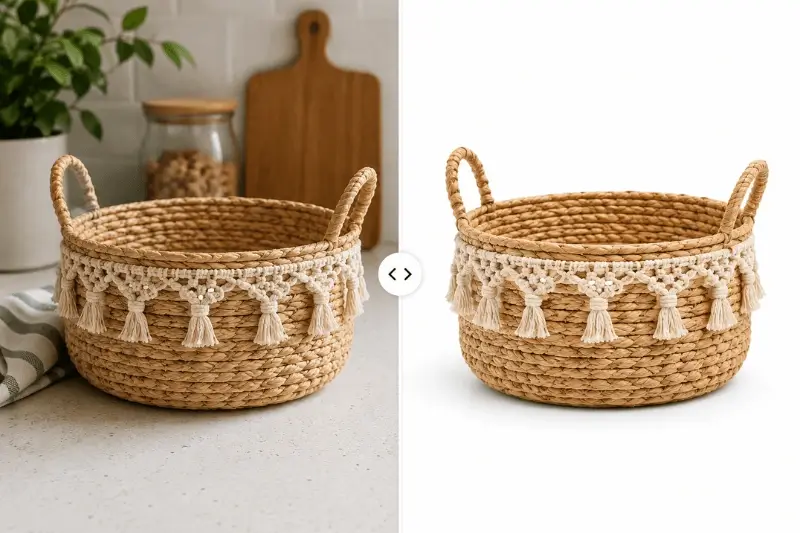
A clean background keeps the focus on the product and makes the listing look more professional. Depending on the listing style, use a clean white, neutral, or suitable lifestyle background that keeps attention on the product. This is especially useful for products photographed at home or in less controlled settings.
Color Correction and Lighting Fixes
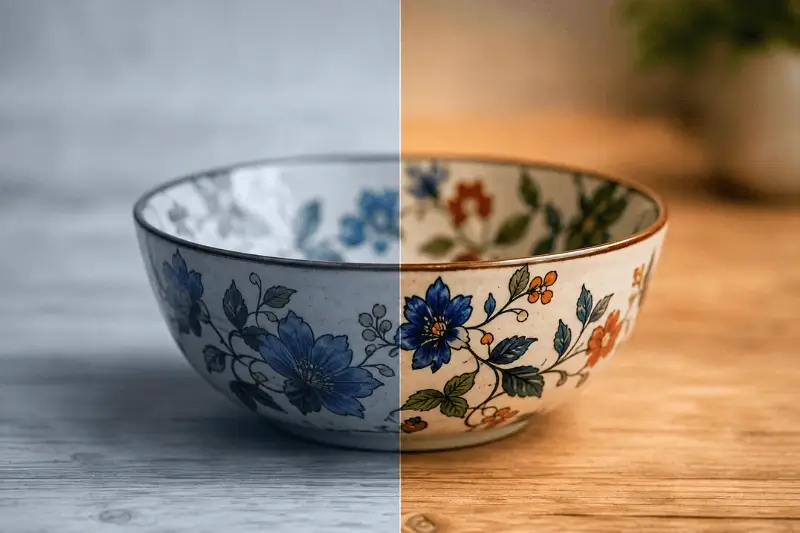
Accurate colors are important because shoppers use product photos to decide what they want to buy. Professional editing can correct exposure, white balance, brightness, contrast, and color tones while keeping the product’s natural appearance. This helps prevent images from looking too dark, dull, or overly saturated.
Cropping, Sharpening, and Retouching
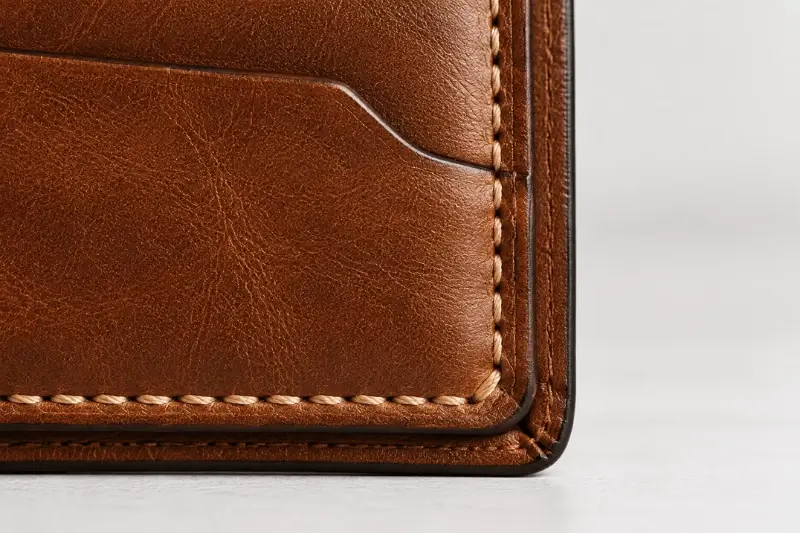
Proper cropping helps place the product in a balanced position and removes unnecessary space from the image. Sharpening can make important details and textures easier to see, while retouching can remove dust, scratches, stains, and other minor distractions. The goal is to improve the image without making the product look unrealistic.
Shadow Effects and Other Enhancements
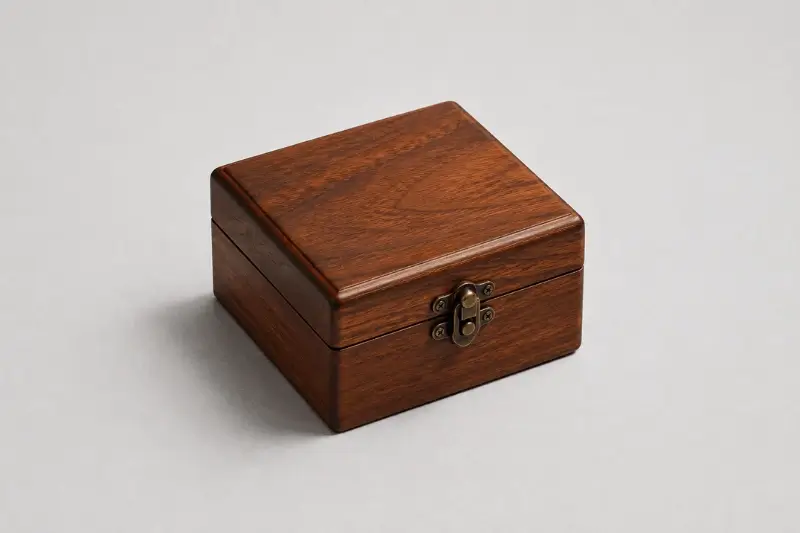
A natural-looking shadow can give a product more depth and help it appear grounded instead of floating against the background. Depending on the product, editing may also include reflection removal, wrinkle reduction, minor shape corrections, and image resizing. These enhancements should be subtle and consistent with the product’s real appearance.
Etsy Photo Requirements You Should Know

Before uploading edited product photos, make sure your images follow Etsy’s current image requirements and recommendations. Proper image dimensions, file format, orientation, and color settings can help your product photos display clearly across Etsy.
Etsy updates its image guidelines from time to time, so sellers should check the official Etsy Help Center before preparing a large batch of product photos.
Image Size and Resolution
Etsy recommends listing photos with a width and height of at least 2000 pixels. Using high-resolution images gives shoppers more detail to view and provides enough flexibility when Etsy crops images for different displays.
Your first listing photo should have a width and height of at least 635 pixels to help avoid appearing lower in Etsy search results. Avoid enlarging very small or blurry images just to meet the recommended dimensions. Upscaling can introduce pixelation and reduce image quality.
Image Orientation and Aspect Ratio
Etsy supports different image orientations, but your first listing photo should be horizontal (landscape) or square. Etsy also recommends using the same shape for your listing photos to create a more cohesive browsing experience.
Horizontal images can provide more usable space within Etsy’s thumbnail frames. Since Etsy may crop listing images into different thumbnail shapes, leave enough negative space around the product and keep important details near the center.
File Format and Size
Etsy supports the following image file types JPG, PNG, GIF, SVG, HEIC. However, animated GIF files and transparent PNG files are not supported. If a PNG contains transparent areas, those areas may appear black on Etsy. Etsy notes that images over 1MB may have trouble finishing uploads. Compress large files while keeping the image quality clear.
Color Profile
For accurate color display, Etsy recommends converting images to the sRGB color profile before uploading if colors appear differently on Etsy. sRGB is designed for digital screens, while CMYK is primarily used for print. Converting product photos to sRGB can help maintain more consistent colors between your original files and their appearance on Etsy.
Image Cropping and Thumbnails
Etsy may crop listing images into different thumbnail formats across the platform. To prevent important parts of your product from being cut off:
- Leave enough negative space around the product.
- Keep the main subject close to the center.
- Avoid placing important product details near the edges.
- Use Etsy’s thumbnail adjustment tool to preview how your image appears.
- Keep your listing images in a consistent orientation when possible.
Quick Reference — Etsy Image Requirements
| Requirement | Etsy Guideline |
|---|---|
| Recommended size | At least 2000 × 2000 pixels |
| Minimum first image | At least 635 × 635 pixels |
| First image orientation | Horizontal (landscape) or square |
| Accepted formats | JPG, PNG, GIF, SVG, HEIC |
| Color profile | sRGB recommended |
Note: Etsy updates its image guidelines periodically. Always check the official Etsy Help Center for the latest requirements before uploading a large batch of edited product photos.
Step-by-Step Etsy Photo Editing Process
Editing Etsy product photos does not mean adding heavy effects or making the product look artificial. The goal is to create clean, attractive images that accurately represent the product. A consistent editing workflow can also help sellers maintain the same visual quality across their entire Etsy shop.
1. Select the Best Original Photo
Start with the clearest product photo you have. Choose an image with good focus, sufficient lighting, and a useful composition. Professional editing can improve a photo, but it cannot fully fix an extremely blurry or poorly captured image.
2. Clean Up the Background
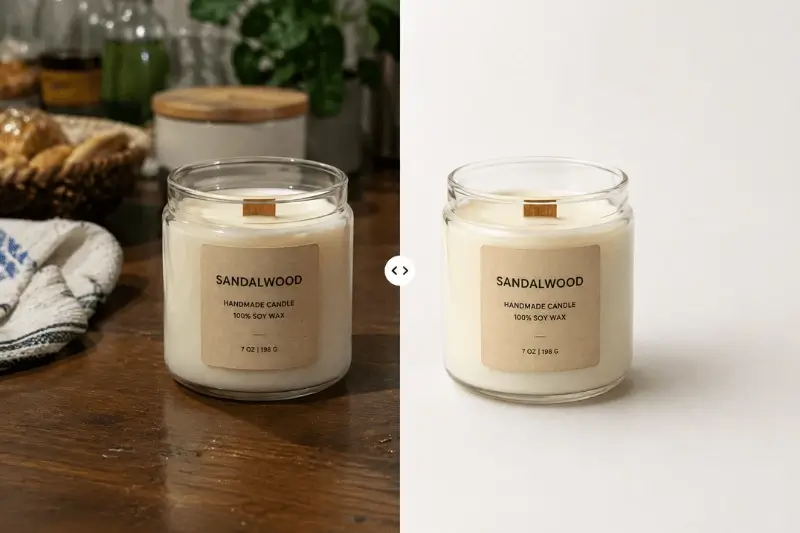
Remove distracting objects, clutter, unwanted marks, or uneven areas around the product, then swap in a clean white, neutral, or lifestyle-appropriate background suited to your listing style.
3. Adjust Brightness and Lighting
Correct exposure, brightness, contrast, highlights, and shadows to make the product easy to see. Avoid making the image excessively bright, as this can remove important details and make colors look inaccurate.
4. Correct the Colors
Adjust white balance, saturation, and color tones so the product looks as close to its real appearance as possible. Accurate color representation is especially important for clothing, jewelry, artwork, and other products where color influences purchasing decisions.
5. Remove Minor Imperfections
Retouch small distractions such as dust, stains, scratches, wrinkles, or unwanted spots. Keep the retouching subtle so the final image still represents the actual product honestly.
6. Crop and Position the Product
Crop unnecessary space and position the product appropriately within the frame. Keep enough space around the item so it does not feel cramped or awkward when displayed in the Etsy listing.
7. Add a Natural Shadow When Needed
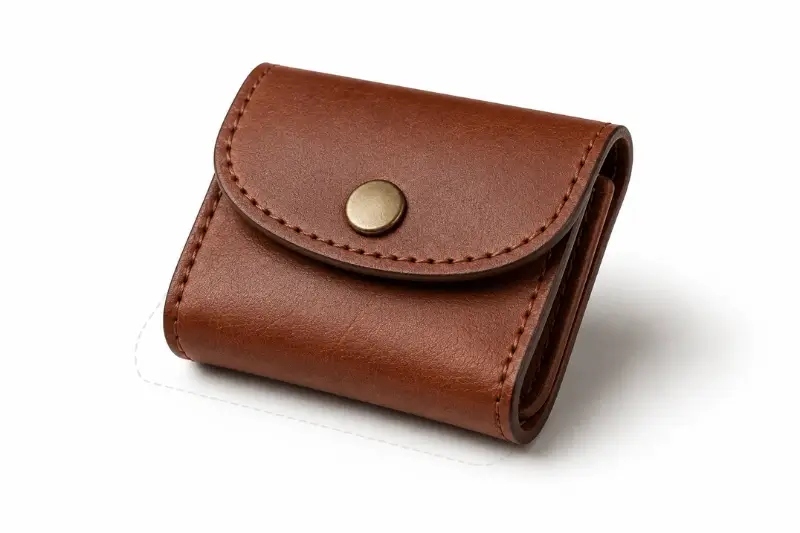
A subtle shadow can give the product depth and make it appear naturally placed on a surface. Use a shadow that matches the lighting direction of the original photo rather than applying a heavy or unrealistic effect.
8. Sharpen Important Details
Apply moderate sharpening to improve the visibility of product textures, edges, and fine details. Avoid excessive sharpening, which can create harsh edges and make the image look unnatural.
9. Review the Final Image
Before exporting, compare the edited image with the original. Check the product shape, colors, details, background, and overall appearance. Make sure the editing improves the image without changing the product’s identity.
10. Export and Prepare for Etsy
Save the final image in a suitable format and resolution for your Etsy listing. Keep the original files separately so you can make future edits without starting from scratch.
Best Tools for Etsy Product Image Editing
The right editing tool depends on the type of product, the level of editing required, and the seller’s experience. Some tools are designed for quick adjustments, while others provide advanced features for detailed retouching and professional image editing. Here are some popular tools Etsy sellers can use:
- Adobe Photoshop: Best suited for meticulous and professional editing.
- Adobe Lightroom: Ideal for editing multiple images at once.
- Canva: Simple and easy to use for basic editing and design.
- GIMP: A free program that is quite helpful in photo editing.
- Photopea: A free editor that is similar to Photoshop in its functionality.
- Remove.bg: Helps to remove backgrounds from Etsy product photos.
- Pixlr: Ideal for fast and easy photo editing.
The best tool ultimately depends on the type and volume of editing required. Simple listings may only need a basic online editor, while large catalogs or detailed product images may benefit from professional software or an experienced editing service.
DIY Tools vs. Professional Editing Services
Choosing between DIY editing tools and professional editing services depends on your budget, time, and the quality you want for your Etsy shop. DIY tools can be a good choice for simple edits, while professional editors can save time and handle more detailed work.
| Point | DIY Tools | Professional Service |
|---|---|---|
| Cost | Lower | Higher |
| Skills | Required | Not required |
| Time | More | Less |
| Quality | Depends on skill | Consistent |
| Best For | Small shops | Growing shops |
| Advanced Edits | Limited by skills | Easier to handle |
For a few simple images, DIY tools may be enough. For large catalogs or detailed editing, outsourcing can save time and maintain a consistent look across your Etsy shop.
Common Photo Editing Mistakes That Hurt Sales
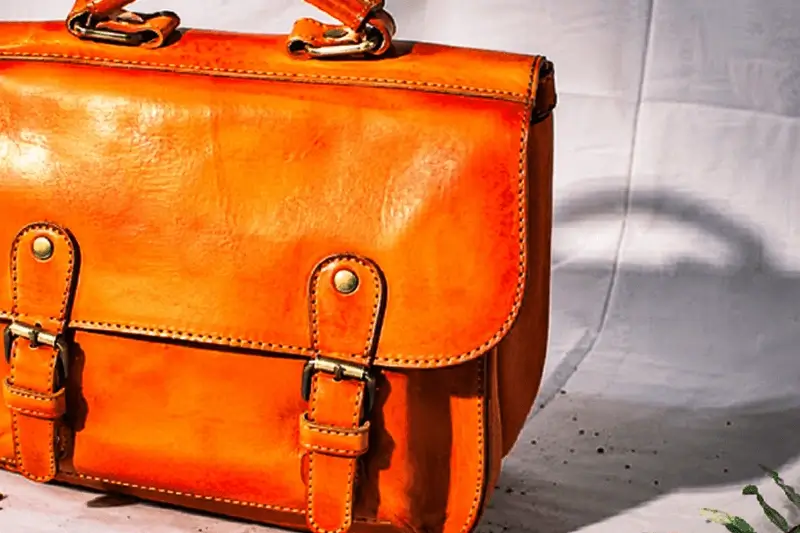
Poorly edited product photos can reduce buyer interest and make a product look less appealing. Avoid these common mistakes to keep your Etsy images clear, accurate, and professional.
- Over-editing Colors: Keep product colors natural and accurate.
- Using Heavy Filters: Avoid filters that hide important details.
- Leaving Harsh Shadows: Use soft, natural-looking shadows.
- Keeping a Messy Background: Remove distractions around the product.
- Using Low-Resolution Images: Upload sharp, high-quality photos.
- Making Products Look Unrealistic: Enhance the image without changing the product’s real appearance.
- Inconsistent Editing: Use a consistent editing style across your Etsy listings to create a more professional storefront.
- Poor Cropping: Leave enough space around the product so important details are not lost when Etsy crops images for thumbnails.
How to Choose a Professional Etsy Photo Editing Service
Choosing the right photo editing service can help you maintain consistent, professional-looking images across your Etsy shop. Before hiring a provider, consider these key factors:
- Portfolio: Check their previous work and experience with similar products.
- Quality: Look for natural colors, clean backgrounds, and detailed editing.
- Turnaround Time: Make sure they can meet your listing schedule.
- Pricing: Compare prices based on quality, complexity, and volume.
- Reviews: Read client feedback to understand their reliability.
- Consistency: Ensure they can maintain the same editing style across your product images.
- Free Trial: Choose a provider that offers sample or trial editing before a large order.
For professional Etsy photo editing, Clipping World provides background removal, retouching, color correction, and other image editing services. You can send a few sample images first to evaluate the editing quality before placing a larger order.
How Much Does Etsy Product Photo Editing Cost?
The cost of Etsy listing photo editing depends on the image quality, editing complexity, number of images, and turnaround time. Simple background removal usually costs less than detailed retouching, color correction, or complex image manipulation.
For sellers with large product catalogs, bulk editing services can also reduce the cost per image. Before placing a large order, ask for a sample edit to check the quality and consistency.
At Clipping World, professional photo editing starts at $0.29 per image. The final price may vary depending on the editing requirements and image complexity.
FAQs on Etsy Product Photo Editing
Is Etsy Product Photo Editing Worth It?
Yes, Etsy product photo editing can be worthwhile for sellers who want clearer, more professional, and consistent listing images. It is especially useful for large product catalogs, complex retouching, background removal, and color correction.
What Image Size Does Etsy Recommend?
Etsy recommends listing photos with a width and height of at least 2000 pixels. The first listing photo should be at least 635 × 635 pixels to help avoid appearing lower in Etsy search.
Is It Worth Hiring a Professional Editor?
It can be worthwhile if you have many products or need detailed, consistent editing. Professional editors can save time and help maintain a consistent look across your Etsy listings.
How Long Does Professional Etsy Photo Editing Take?
Turnaround time depends on the editing complexity and order volume. At Clipping World, many photo editing orders can be completed within 24–48 hours, depending on the project requirements.
Conclusion
Professional Etsy product photo editing can help sellers present their products more clearly, build buyer confidence, and create a consistent look across their shop. Simple improvements such as background cleanup, color correction, retouching, and natural shadows can make product images look more polished without making them appear artificial.
If you have a small number of products, DIY tools may be enough for basic edits. For larger catalogs or detailed editing, a professional service can save time and maintain consistent quality across your listings.
With the right editing approach and high-quality product images, Etsy sellers can create stronger listings and give shoppers a clearer view of what they are buying.