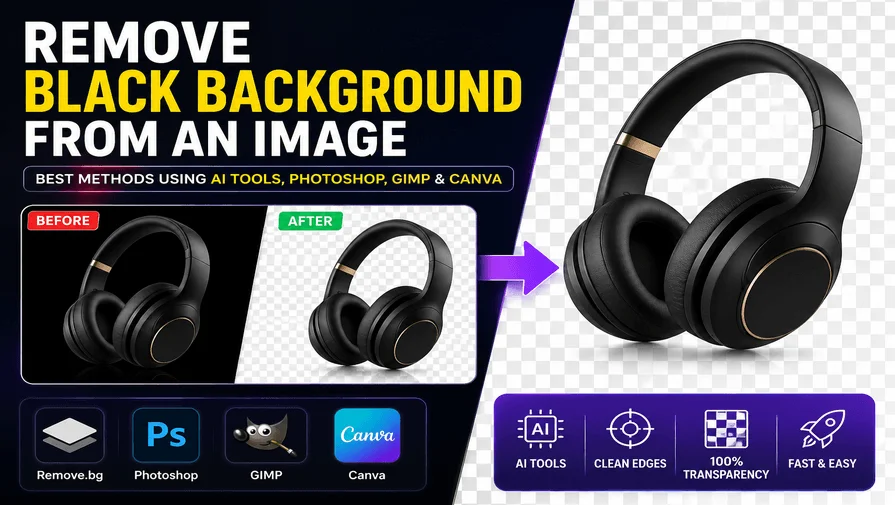
The easiest way to remove a black background is by using AI tools like Remove.bg or Photoshop’s Select and Mask feature. For glow effects and light trails, Screen Blend Mode works best, while GIMP’s Color to Alpha feature is ideal for free transparent background removal.
In this guide, you’ll learn how to remove a black background from logos, product photos, portraits, glow effects, and other complex images using AI tools, Photoshop, GIMP, and Canva.
Quick Recommendations by Use Case
- Best for quick edits: AI tools like Remove.bg
- Best for professional quality: Adobe Photoshop
- Best free method: GIMP Color to Alpha
- Best for hair and fur: Photoshop Select and Mask
- Best for glow effects: Screen Blend Mode
Best Black Background Removal Methods Compared
| Method | Speed | Quality | Best For |
|---|---|---|---|
| AI Tools | Instant | 4/5 | Quick edits |
| Photoshop | Medium | 5/5 | Hair & complex edges |
| GIMP | Fast | 4/5 | Smoke & gradients |
| Canva | Instant | 3/5 | Social graphics |
AI tools work well for simple backgrounds and quick edits. But for Amazon, Shopify, and other premium marketplaces, professional editing provides cleaner edges and more consistent results. For complex images, professional background removal services provide more accurate transparency and cleaner edge refinement than most automated AI tools.
At Clipping World, we handle everything from basic white background removal to complex jewelry, hair, and dark-background editing. Our editors combine manual clipping paths to deliver consistent, marketplace-ready images at scale.
How to Remove a Black Background Using AI Tools
AI-powered background removal tools are the quickest way to remove a black background from an image. They automatically detect the subject and make the background transparent in seconds. These tools work best for portraits, product photos, and simple graphics.
Step 1 — Open an AI Background Removal Tool
Open an AI-powered tool like Remove.bg, or Adobe Express in your browser. These tools use artificial intelligence to separate the foreground subject from the black background automatically.
Step 2 — Upload Your Image
Click Upload Image or drag and drop your file into the editor. Most tools support JPG, PNG, and WEBP formats. The AI usually processes the image within a few seconds and generates a transparent background automatically.

Step 3 — Refine the Edges If Needed
After processing, review the result carefully. Use the built-in brush or erase/restore tools to fix areas where the AI removed too much or missed parts of the background.
This is especially useful for:
- Hair and fur
- Transparent objects
- Dark subjects on black backgrounds
- Soft shadows and glow effects
Step 4 — Download as PNG
Export the final image as a PNG file to preserve transparency. Avoid saving as JPG, since JPG does not support transparent backgrounds and will replace transparent areas with white.
Tip: AI tools work best when there is a clear contrast between the subject and the black background. For very dark subjects, Photoshop or GIMP usually produces cleaner results.
If AI tools struggle with dark edges or complex details, Photoshop provides cleaner and more precise results. Tools like Select and Mask and Refine Edge preserve fine details like hair, jewelry, and shadows that AI often misses. For high-stakes images where quality cannot be compromised, Photoshop remains the professional’s first choice.
How to Remove a Black Background in Photoshop
Adobe Photoshop gives you more control and cleaner results than most AI tools, especially for hair, fur, smoke, glow effects, and complex edges. Depending on your image, you can use Blend Modes, Select & Mask, or the Magic Eraser Tool.
Remove Black Background Using Screen Blend Mode
This method is perfect for neon lights, sparks, fire, bokeh, and other light effects on a black background.
Step 1 — Open Your Image
Open your image in Photoshop and place it on a new layer above your background.
Step 2 — Change the Blend Mode
In the Layers panel, change the blend mode from Normal to Screen. The Screen blend mode hides black pixels while preserving brighter elements.
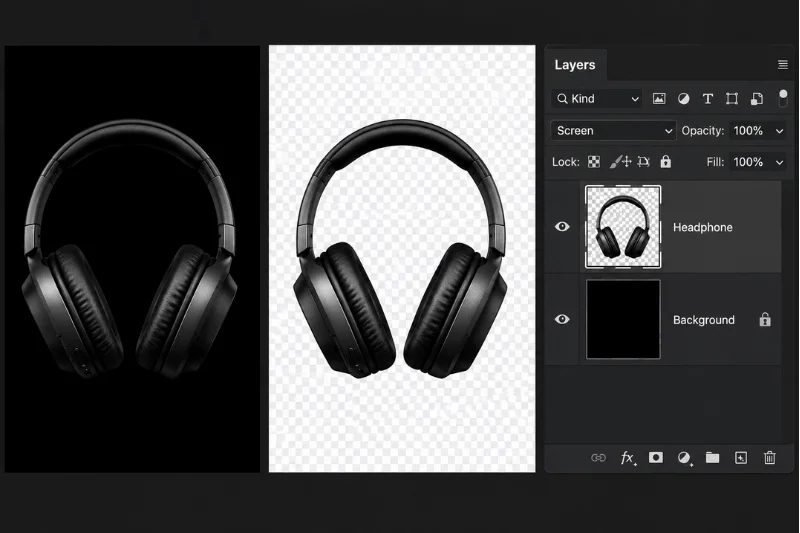
Step 3 — Position Your Image
Move the image over your desired background and adjust the size or placement if needed.
Bonus Tip — Using Blend Modes for Video & Compositing
If you are working with black text, graphics, stars, smoke, or light effects on a black background, you may not need to remove the background manually at all. In software like Photoshop, or After Effects, simply change the layer’s blend mode to Screen or Add. This makes the black background invisible while keeping the brighter elements visible.
This method works especially well for:
- Glow effects
- Fire and sparks
- Light leaks
- Smoke overlays
- Star fields
- Lens flares
Blend modes are commonly used in video editing and compositing workflows because they are fast, non-destructive, and preserve natural light effects.
Note: Screen Blend Mode is non-destructive, but the black background is not truly transparent. Exporting as PNG may still require masking for a fully transparent result.
Remove Black Background from Hair Using Select & Mask
Use this method when your image contains hair, fur, smoke, or soft transparent edges.
Step 1 — Select the Subject
Go to Select → Subject. Photoshop will automatically detect and select the main subject. Use the Quick Selection Tool (W) to refine areas manually if needed.
Step 2 — Open Select & Mask
Click Select → Select and Mask. Use the Refine Edge Brush Tool around hair and soft edges to improve the selection.
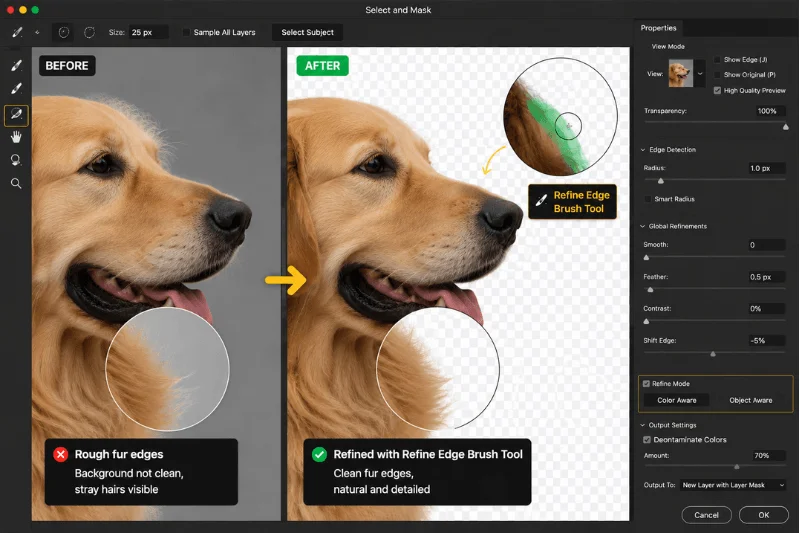
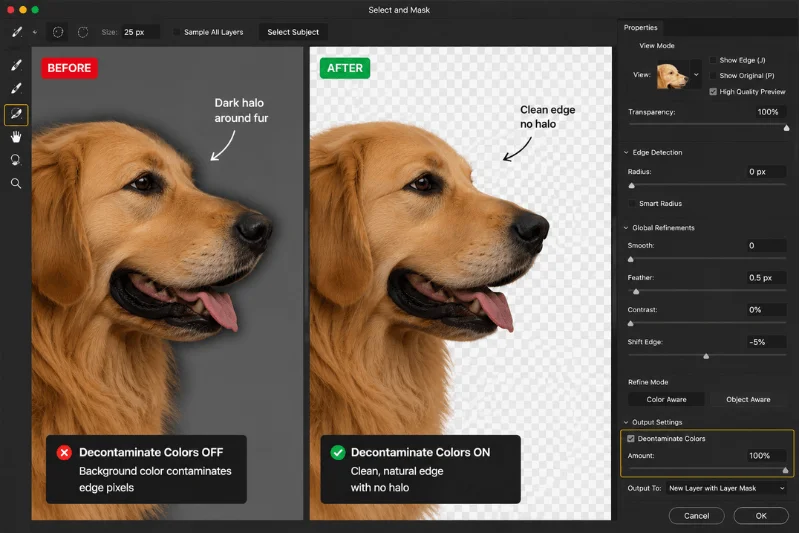
Step 3 — Remove Dark Edge Fringing
Enable Decontaminate Colors to reduce dark halos left from the black background. Set the output to New Layer with Layer Mask.
Step 4 — Export as PNG
Hide or delete the original background layer, then export the image as a PNG with transparency enabled.
Remove Black Background with the Magic Eraser Tool
If your image has a solid black background with no gradients or shadows, the Magic Eraser Tool is the fastest option.
Step 1 — Select the Magic Eraser Tool
Press E and cycle through the eraser tools until you find Magic Eraser Tool.
Step 2 — Adjust the Tolerance
Set the Tolerance between 30 and 50.
- Lower values remove fewer pixels
- Higher values remove more shades of black
Step 3 — Remove the Background
Click anywhere on the black background. Photoshop instantly removes the matching black pixels and replaces them with transparency.
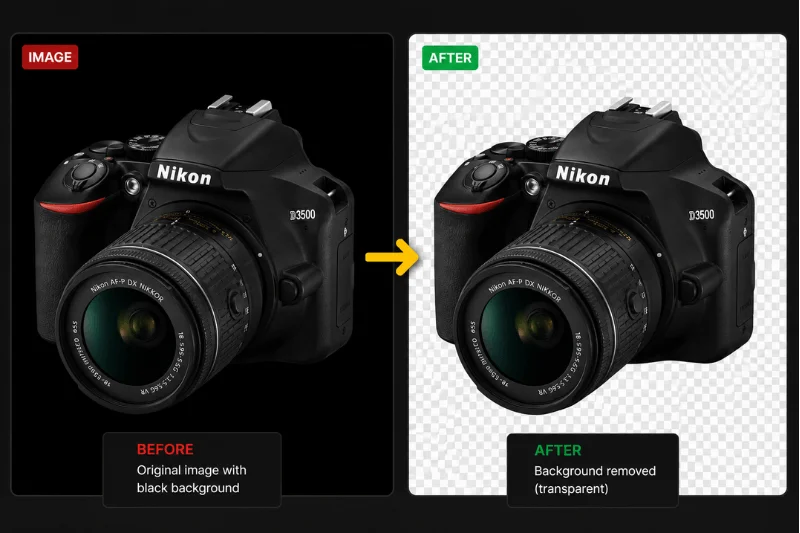
Tip: Enable Contiguous if you only want to remove connected black areas. Disable it to remove similar black tones across the entire image.
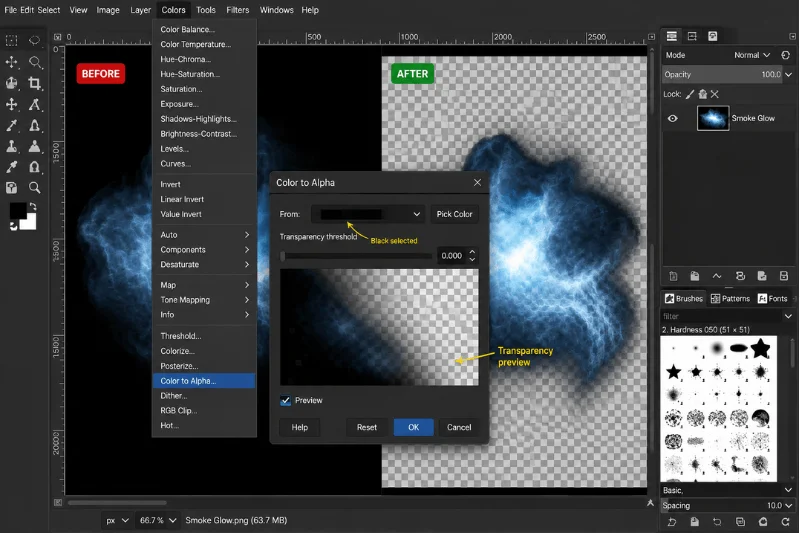
How to Remove a Black Background in GIMP
GIMP is one of the best free tools for removing black backgrounds from images. Its Color to Alpha feature can turn black pixels into transparency while preserving soft edges, smoke, shadows, and semi-transparent details.
Step 1 — Open the Image in GIMP
Launch GIMP and open your image using File → Open.
Step 2 — Add an Alpha Channel
Before removing the background, add transparency support to the layer. Go to: Layer → Transparency → Add Alpha Channel. Without an alpha channel, transparent areas cannot be saved properly.
Step 3 — Use Color to Alpha
Navigate to: Colors → Color to Alpha
In the dialog box:
- Click the color preview box
- Choose pure black
- Click OK
GIMP will automatically convert the black background into transparency.
Step 4 — Clean Up the Edges
Zoom in and inspect the edges of your subject. If some areas look faded or washed out, use:
- Colors → Curves
- Colors → Levels
This helps restore contrast and improve edge quality.
Step 5 — Export as PNG
Go to File → Export As. Save the image as a PNG file to preserve transparency. Make sure the filename ends with .png before exporting.
Tip: After Color to Alpha, some edges may look slightly washed out. Use Colors → Curves to boost contrast and punch up the remaining colors before exporting.
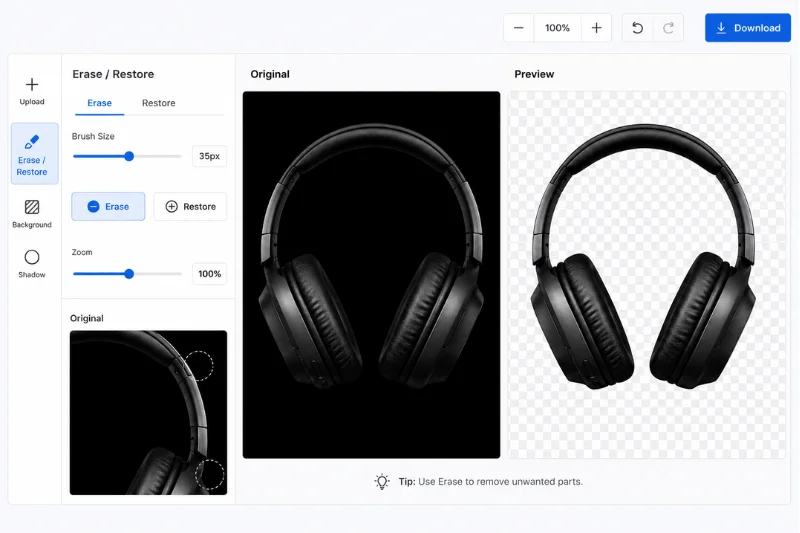
How to Remove a Black Background in Canva
Canva includes a built-in AI background remover that works directly inside the editor. Background Remover is available only on Canva Pro plans. This is ideal for social media graphics, presentations, thumbnails, and lightweight design projects.
Step 1 — Upload Your Image
Open Canva and upload your image to a new design.
Step 2 — Open the Background Remover
Select the image, then click Edit Image in the top toolbar. Choose Background Remover from the editing panel. Canva automatically detects the subject and removes the black background.

Step 3 — Refine the Result and Export
Use the Erase and Restore brushes to fix any areas that need cleanup. Export the image as a PNG with transparency enabled.
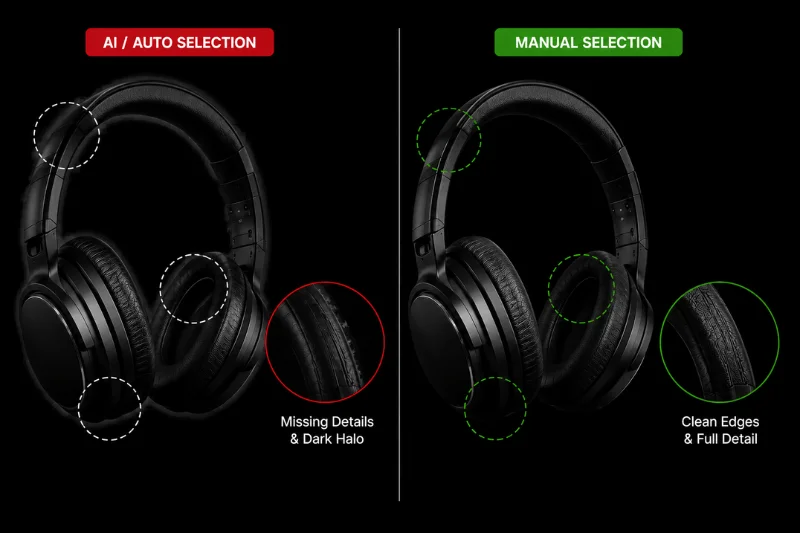
Why AI Tools Struggle to Remove Black Backgrounds
AI background removal tools are fast, but they struggle with certain types of images — especially when the subject blends into the black background or contains soft transparent edges.
AI tools often fail with:
- black hair on black backgrounds
- fur and animal photography
- smoke, fire, and glow effects
- transparent or reflective objects
- dark low-contrast images
- complex shadows and motion blur
In these situations, automatic removers may create rough edges, missing details, or dark halos around the subject. While AI tools are excellent for quick edits, professional clipping path services usually deliver more precise edges and cleaner transparency for complex product photos and detailed subjects.
For cleaner results:
- Use Photoshop Select and Mask for hair and fur
- Use Screen Blend Mode for glow effects
- Use GIMP Color to Alpha for gradients and smoke
- Switch to manual masking when AI tools cannot separate the subject properly
How to Remove Black Backgrounds from Dark Subjects
Removing a black background becomes much harder when the subject itself is also dark. Black clothing, dark hair, animal fur, and shadow-heavy images often blend into the background, making automatic tools less accurate. Here are some techniques that work better for difficult black-on-black images.
Increase Contrast Before Removing the Background
Before using any background removal tool, temporarily boost the contrast of the image. Use Levels, Curves and Brightness/Contrast. This helps separate the subject from the background and improves detection accuracy in AI tools and selection-based methods.
Use Photoshop Select & Mask for Fine Details
Adobe Photoshop delivers the best results for dark subjects with soft edges. Go to Select → Subject → Select and Mask, then:
- Use the Refine Edge Brush Tool around hair and fur
- Enable Decontaminate Colors to reduce dark edge halos
This method preserves more natural detail around difficult edges.
Try GIMP Threshold + Fuzzy Select
In GIMP, go to Colors → Threshold and adjust the slider until the subject separates clearly from the black background. Then:
- Use the Fuzzy Select Tool on the black areas
- Return to the original image layer
- Apply the selection as a layer mask
This works particularly well for dark objects with defined edges.
Use Manual Masking for the Cleanest Result
When automatic tools fail, manual masking is often the most reliable solution. You can use the Photoshop Pen Tool or GIMP Paths Tool for precise manual masking. Carefully trace around the subject edge by edge for maximum accuracy.
Tip: For very dark subjects on black backgrounds, professional editors often combine AI tools with manual masking to achieve clean, natural-looking transparency.
Common Black Background Removal Mistakes
Even with the right tool, small mistakes can leave rough edges, halos, or poor transparency. Here are the most common problems to avoid when removing a black background from an image.
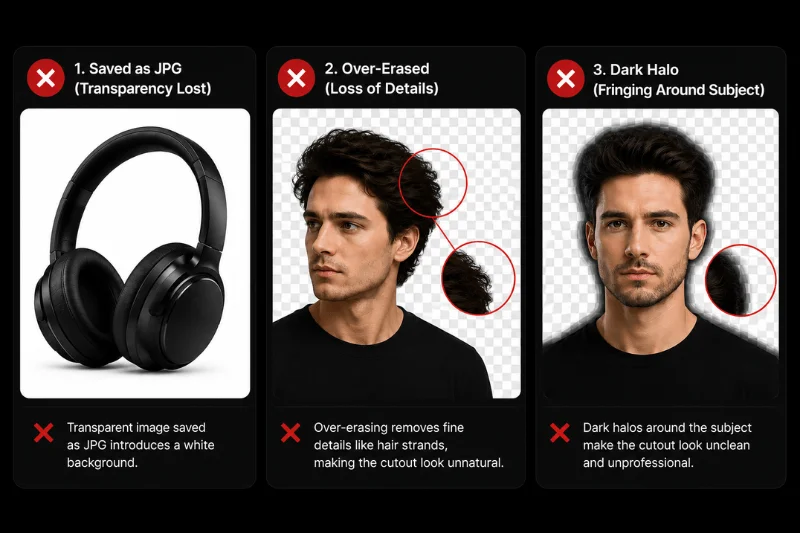
Saving the Image as JPG Instead of PNG
JPG files do not support transparency. If you save your image as a JPG, the transparent background will usually turn white. Always export transparent images as PNG or WEBP (for web use).
Removing Too Much of the Subject
High tolerance or aggressive AI removal can accidentally erase parts of the subject, especially around hair, fur, smoke, and transparent objects. Zoom in and inspect the edges carefully before exporting.
Ignoring Dark Edge Halos
Black backgrounds often leave dark outlines around the subject after removal. This issue is called edge fringing.
To reduce it:
- Use Decontaminate Colors in Adobe Photoshop
- Refine the mask manually
- Feather the edges slightly
- Adjust Levels or Curves if needed
Exporting Without Checking Transparency
Before downloading the final image, check for leftover black pixels and preview the image on both light and dark backgrounds to catch missed edges or transparency issues.
Frequently Asked Questions
PNG is the best format for transparent images because it fully supports alpha transparency without quality loss. WEBP also supports transparency and offers smaller file sizes for websites, but PNG remains the most widely compatible option. Avoid JPG because it does not support transparent backgrounds.
Yes. Tools like Remove.bg, Canva, Adobe Express, and GIMP can remove black backgrounds without Photoshop. AI tools are faster for simple images, while GIMP provides more manual control for gradients, smoke, glow effects, and semi-transparent edges.
Adobe Photoshop’s Select and Mask workspace usually delivers the best results for hair, fur, and soft edges. The Refine Edge Brush Tool helps preserve fine strands while reducing harsh cutout edges and dark halos from the original black background.
Dark outlines are caused by edge fringing — leftover black pixels from the original background. This commonly happens around hair, shadows, and soft edges. In Photoshop, enabling Decontaminate Colors can reduce dark halos. In GIMP, adjusting Levels, Curves, or feathering the mask helps clean up the edges.
Yes. Photoshop Screen Blend Mode and GIMP Color to Alpha both work well for black gradients. These methods gradually convert darker pixels into transparency while preserving glow effects, smoke, and light trails more naturally than hard selections.
This usually happens because the image was exported as a JPG file. JPG does not support transparency, so transparent areas are automatically replaced with white. Always export transparent images as PNG or WEBP.
Final Thoughts
Removing a black background from an image can be simple or highly detailed depending on the subject and the tool you use. AI tools are the fastest option for quick edits, while Adobe Photoshop and GIMP give you more control for complex edges, dark subjects, and professional-quality results.
Start with the easiest method first, then switch to more advanced tools if you need cleaner edges or better transparency. No matter which method you choose, always export the final image as a PNG to preserve transparency.
For ecommerce and marketplace listings, clean edges and transparent PNG images help products look more professional across websites, ads, and online stores.