
Old photographs capture memories that can never be replaced — but over time, they fade, tear, scratch, or lose important details. If you’re wondering how to restore old photos, the good news is that in 2026, you can repair many damaged pictures using free AI apps, Photoshop tools, or professional restoration services.
To restore old photos, first digitize them at high resolution (600 DPI). Then use AI-powered apps or Photoshop tools to fix scratches, fading, and discoloration. For severely damaged or torn images, professional manual restoration delivers the most natural and accurate results.
In this step-by-step guide, you’ll learn how to restore old photos for free, how to fix damaged pictures in Photoshop, and when expert restoration is the best choice for preserving irreplaceable memories.
Common Types of Old Photo Damage
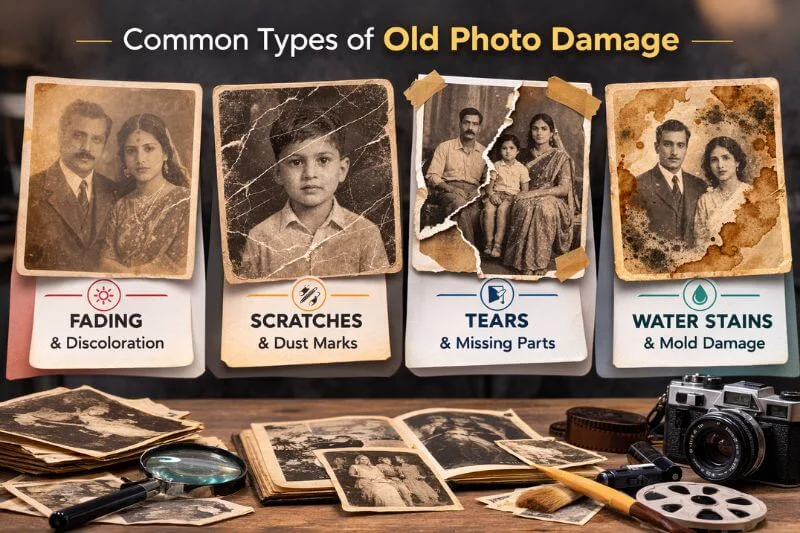
Before learning how to restore old photos, it’s important to understand what kind of damage you’re dealing with. Different problems require different restoration techniques. Some issues can be fixed easily using free AI apps, while others need manual Photoshop editing or professional restoration.
1. Faded or Discolored Photos
Over time, exposure to sunlight, air, and chemicals in photo paper causes colors to fade or shift. Many old photos turn yellow, bluish, or washed out. This is one of the most common problems when trying to restore old photos. Minor fading can often be corrected using AI apps or color adjustment tools. Severe fading may require manual color correction.
2. Scratches and Dust Marks
Physical handling, poor storage, or old photo albums can leave scratches and dust spots on printed photos. When scanned, these marks become even more visible. Most small scratches and dust marks can be fixed using healing tools in Photoshop or AI-powered restoration apps.
3. Torn or Missing Corners
Old photographs are fragile. They can tear easily, especially around the edges. Sometimes entire corners or sections go missing. Small tears may be repaired digitally. However, restoring missing parts often requires careful manual reconstruction for natural results.
4. Water Stains and Mold Damage
Humidity, flooding, or poor storage can leave watermarks and mold stains on photos. These stains may cause discoloration and texture damage. AI tools usually struggle with water damage. Professional manual editing is often the best solution in these cases.
5. Blurry or Low-Resolution Images
Older cameras and low-quality scans may produce blurry or pixelated images. Facial details often look soft or unclear. AI enhancement apps can improve sharpness, but they may over-smooth skin or create artificial details. High-end manual restoration preserves natural texture better.
Not all photo damage is the same. Some issues can be corrected quickly with free AI apps, while others need careful manual reconstruction. The table below summarizes what can realistically be fixed using DIY tools and when professional restoration becomes necessary.
Photo Damage vs Restoration Method Comparison
The table below gives a quick comparison of common photo damage types, their typical causes, and whether they can be fixed using free tools or require professional restoration.
| Type of Damage | Common Cause | Can AI Fix It? | Pro Needed? |
|---|---|---|---|
| Faded colors | Sunlight & aging | Yes (basic correction) | Sometimes |
| Scratches & dust | Handling & storage | Yes | Rarely |
| Torn edges | Physical damage | Limited | Often |
| Water stains | Moisture & mold | Weak | Frequently |
| Missing sections | Severe tears | No | Yes |
If your photo has severe tears, water stains, or missing parts, free apps may not deliver natural results. You can upload your image and get a free manual restoration preview to see the difference before making any decision.
Why This Matters
Understanding the type of damage helps you decide:
- Whether you can restore old photos for free
- Whether Photoshop tools are needed
- Or whether professional restoration is the best option
Now that you know what kind of damage you’re dealing with, let’s move to the first practical step — properly digitizing your old photo.
Step 1: Scan or Digitize Your Old Photo Properly
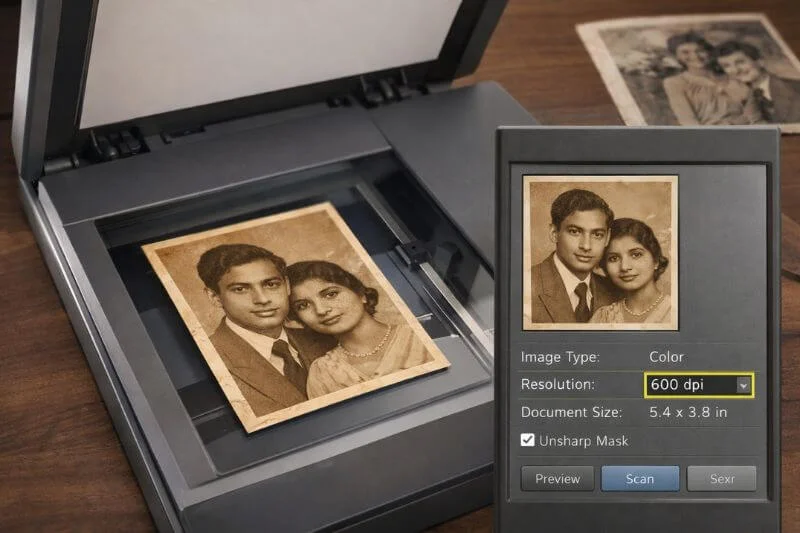
The first and most important step in restoring old photos is proper digitization. A high-quality scan preserves detail, texture, and color accuracy, making it much easier to fix scratches, fading, or tears later.
Best Way to Scan Old Photos
- Use a flatbed scanner
- Scan at 600 DPI minimum
- Save as TIFF or high-quality JPEG
- Clean dust gently before scanning
For professional-quality results, scanning at 600 DPI helps preserve fine detail. For printing, 300 DPI is widely considered the standard resolution for sharp output. If you’re unfamiliar with how DPI affects image quality, you can review this official guide on image resolution and print standards from Adobe.
If you don’t have a scanner, use your smartphone:
- Place the photo on a flat surface
- Use natural daylight
- Keep the camera parallel
- Avoid flash and shadows
Avoid scanning at low resolution (300 DPI or less), as it limits how well you can restore old photos later. Now that you have a high-resolution digital copy, you’re ready to choose the best method to restore your old photo.
Step 2: Restore Old Photos for Free Using AI Apps
Once you’ve digitized your image, the easiest way to restore old photos for free is by using AI-powered restoration apps. These tools automatically detect scratches, enhance facial details, improve sharpness, and correct faded colors within seconds.
If you want a detailed comparison of features, pros, and limitations, explore our guide to the best free photo restoration apps before choosing the right tool for your needs. Free AI apps are ideal for fixing minor damage and improving overall clarity without requiring advanced editing skills.
Popular Free AI Photo Restoration Apps
You can try tools like:
- Remini – Best for sharpening faces and enhancing blurry portraits
- Snapseed – Useful for manual spot healing and color adjustments
- Adobe Photoshop Express – Good for quick lighting and scratch fixes
- Fotor – Offers automatic AI restoration and color correction
What AI Apps Can Fix
Most free AI tools can help with:
- Minor scratches and dust
- Slight blur
- Basic color fading
- Low contrast
- Simple black-and-white colorization
Typically, you just upload your photo and apply the “restore” or “enhance” feature.
Limitations of Free AI Restoration
While AI tools are powerful, they do have limits:
- Over-smoothed skin textures
- Artificial-looking facial features
- Inability to rebuild missing sections
- Poor results with heavy water damage
- Watermarks in free versions
AI works best for lightly damaged images. If your photo has severe tears, missing parts, or strong discoloration, manual editing often produces more natural results.
Now that you understand how to restore old photos for free using AI apps, let’s explore how to fix damaged photos manually in Photoshop for greater control and precision.
Step 3: Restore Old Photos in Adobe Photoshop
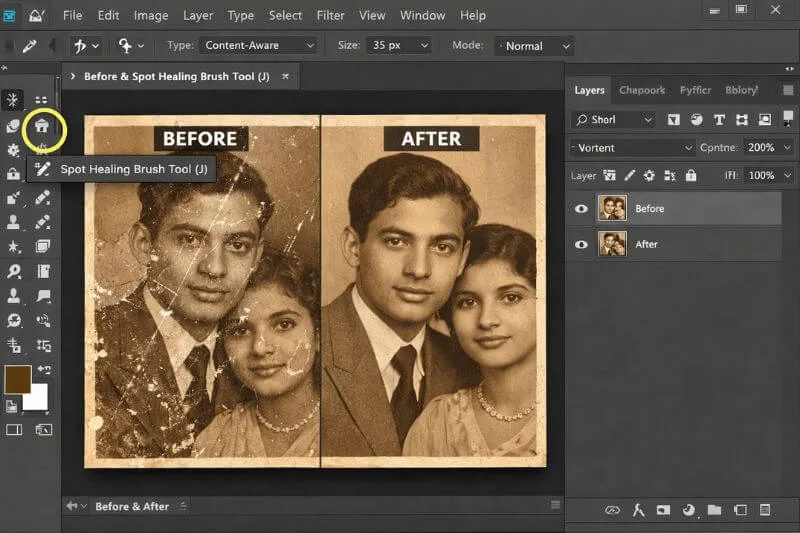
If free AI apps don’t deliver the results you want, Photoshop gives you full control to restore old photos manually. Unlike automated tools, Photoshop allows you to repair damage with precision, preserve natural textures, and rebuild missing details carefully.
Manual editing takes more time, but it produces more realistic and professional results — especially for heavily damaged images.
Essential Photoshop Tools for Photo Restoration
Here are the most useful tools when fixing damaged photos:
1. Spot Healing Brush Tool
Removes small scratches, dust spots, and minor surface imperfections automatically. It blends surrounding pixels smoothly to clean up light damage without visible edits.
2. Clone Stamp Tool
Repairs larger damaged areas by copying clean sections of the image. It allows precise reconstruction of tears, stains, and partially missing details.
3. Patch Tool
Corrects medium-sized damaged areas while maintaining natural texture. It blends repaired sections seamlessly to avoid harsh transitions or uneven tones.
4. Levels & Curves Adjustments
Restores faded contrast and improves overall brightness balance. These adjustments help recover depth, clarity, and lost tonal details.
5. Color Balance
Fixes yellowing and unwanted color shifts caused by aging. It helps create more natural skin tones and balanced color distribution.
Basic Photoshop Restoration Workflow
When restoring old photos in Photoshop, follow this order:
- Duplicate the original layer (always work non-destructively)
- Remove scratches and dust using healing tools
- Repair tears and missing edges
- Adjust brightness and contrast
- Correct colors and fine-tune skin tones
- Sharpen lightly for final clarity
Working in this structured order ensures clean, professional-looking results.
When Photoshop Is the Better Choice
Photoshop works best when:
- The image has medium to heavy scratches
- Tears need careful reconstruction
- Colors require precise correction
- AI tools create unnatural smoothing
However, if the photo has large missing sections, heavy mold damage, or complex facial reconstruction needs, manual expert restoration may still produce superior results.
Now that you’ve learned how to restore old photos using both free AI apps and Photoshop, let’s look at what to do when dealing with severely damaged or partially missing photographs.
Step 4: How to Restore Severely Damaged Photos (Professional Methods)
Some old photographs are too damaged for AI apps or basic Photoshop fixes. When an image has missing sections, heavy water stains, mold damage, or severe tearing, many people choose to restore old photos professionally to ensure realistic and long-lasting results.
Unlike automated tools, professional restoration involves careful reconstruction — rebuilding details pixel by pixel to preserve realism.
Types of Severe Damage That Need Expert Restoration
Professional photo restoration is often recommended when:
- Large portions of the photo are missing
- Faces are partially damaged or unclear
- Heavy water stains have distorted textures
- Burn marks or deep cracks are visible
- Important historical or sentimental images must be preserved accurately
In these cases, AI tools usually blur or guess missing details instead of truly rebuilding them.
What Professional Restoration Involves
Expert editors typically:
- Reconstruct missing areas manually
- Match skin tones and textures naturally
- Repair torn edges seamlessly
- Remove deep stains without over-smoothing
- Enhance resolution for high-quality printing
This process ensures the restored image looks authentic — not artificial.
Why Professional Restoration Produces Better Results
AI tools prioritize speed. Professional restoration prioritizes accuracy.
When restoring old photos that carry emotional or historical value, preserving facial details and natural textures matters. Manual editing allows for subtle refinements that automated apps cannot replicate.
Now that you’ve explored all restoration methods — from free apps to Photoshop to professional techniques — let’s compare which option works best for different types of damage.
Free Apps vs Professional Photo Restoration
By now, you’ve seen that there are multiple ways to restore old photos — from free AI apps to manual Photoshop editing to expert restoration. But which option is right for your image? The answer depends on the level of damage and the importance of the photo.
Quick Comparison
| Feature | Free AI Apps | Photoshop (DIY) | Pro Restoration |
|---|---|---|---|
| Fix minor scratches | Yes | Yes | Yes |
| Repair torn edges | Limited | Yes (manual) | Yes (advanced) |
| Rebuild Missing Parts | No | Difficult | Yes |
| Fix Water Damage | Weak | Moderate | Strong |
| Natural skin detail | Often over-smoothed | Good | Excellent |
| Print-Ready Quality | Limited | Good | High-quality |
| Time required | Seconds | Hours | Done by experts |
When to Use Each Option
Free AI Apps are ideal when:
- The damage is minor
- You need quick results
- Print-quality output is not required
- The restoration is casual or experimental
Photoshop works best when:
- You’re comfortable using editing tools
- The damage is moderate
- Greater control over adjustments is necessary
Professional restoration is recommended when:
- The photo has severe structural damage
- Important facial details are missing
- A natural and realistic reconstruction is required
- The image has strong sentimental or historical value
Not Sure Which Option Is Best?
If your photo has heavy tears, missing areas, or deep staining, AI tools may not deliver natural results. In such cases, reviewing real restoration examples can help you understand what level of detail is achievable through professional editing.
Restoring old photos isn’t just about improving image quality or removing damage — it’s about carefully preserving memories, emotions, and moments that can never be recreated.
How to Colorize Black and White Photos
Another common question when learning how to restore old photos is how to add natural-looking color to black-and-white images. AI tools like Remini and Fotor can automatically apply color within seconds. These apps detect faces, clothing, and backgrounds, then generate color based on visual patterns.
However:
- AI guesses skin tones
- Clothing colors may be inaccurate
- Historical accuracy is not guaranteed
AI predicts color — it does not know the original scene.
For important or historical photos, professional colorization delivers more realistic results. Experts use research, manual shading, and layer-by-layer painting to create natural skin tones, accurate fabric colors, and balanced contrast.
How to Prepare Restored Photos for Printing
After restoring your old photo, proper export settings are essential to preserve quality — especially for framing or large prints.
Follow these guidelines:
- Export at 300 DPI
- Use high resolution (minimum 3000px wide for medium prints)
- Convert to CMYK for professional printing
- Avoid heavy JPEG compression
Correct export settings ensure your restored image looks sharp and natural when printed. If you’re unsure about print dimensions, see our detailed guide on how big a 5×7 photo is and what resolution works best for printing.
Tips to Preserve Old Photos After Restoration
Restoration improves old images — but preservation protects them long-term.
To keep both original and restored versions safe:
- Store physical photos in acid-free sleeves
- Keep away from direct sunlight
- Maintain low humidity levels
- Create multiple digital backups
Prevention is just as important as restoration.
How Much Does It Cost to Restore Old Photos?
The cost to restore old photos depends on the level of damage and the amount of manual reconstruction required. While some images can be improved using free AI tools, professionally restored photos are priced based on complexity.
Photo Restoration Cost Breakdown
| Damage Level | Typical Issues | Price Range | Best For |
|---|---|---|---|
| Minor Damage | Small scratches, dust, light fading | $10 – $25 | Quick cleanups, simple portraits |
| Moderate Damage | Tears, color correction, stain removal | $30 – $60 | Family portraits, moderate repair |
| Severe Reconstruction | Missing parts, heavy water damage, and facial rebuilding | $70+ | Heirloom or historically valuable photos |
What Affects the Final Price?
Several factors influence the restoration cost:
- Size of missing or damaged areas
- Facial reconstruction complexity
- Amount of manual texture rebuilding
- Required print resolution
- Turnaround time
Photos that require pixel-by-pixel reconstruction naturally take more time and skill, which increases cost.
Why Pricing Transparency Matters
Professional photo restoration is not just about removing scratches. It involves detailed manual editing to preserve:
- Natural skin texture
- Accurate facial features
- Realistic color balance
- Print-ready resolution
For sentimental or irreplaceable images, investing in high-quality restoration ensures the memory is preserved properly. Not sure which pricing category your photo falls into? Upload your image for a free damage assessment and get a custom quote before making any decision.
Common Mistakes When Restoring Old Photos
While learning how to restore old photos, many people unintentionally reduce image quality instead of improving it. Simple mistakes during scanning, editing, or exporting can permanently damage important details.
Some common restoration mistakes include:
- Scanning at low resolution (300 DPI or lower)
- Over-sharpening faces and textures
- Using heavy filters that destroy natural tones
- Cropping the original image too tightly
- Saving in low-quality JPEG format
- Ignoring proper color balance adjustments
Avoiding these errors helps preserve natural detail and ensures better final results — especially if the image will be printed or archived. For a complete breakdown of mistakes and how to avoid them, read our detailed guide on common photo restoration mistakes.
Before & After Photo Restoration Examples
Seeing real results can help you understand what’s possible when restoring old photos. While minor scratches and fading can often be improved with AI tools, severely damaged images usually require careful manual reconstruction.
Example 1: Faded & Discolored Portrait
Before:
An old family portrait with heavy yellowing, low contrast, and visible dust marks.
After:
Colors were corrected, skin tones balanced, contrast restored, and small scratches removed — resulting in a natural, print-ready image while preserving original facial details.
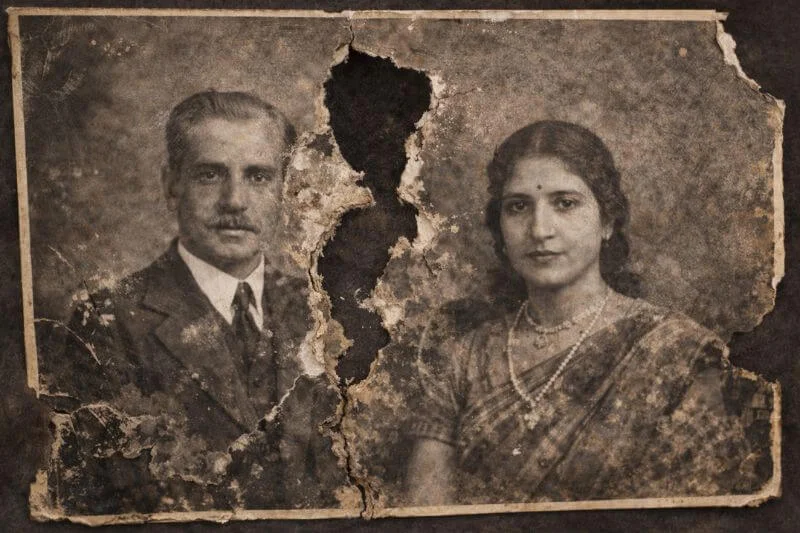
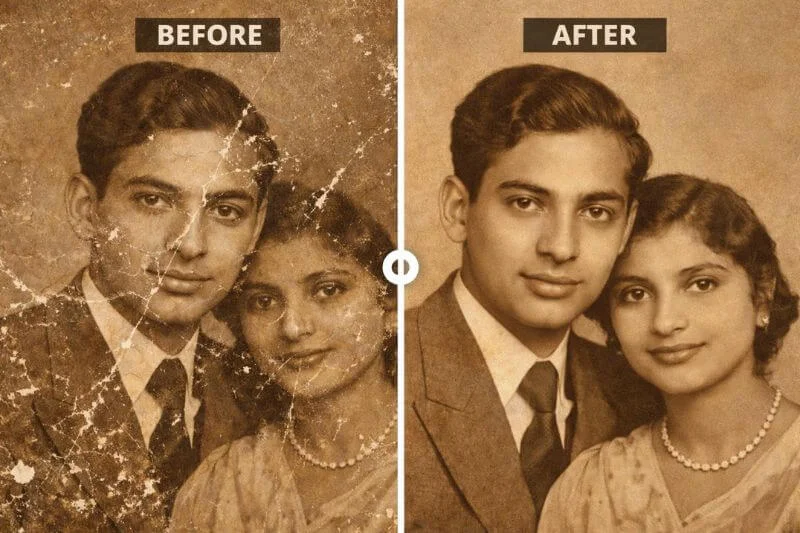
Example 2: Torn & Water-Damaged Photograph
Before:
A vintage photo with torn edges, missing corners, and water stains affecting the background.
After:
Missing sections were digitally reconstructed, tears repaired seamlessly, stains removed, and textures carefully blended to maintain authenticity.
These examples show the difference between basic enhancement and detailed restoration. AI tools can improve clarity, but complex damage often requires manual editing to achieve natural and realistic results.
You can view more real before-and-after restoration results on our sample page to see how different types of photo damage are repaired professionally.
Frequently Asked Questions (FAQ)
You can restore damaged photographs for free using AI-powered apps that remove scratches, improve sharpness, and correct faded colors. First, scan the image at 600 DPI, then upload it to a restoration app. Free tools work best for minor surface damage but struggle with missing sections or heavy staining.
The best app depends on the type of damage. AI tools like Remini and Fotor enhance faces and clarity, while Snapseed offers manual adjustments. For complex repairs, Photoshop or professional editing typically produces more natural results
Yes, Photoshop can repair tears, stains, and missing areas using tools like the Clone Stamp, Spot Healing Brush, and Patch Tool. It allows precise manual reconstruction, but advanced damage may require experienced editing skills
In many cases, yes. Even images with large tears, stains, or missing details can be digitally reconstructed. While AI tools have limitations, professional manual restoration can rebuild structure and preserve realistic textures.
Scan at a minimum of 600 DPI to preserve fine detail during restoration. For printing, export at 300 DPI with sufficient pixel dimensions to ensure sharp, high-quality output.
Professional restoration is worthwhile for sentimental, historical, or print-ready images. While free apps handle minor fixes, expert editing ensures natural skin tones, accurate reconstruction, and archival-quality results.
Final Thoughts: How to Restore Old Photos the Right Way
Learning how to restore old photos is not just about fixing scratches or improving clarity — it’s about preserving memories that cannot be recreated. Whether you want to restore old family photos or repair a historically valuable image, the right method depends on the level of damage and the importance of the photograph.
Start with proper digitization. Use AI tools for quick improvements. Turn to Photoshop for more control. And when dealing with severe damage or meaningful family heirlooms, consider professional restoration for the most natural and lasting results.
Old photographs connect us to people, places, and moments from the past. Restoring them carefully ensures those memories remain clear for generations to come. If you’re unsure which method is best for your image, reviewing real restoration examples or testing a preview can help you make the right decision with confidence.
About the Author
Clipping World Photo Restoration Team
Clipping World has been providing professional image editing and photo restoration services since 2012, serving clients worldwide. Our restoration specialists combine advanced manual Photoshop reconstruction techniques with modern AI enhancement tools to deliver natural, high-resolution, print-ready results.
Over the years, we have restored thousands of vintage family portraits, historical photographs, and severely damaged images — preserving meaningful memories with careful attention to detail, authenticity, and long-term archival quality.