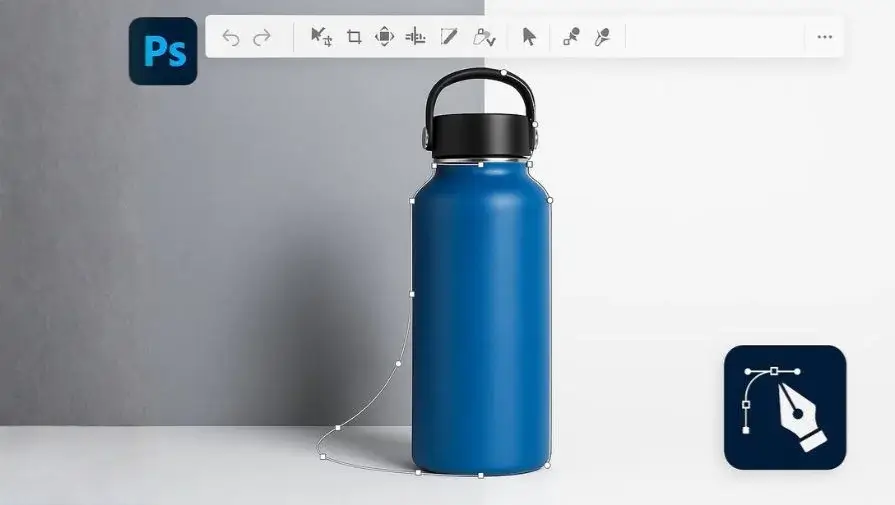
A clipping path is a hand-drawn vector outline used to cut an object from its background in photo editing. Created with the Photoshop Pen Tool, it isolates subjects with clean, sharp edges — making it one of the most important techniques for product images, ecommerce photography, and professional design work.
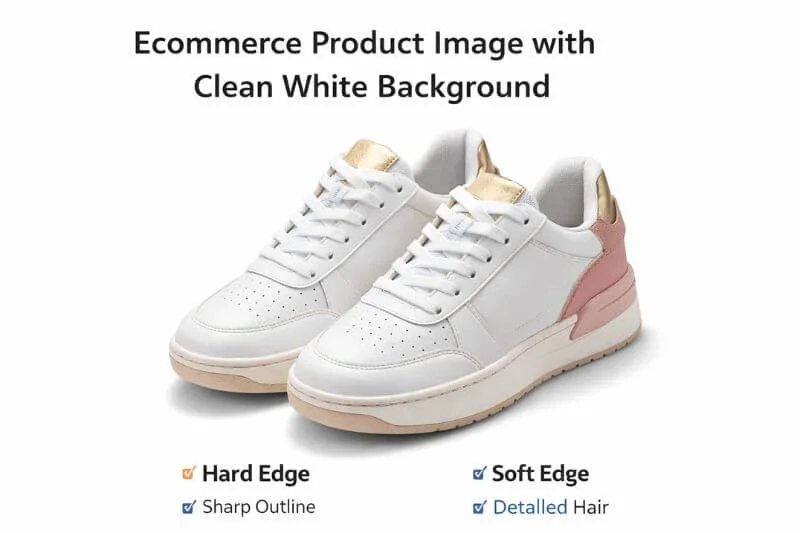
This technique is widely used in ecommerce, advertising, and catalog production, where distraction-free images improve clarity and conversions. While clipping paths work best for hard-edged objects, more complex subjects like hair or fur often require image masking instead.
In this complete guide, you’ll learn what a clipping path is, when to use it, how it works, different types, pricing factors, and how professionals use it to create marketplace-ready images.
What Is a Clipping Path in Photoshop?
A clipping path in Photoshop is a hand-drawn vector outline created with the Pen Tool to isolate an object from its background. It creates clean, sharp edges and is widely used for product photos, ecommerce images, and professional graphic design.
How Clipping Path Works
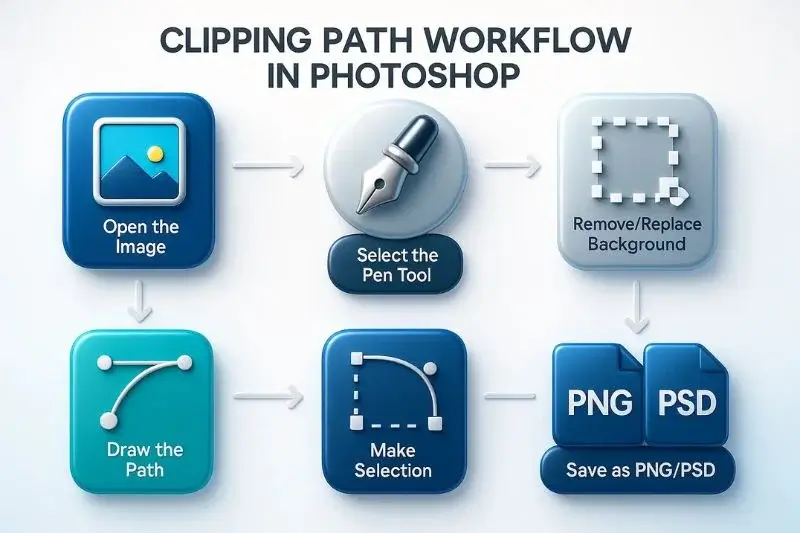
Now that you understand the concept, let’s walk through the process step by step.
- Open the image in Photoshop
- Use the Pen Tool to draw a closed path around the object
- Convert the path into a selection
- Remove or replace the background
- Save in a format that supports transparency (PNG, PSD)
This method works well for simple, medium, and complex objects with solid edges.
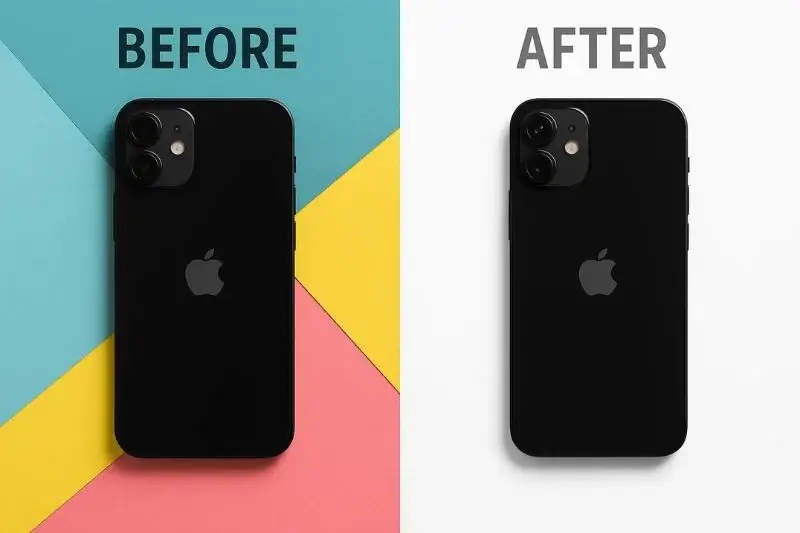
Why Clipping Path Is Important in Photo Editing
Clipping paths are essential for creating professional, distraction-free images. Clean cutouts help products stand out and maintain visual consistency across websites, catalogs, and advertisements.
Key benefits include:
- Removing distracting or messy backgrounds
- Creating a consistent product presentation
- Improving visual clarity and professionalism
- Meeting ecommerce marketplace image standards
- Allowing flexible background changes for marketing
Without clean object isolation, product images can look unprofessional. This can reduce customer trust and hurt conversions.
When You Should Use a Clipping Path
Clipping paths are ideal for:
- Products with hard, well-defined edges
- Electronics, boxes, bottles, furniture
- Fashion items like shoes and bags
- Jewelry with clear outlines
- Catalog and advertising images
These objects benefit from the sharp, precise edges that vector paths provide.
When You Should NOT Use a Clipping Path
Clipping paths are not suitable for subjects with soft or transparent edges, such as:
- Hair or fur
- Smoke or fire
- Glass transparency
- Motion blur
- Feathers or soft fabrics
In these cases, the image masking is a better technique because it preserves soft transitions and semi-transparent details.
Clipping Path vs. Image Masking (Quick Comparison)
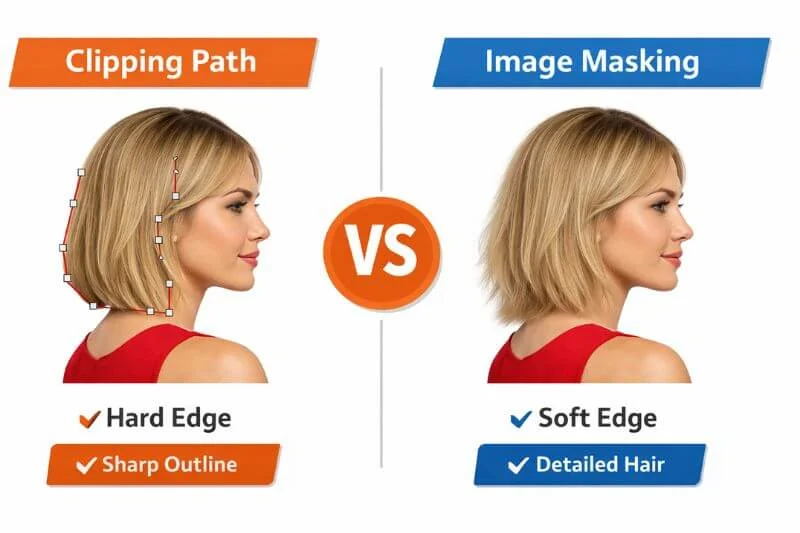
Clipping path and image masking are both used to remove backgrounds, but they work best for different types of edges and image details. The table below highlights the key differences to help you choose the right technique for your editing needs.
| Feature | Clipping Path | Image Masking |
| Best For | Hard-edged items | Soft-edged items |
| Technique | Pen Tool (vector) | Brush & Channel Masking |
| Edge Precision | Sharp & clean | feathered, semi-transparent |
| Use Case | eCommerce products | Complex & Transparent Images |
Paths work well for solid edges, whereas masking is better for soft or complex details. Many professionals use a combination of both for optimal results.
Clipping Path vs Automated Background Removal Tools
Automated background removal tools are fast but often produce rough edges and inaccurate cutouts. Manual clipping paths provide better control, cleaner edges, and higher accuracy — especially for commercial and ecommerce images where quality matters.
Types of Clipping Path
Once you understand how the process works, the next step is to explore the different types. Choosing the right technique depends on how simple or complex the object is.
1. Simple
A simple or basic path is used to isolate objects with straightforward shapes from their backgrounds, such as boxes or bottles. It typically requires a single path with minimal anchor points, making it a quick process.
2. Medium
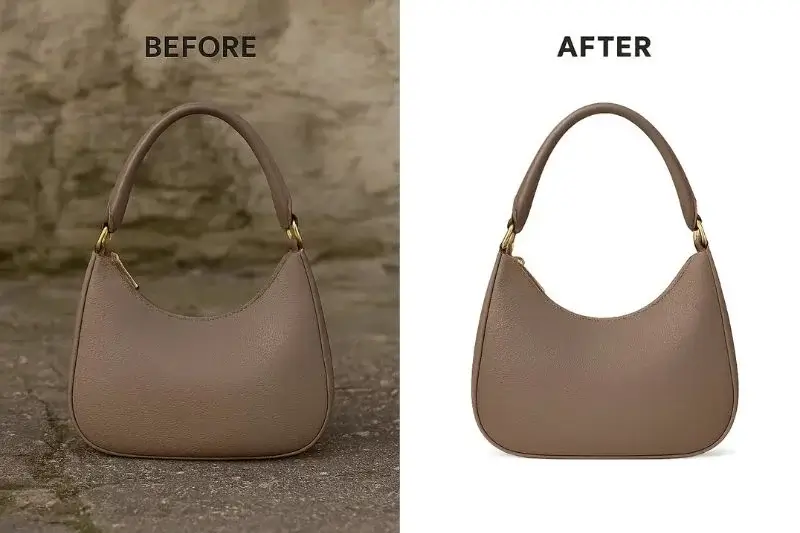
Medium paths are suitable for items that have slight curves and a moderate level of detail, including shoes, handbags, and small accessories. This technique requires more precision than simple clipping paths. eCommerce product photography often uses medium clipping paths to make products look neat and clean.
3. Complex
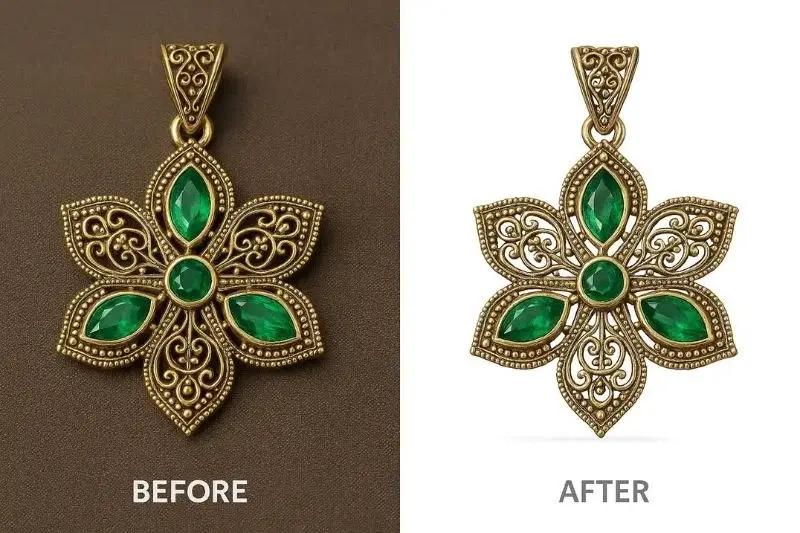
A complex clipping path is used for objects with many curves and small details, such as jewelry, plants, or decorative items. This technique uses many anchor points and usually requires careful manual work to keep the edges accurate. Complex clipping paths are perfect for high-quality product photos, catalogs, and marketing images where clean results are important.
4. Super Complex
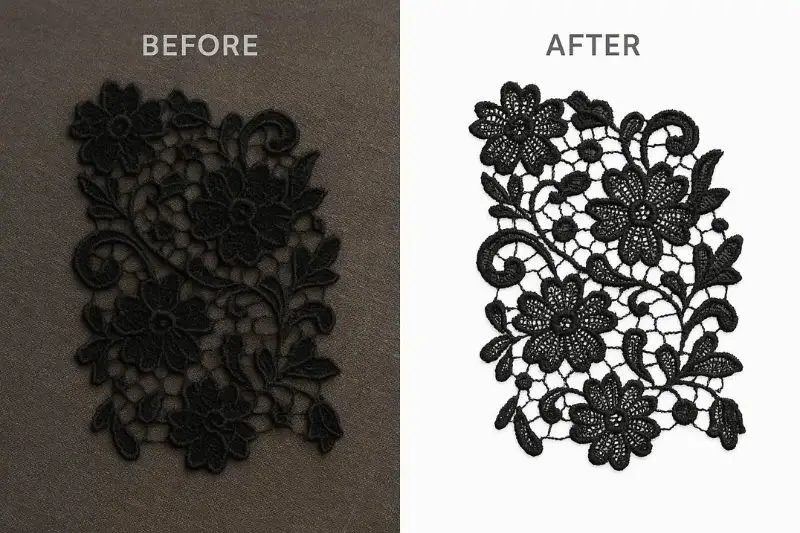
Deep etching, also known as a super complex path, is ideal for images that contain fine details, complex textures, or numerous small components, including lace fabrics, ornate jewelry, and detailed group shots.
Understanding these types can help you decide whether to handle the work yourself or hire a professional service for high-quality results.
Clipping Path Cost & Price Per Image
A common question people ask is how much a clipping path costs per image. Pricing varies depending on complexity, quantity, delivery time, and add-ons. Below are industry-standard ranges.
Clipping Path Price Breakdown
| Type of Clipping Path | Difficulty | Price Range | Examples |
| Simple / Basic | Easy | $0.20 – $0.50 | Boxes, bottles |
| Medium | Moderate | $0.50 – $1.50 | Shoes, bags |
| Complex | Hard | $1 – $3 | Jewelry, decor |
| Super Complex | Very Hard | $3 – $5+ | Lace, chains |
For exact rates based on image complexity, see our detailed clipping path pricing page.
What Affects Real-World Pricing
- Object Complexity – More curves and holes increase cost.
- Image Quantity – Bulk discounts:
- 50–100 images: 5–10% off
- 100–500 images: 10–20% off
- 1,000+ images: 30–40% off
- Turnaround Time – Rush fees may add 20–100%.
- Additional Services – Shadows, masking, retouching.
- Skill & QA – Premium studios charge more.
For commercial-quality finishing, consider Product Photo Retouching alongside clipping paths.
Quick Formula to Estimate Cost
Total Cost = (Image Quantity × Base Rate) + Add-On Costs + Rush Fees
Example
- 200 medium images @ $0.90
- Shadow add-on @ $0.20
Total = (200 × 0.90) + (200 × 0.20) = 180 + 40 = $220
Industry Pricing Insights
- Global range: $0.20–$5 per image
- U.S./EU agencies often charge $2–$10+
- Masking + clipping usually costs 20–40% more
- Large studios negotiate custom rates
While cheap clipping path services exist, always prioritize quality and accuracy, especially for eCommerce or marketing images. Poorly edited photos can harm your brand and reduce sales.
Why Clipping Path Is Crucial for eCommerce
Now that you know the different types of clipping paths, it’s important to understand why this technique is so valuable—especially in eCommerce.
Since customers cannot touch or test products online, product photos become the main factor that influences buying decisions. This is where the clipping path plays a major role.
Here’s why clean product cutouts are essential for eCommerce:
- Removes distracting backgrounds
- Creates consistent product presentation
- Increases visual clarity and click-through rate
- Meets Amazon/eBay white-background standards
Need clean, marketplace-ready images? Try our professional ecommerce clipping path services and see the difference in quality.
Who Needs Clipping Path Services?
Businesses and creative professionals use these services to ensure their images look clean, sharp, and professional. Whether for online stores, portfolios, or marketing campaigns, these services help create clean, professional visuals that stand out.
Key users include:
- eCommerce sellers who want sharp and consistent product images
- Photographers building impressive portfolios
- Marketing agencies need high-quality visuals for campaigns
- Graphic designers and freelancers working on client projects
- Photo editors seeking career opportunities in clipping path jobs
Many objects, especially those with soft edges like hair, fur, or transparent fabrics, may require image masking instead of standard clipping paths.
Common Mistakes in Clipping Path
Mistakes can happen at any skill level. Here are some of the most common problems editors face during the process.
- Relying solely on automated tools instead of manual clipping paths
- Creating uneven or rough edges
- Ignoring hair clipping path or soft-edge requirements
- Choosing the cheapest service over quality
Manual precision and quality control are key to professional results.
Clipping Path Basic Tutorial (Step-by-Step)
Now that you understand what a clipping path is and when to use it, let’s look at a simple step-by-step process in Photoshop.
Step 1: Open Your Image in Photoshop
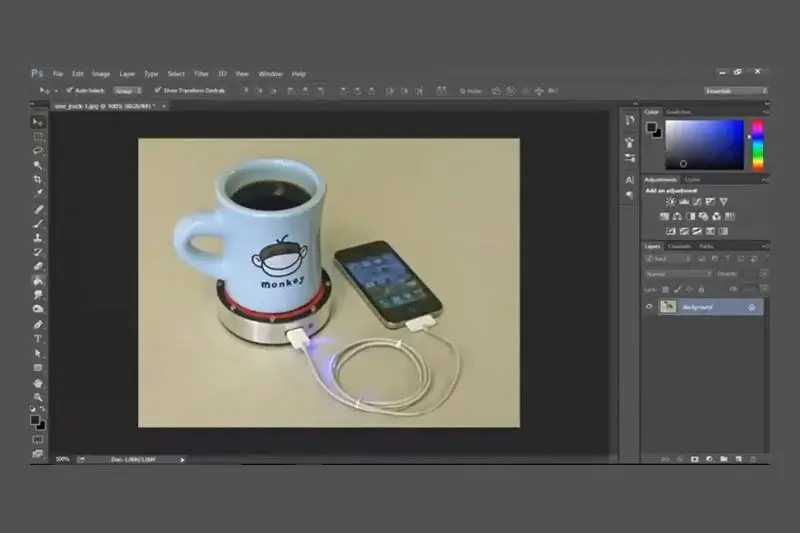
Start by importing the image you want to edit. Make sure it’s high-resolution for the best results.
Step 2: Select the Pen Tool
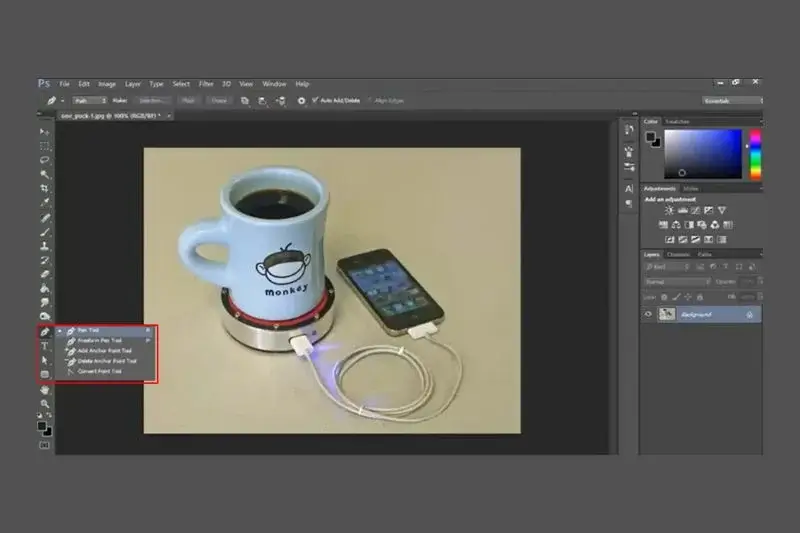
Select the Pen Tool from the toolbar to create a precise vector path around your object.
Step 3: Draw, Complete, and Select the Path
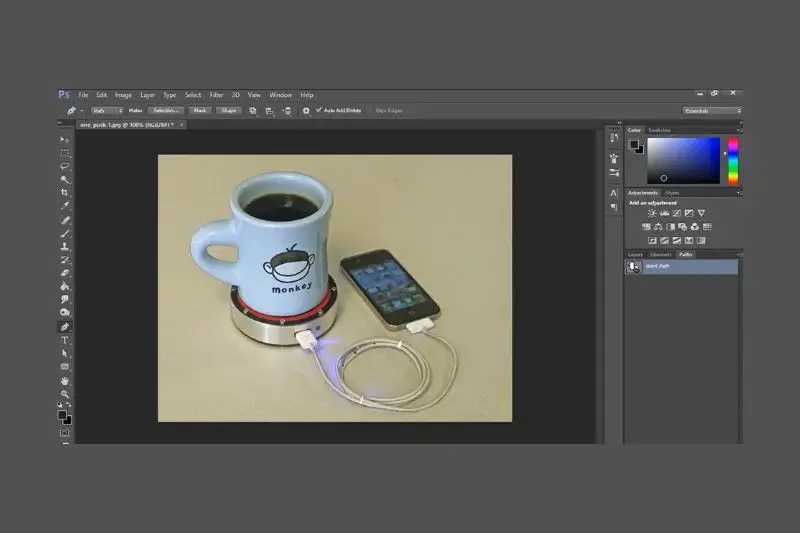
Use the Pen Tool to trace around your object, clicking for points and dragging for curves. Close the path by connecting the last point to the first. Right-click the path, choose “Make Selection”, and set feathering to 0–1 px for sharp edges.
Step 4: Remove or Replace the Background
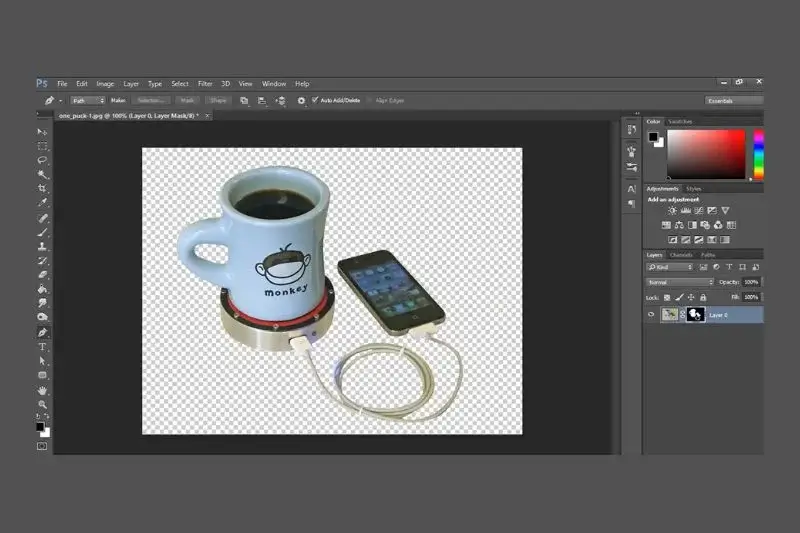
Press Delete to remove the background. Or add a new layer with a different background color. Save in PNG or PSD format to preserve transparency. If you want a clean white background for eCommerce, try our Background Removal Service.
By following this tutorial, you can achieve clean, professional images suitable for eCommerce, marketing campaigns, or portfolios. For more detailed instructions, check out our advanced clipping path tutorial in Photoshop, where we cover precise path techniques and workflow tips.
Conclusion
Rather than simple cutouts, clipping paths are used to elevate product images with a clean and professional finish. High-quality images build trust, increase clicks, and drive sales. Whether your project requires a simple path or an advanced deep-etching workflow, the right editing can completely transform your visuals.
Want perfect, pixel-accurate results? Start your free clipping path trial and experience professional editing firsthand.
Frequently Asked Questions About Clipping Path
This technique uses a hand-drawn vector line to cut an object out of its background cleanly and precisely.
You trace the object with the Pen Tool, turn the path into a selection, and remove or replace the background.
Use a clipping path for hard edges. Choose image masking for soft, fuzzy, or transparent edges like hair and fur.
Items with solid, well-defined edges, including bottles, footwear, bags, jewelry, and electronic products, are ideal candidates for this process.
A simple image takes a few minutes. Complex or highly detailed images take longer, depending on curves and holes.
About the Author
Clipping World – Clipping Path and Photo Editing Company. With 10+ years of professional experience and 3,500+ global eCommerce clients, Clipping World specializes in clipping paths, masking, and high-end product retouching.