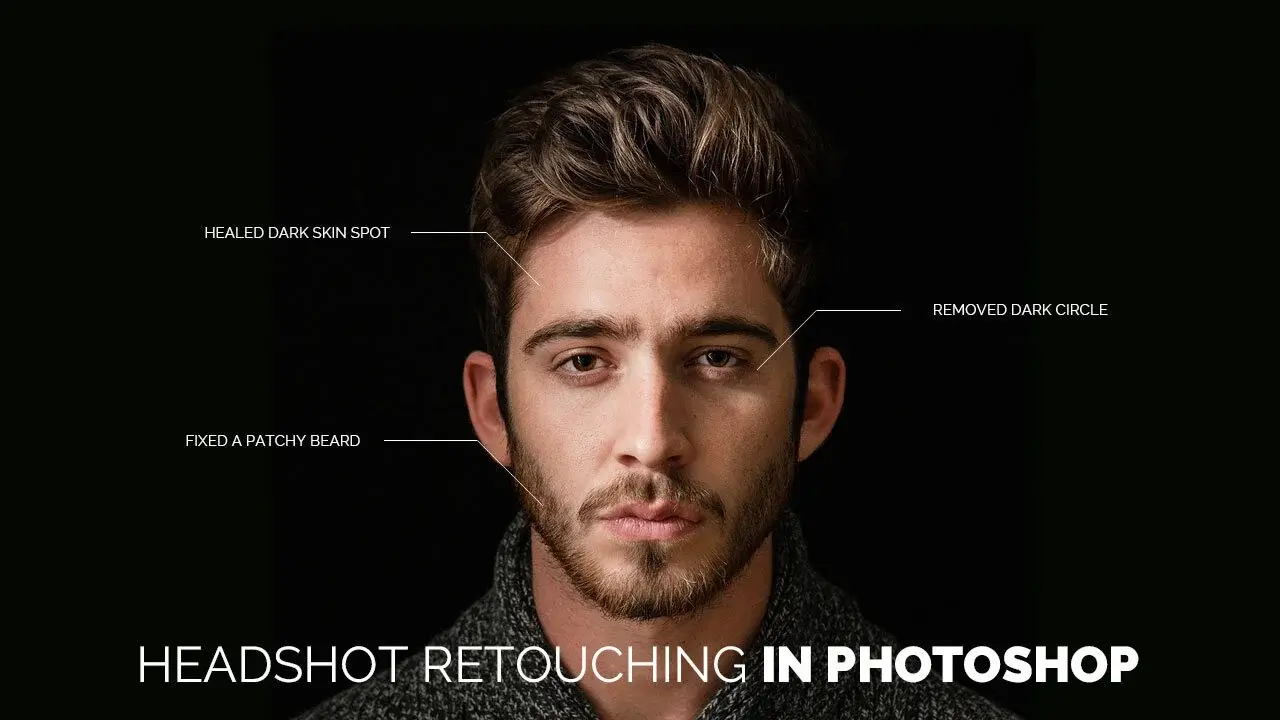
Editing headshots in Photoshop is an important skill for photographers and designers who want to improve portrait photos. It helps remove skin blemishes, smooth texture, and fix lighting to make the image look clean and professional.
Tools like Healing Brush, Frequency Separation, and Dodge & Burn are commonly used in headshot retouching while keeping the skin natural. If you want to learn how to edit headshots in Photoshop step by step, this guide will show you the complete retouching process.
What is Headshot Retouching in Photoshop?
Headshot retouching in Photoshop is the process of improving portrait photos by removing blemishes, smoothing skin, adjusting lighting, and enhancing facial details. Editors use tools like Healing Brush, Frequency Separation, and Dodge & Burn to create clean, natural-looking professional headshots.
Quick Answer: How to Retouch Headshots in Photoshop
- Adjust brightness and contrast
- Remove blemishes with Healing Brush
- Apply frequency separation for skin texture
- Use the Patch Tool for larger imperfections
- Perform skin healing on a new layer
- Enhance lighting using dodge and burn
- Apply color correction or LUT
Best Photoshop Tools for Headshot Retouching
The most commonly used tools for professional headshot retouching include:
- Healing Brush Tool
- Clone Stamp Tool
- Frequency Separation
- Dodge and Burn
- Patch Tool
- Color Lookup Adjustment
Photoshop Tools Used for Headshot Retouching
| Tool | Purpose |
|---|---|
| Healing Brush | Remove blemishes and spots |
| Clone Stamp | Fix texture issues |
| Frequency Separation | Smooth skin while keeping texture |
| Dodge & Burn | Improve lighting and depth |
| Patch Tool | Remove wrinkles or larger imperfections |
| Color Lookup | Apply cinematic color effects |
Why Headshot Retouching is Important
Headshot retouching helps improve the overall appearance of portrait photos. It removes small skin imperfections, balances lighting, and enhances facial features while keeping the image natural and professional.
Step-by-Step Headshot Retouching in Photoshop
Headshot retouching is a post-processing technique, which means it is performed after the photo is captured. Below are the most effective steps to improve a portrait image professionally.
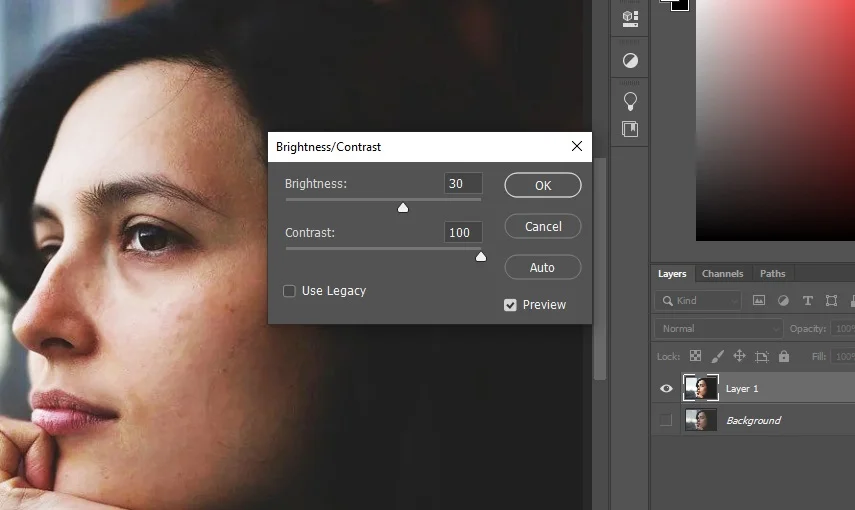
Step 1: Adjust Brightness and Contrast
The first step is to correct the overall brightness and contrast of the image. Proper lighting makes it easier to identify skin imperfections and details.
Go to: Image → Adjustments → Brightness/Contrast
Increase the brightness slightly to reveal details and adjust contrast to improve the depth of the image. However, avoid over-adjusting the settings. The goal is to maintain a natural appearance.
Step 2: Remove Spots and Skin Blemishes
Most portrait images contain minor skin imperfections such as acne, spots, or dust. These can be removed using the Healing Brush Tool. If you want a detailed guide, check our tutorial on how to remove blemishes from photos.

Steps:
- Select the Healing Brush Tool
- Hold Alt (Windows) / Option (Mac) to sample a clean skin area
- Brush gently over the blemish
This method blends the sampled texture with the surrounding skin tone, creating a natural result.
Step 3: Apply Frequency Separation
Frequency separation is a professional retouching technique that separates skin texture and skin color into two different layers. This allows you to smooth skin tones without destroying natural texture.
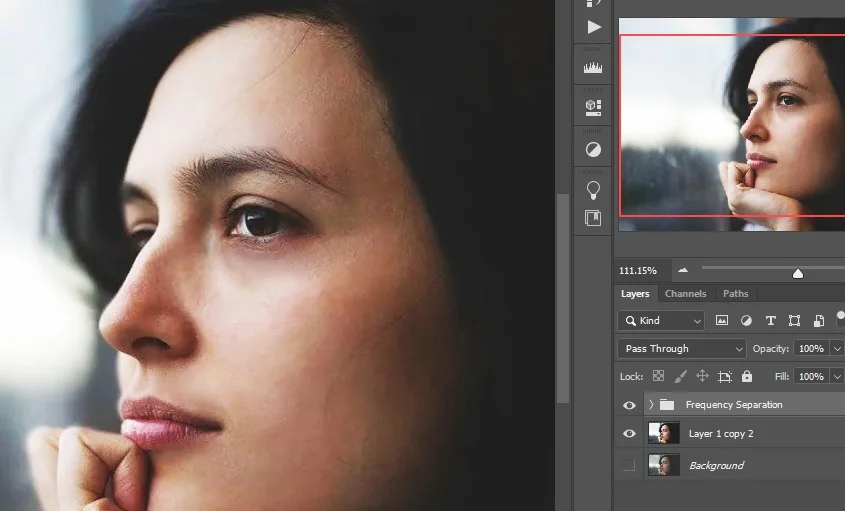
Benefits of Frequency Separation:
- Non-destructive editing
- Better control over skin retouching
- Natural-looking skin
Frequency separation helps smooth skin while keeping natural texture. If you want to learn more techniques, read our guide on how to smooth skin in Photoshop.
Step 4: Use the Patch Tool for Larger Imperfections
Sometimes portraits contain larger imperfections such as wrinkles, shadows, or uneven areas. The Patch Tool can help fix these areas.
Steps:
- Select the Patch Tool
- Draw around the problem area
- Drag the selection to a clean skin area
Photoshop will blend the textures automatically.
Step 5: Healing for Detailed Skin Retouching
Healing is one of the most important steps in professional headshot editing. Create a new empty layer and use the Brush Tool with low flow (2–3%).
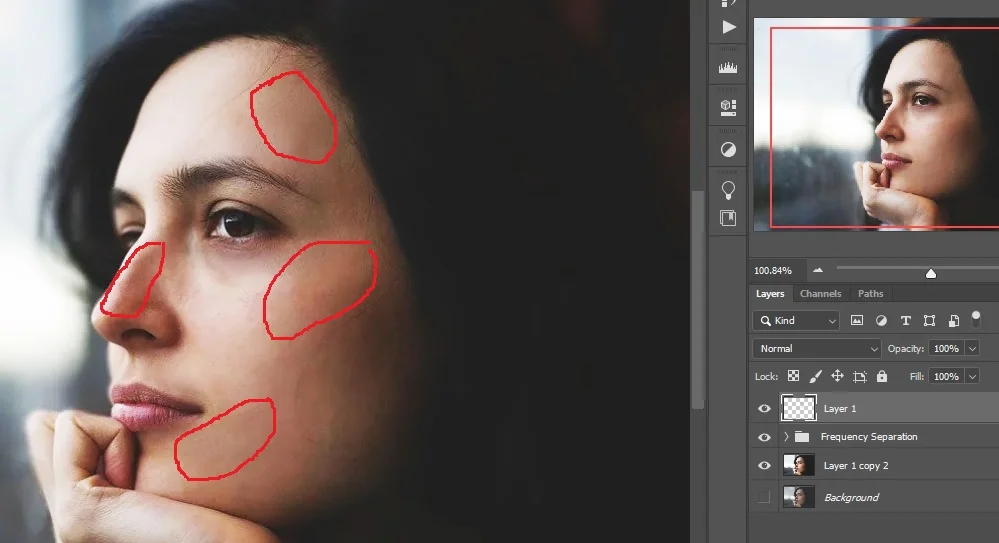
Steps:
- Sample nearby skin using Alt/Option
- Paint softly over uneven areas
- Work slowly for natural results
Using a soft brush ensures the skin remains smooth without looking plastic.
Step 6: Dodge and Burn for Skin Enhancement
Dodge and Burn is a powerful technique used by professional retouchers to improve lighting and facial depth in a portrait. The Dodge tool is used to lighten highlights, while the Burn tool is used to darken shadows. By carefully adjusting these areas, editors can create better depth and enhance the facial structure.
Using a soft brush with a low flow helps make subtle adjustments to areas like under-eye shadows, facial highlights, and skin transitions. This technique keeps the skin natural while improving the overall lighting and balance of the headshot.
Dodge and Burn can also help improve facial areas like under-eye shadows. For more advanced methods, see our tutorial on how to remove eye bags in Photoshop.
Step 7: Apply Color Lookup Adjustment
The Color Lookup adjustment layer can enhance the overall mood and tone of the portrait.
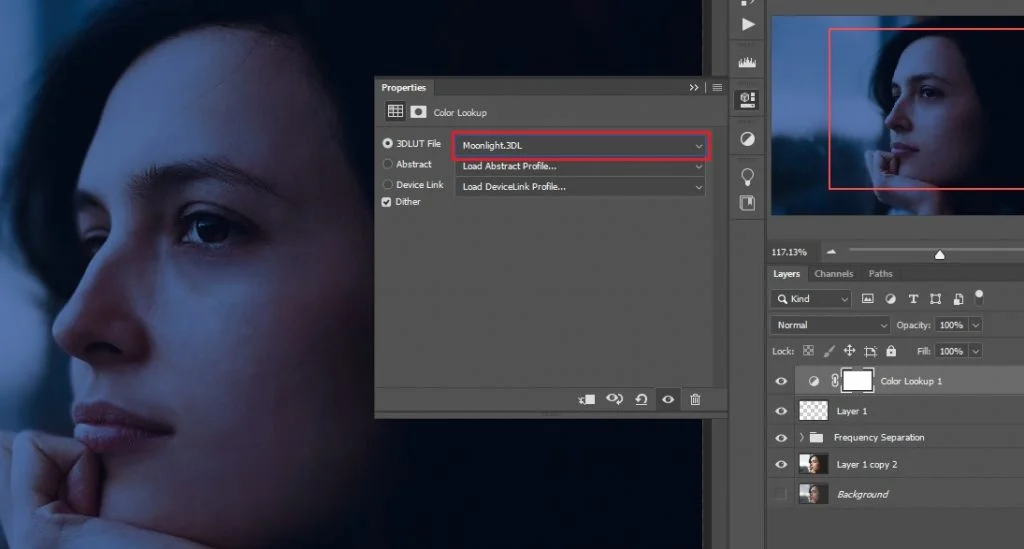
Steps:
- Click Create New Adjustment Layer
- Select Color Lookup
- Choose a LUT such as Moonlight or other cinematic options
You can adjust the opacity of the layer to control the intensity of the effect.
Common Headshot Retouching Mistakes
Many beginners make mistakes when editing portraits. Avoid these common errors:
- Over-smoothing the skin
- Removing natural skin texture
- Excessive brightness or contrast
- Overusing color adjustments
Professional retouching should enhance the image while keeping it natural.
Tips for Professional Headshot Editing
To achieve the best results in Photoshop:
- Always work on separate layers
- Zoom in while retouching skin
- Keep edits subtle
- Preserve natural skin texture
- Use non-destructive techniques
These practices help maintain image quality and flexibility.
How Long Does Headshot Retouching Take?
Basic headshot retouching in Photoshop can take 5–15 minutes. More detailed retouching, such as skin smoothing and lighting adjustments, may take 30 minutes or more, depending on the level of editing.
What is the Best Way to Retouch Headshots in Photoshop?
The best way to retouch headshots in Photoshop is to remove skin blemishes, smooth the texture, and adjust the lighting. Tools like Healing Brush, Frequency Separation, and Dodge & Burn help create clean and natural-looking professional headshots.
If you need professional help with portrait editing, you can learn about our Photo Retouching Service Cost and choose the right service for your project.
Conclusion
Headshot retouching in Photoshop may seem complex at first, but with practice, it becomes easier. Using techniques such as healing, frequency separation, and dodge & burn, you can create professional-quality portraits. The key to great portrait editing is maintaining a natural balance between enhancement and realism.
Avoid excessive retouching and focus on subtle improvements that highlight the subject’s features. With the right tools and workflow, Photoshop can help you transform ordinary headshots into polished professional portraits.
Frequently Asked Questions
Professionals retouch headshots in Photoshop by removing blemishes, smoothing skin texture, and improving lighting. They commonly use tools like Healing Brush, Frequency Separation, and Dodge & Burn to enhance facial details while keeping the skin natural and realistic.
The best tools for skin retouching in Photoshop are the Healing Brush Tool and Frequency Separation. These tools help remove blemishes, smooth skin, and maintain natural texture without making the portrait look overly edited.
Yes, beginners can retouch headshots in Photoshop by starting with simple tools such as the Spot Healing Brush and Healing Brush Tool. With practice, they can learn advanced techniques like frequency separation and dodge & burn for professional results.
Photoshop is generally better than Lightroom for headshot editing because it offers advanced retouching tools. Techniques like frequency separation, healing tools, and dodge & burn allow more precise control over skin retouching and facial details.
Portrait retouching improves the overall image, including background, lighting, and color adjustments. Headshot retouching mainly focuses on facial features such as skin texture, blemish removal, and lighting corrections to create clean and professional headshots.